
Fabricator (Subnautica): Difference between revisions
Pencechris1 (talk | contribs) m (Added debug spawn name) |
UnderseaDee (talk | contribs) (Updates) |
||
| Line 1: | Line 1: | ||
{{Spoiler}} |
|||
{{ExperimentalMode}}{{Craftable|title1 = Fabricator|image4 = Fabricator.png|tab = [[Interior Modules]]|description = Basic survival fabricator. Atomically rearranges raw resources into useful objects.|crafting =[[File:Titanium.png|30px|link=Titanium]] |
{{ExperimentalMode}}{{Craftable|title1 = Fabricator|image4 = Fabricator.png|tab = [[Interior Modules]]|description = Basic survival fabricator. Atomically rearranges raw resources into useful objects.|crafting =[[File:Titanium.png|30px|link=Titanium]] [[File:Gold.png|30px|link=Gold]] [[File:Table Coral Sample.png|30px|link=Table Coral Sample]]|debugspawn = fabricator}}The '''Fabricator''' is an [[Interior Modules|appliance]] which can be used to craft [[Food & Water|food & water]], [[equipment]], [[tools]] and [[Deployables|machines]] from [[Raw Materials|raw]], [[Basic Materials|basic]] or [[Advanced Materials|advanced]] materials. |
||
One '''Fabricator''' can be found in [[Lifepod 5]]. Lifepod 5 is the [[player]]'s starting location, so the use of this '''Fabricator''' is vital towards the player's progress and survival. Additional '''Fabricators''' can be constructed with the [[Habitat Builder]] and placed inside a [[Cyclops]] or a [[Seabases|Seabase]] module. |
One '''Fabricator''' can be found in [[Lifepod 5]]. Lifepod 5 is the [[player]]'s starting location, so the use of this '''Fabricator''' is vital towards the player's progress and survival. Additional '''Fabricators''' can be constructed with the [[Habitat Builder]] and placed inside a [[Cyclops]] or a [[Seabases|Seabase]] module. |
||
| Line 15: | Line 16: | ||
==Recipe== |
==Recipe== |
||
{{Recipe|item1= |
{{Recipe|item1=Titanium|count1 = 1|item2=Gold|count2 = 1|item3=Table Coral Sample|count3 = 1|machine=Builder|result=Fabricator}} |
||
==Fabricator Crafting Sections== |
==Fabricator Crafting Sections== |
||
| Line 33: | Line 34: | ||
{{Recipe|item1=Creepvine Seed Cluster|machine=Fabricator|result=Lubricant}} |
{{Recipe|item1=Creepvine Seed Cluster|machine=Fabricator|result=Lubricant}} |
||
{{Recipe|item1=Stalker Tooth|item2=Glass|machine=Fabricator|result=Enameled Glass}} |
{{Recipe|item1=Stalker Tooth|item2=Glass|machine=Fabricator|result=Enameled Glass}} |
||
{{Recipe|item1=Titanium Ingot|item2=Lithium|machine=Fabricator|result=Plasteel Ingot}} |
{{Recipe|item1=Titanium Ingot|item2=Lithium|count2 = 2|machine=Fabricator|result=Plasteel Ingot}} |
||
====[[Advanced Materials]]==== |
====[[Advanced Materials]]==== |
||
| Line 43: | Line 44: | ||
====[[Electronics]]==== |
====[[Electronics]]==== |
||
{{Recipe|item1=Copper Ore|count1 = 2|machine=Fabricator|result=Copper Wire}} |
{{Recipe|item1=Copper Ore|count1 = 2|machine=Fabricator|result=Copper Wire}} |
||
{{Recipe|item1=Acid Mushroom|count1 = 2|item2=Copper Ore|machine=Fabricator|result=Battery}} |
{{Recipe|item1=Acid Mushroom|count1 = 2|item2=Copper Ore|machine=Fabricator|result=Battery}} |
||
| ⚫ | |||
{{Recipe|item1=Battery|count1 = 2|item2=Silicone Rubber|machine=Fabricator|result=Power Cell}} |
{{Recipe|item1=Battery|count1 = 2|item2=Silicone Rubber|machine=Fabricator|result=Power Cell}} |
||
| ⚫ | |||
{{Recipe|item1=Table Coral Sample|count1 = 2|item2=Gold|item3=Copper Wire|machine=Fabricator|result=Computer Chip}} |
{{Recipe|item1=Table Coral Sample|count1 = 2|item2=Gold|item3=Copper Wire|machine=Fabricator|result=Computer Chip}} |
||
{{Recipe|item1=Silver Ore|count1 = 2|machine=Fabricator|result=Wiring Kit}} |
{{Recipe|item1=Silver Ore|count1 = 2|machine=Fabricator|result=Wiring Kit}} |
||
| ⚫ | |||
{{Recipe|item1= |
{{Recipe|item1=Wiring Kit|count1 = 1|item2=Gold|count2 = 2|item3=Computer Chip|machine=Fabricator|result=Advanced Wiring Kit}} |
||
| ⚫ | |||
{{Recipe|item1= |
{{Recipe|item1=Uraninite Crystal|count1=3|item2=Lead|count2=1|item3=Titanium|count3=1|item4=Glass|count4=1|machine=Fabricator|result=Reactor Rod}} |
||
</div> |
</div> |
||
| Line 60: | Line 71: | ||
====[[Food & Water#Water|Water]]==== |
====[[Food & Water#Water|Water]]==== |
||
{{Recipe|item1=Bladderfish|machine=Fabricator|result=Filtered Water}} |
{{Recipe|item1=Bladderfish|machine=Fabricator|result=Filtered Water}} |
||
{{Recipe|item1=Bleach|machine=Fabricator|result=Disinfected Water}} |
{{Recipe|item1=Bleach|machine=Fabricator|result=Disinfected Water|resultcount=2}} |
||
====[[Food & Water#Cooked|Cooked Food]]==== |
====[[Food & Water#Cooked|Cooked Food]]==== |
||
| Line 100: | Line 111: | ||
====[[Equipment]]==== |
====[[Equipment]]==== |
||
| ⚫ | |||
{{Recipe|item1 |
{{Recipe|item1=Titanium|count1 = 3|machine=Fabricator|result=Tank}} |
||
{{Recipe|item1=Tank|item2=Glass|count2=2||item3=Titanium||count3=4|item4=Silver Ore|machine=Fabricator|result=High Capacity O₂ Tank}} |
|||
{{Recipe|item1=Silicone Rubber|count1 = 2|machine=Fabricator|result=Fins}} |
{{Recipe|item1=Silicone Rubber|count1 = 2|machine=Fabricator|result=Fins}} |
||
{{Recipe|item1=Fiber Mesh|count1 = 2|item2=Lead|count2 = 2|machine=Fabricator|result=Radiation Suit|result2 = Radiation Gloves|result3 = Radiation Helmet}} |
{{Recipe|item1=Fiber Mesh|count1 = 2|item2=Lead|count2 = 2|machine=Fabricator|result=Radiation Suit|result2 = Radiation Gloves|result3 = Radiation Helmet}} |
||
{{Recipe|item1=Synthetic Fibers|count1 = 2|machine=Fabricator|result=Reinforced Dive Suit|result2 = Reinforced Gloves}} |
{{Recipe|item1=Synthetic Fibers|count1 = 2|machine=Fabricator|result=Reinforced Dive Suit|result2 = Reinforced Gloves}} |
||
{{Recipe|item1=Fiber Mesh|count1 = 2|item2=Silver Ore|count2 = 2|machine=Fabricator|result=Stillsuit}} |
{{Recipe|item1=Fiber Mesh|count1 = 2|item2=Silver Ore|count2 = 2|machine=Fabricator|result=Stillsuit}} |
||
| ⚫ | |||
{{Recipe|item1= |
{{Recipe|item1=Fiber Mesh|machine=Fabricator|result=First Aid Kit}} |
||
| ⚫ | |||
| ⚫ | |||
{{Recipe|item1=Wiring Kit|item2=Fiber Mesh|machine=Fabricator|result=Rebreather}} |
{{Recipe|item1=Wiring Kit|item2=Fiber Mesh|machine=Fabricator|result=Rebreather}} |
||
{{Recipe|item1=Titanium|count1 = 3|machine=Fabricator|result=Pipe|resultcount = 5}} |
|||
{{Recipe|item1= |
{{Recipe|item1=Titanium|count1 = 2|machine=Fabricator|result=Pipe|resultcount = 5}} |
||
| ⚫ | |||
| ⚫ | |||
{{Recipe|item1 = Ion Crystal|item2 = Diamond|count2 = 2|machine = Fabricator|result = Purple Artifact}} |
|||
| ⚫ | |||
| ⚫ | |||
====[[Tools]]==== |
====[[Tools]]==== |
||
{{Recipe|item1=Battery|item2=Titanium|machine=Fabricator|result=Scanner}} |
{{Recipe|item1=Battery|item2=Titanium|machine=Fabricator|result=Scanner}} |
||
| ⚫ | |||
| ⚫ | |||
{{Recipe|item1=Battery|item2=Glass|machine=Fabricator|result=Flashlight}} |
{{Recipe|item1=Battery|item2=Glass|machine=Fabricator|result=Flashlight}} |
||
{{Recipe|item1=Silicone Rubber|item2=Titanium|machine=Fabricator|result=Survival Knife}} |
{{Recipe|item1=Silicone Rubber|item2=Titanium|machine=Fabricator|result=Survival Knife}} |
||
{{Recipe|item1=Creepvine Sample|count1 = 5|item2=Titanium|machine=Fabricator|result=Dive Reel}} |
{{Recipe|item1=Creepvine Sample|count1 = 5|item2=Titanium|machine=Fabricator|result=Dive Reel}} |
||
{{Recipe|item1=Silicone Rubber|item2=Bladderfish|machine=Fabricator|result=Air Bladder}} |
{{Recipe|item1=Silicone Rubber|item2=Bladderfish|machine=Fabricator|result=Air Bladder}} |
||
{{Recipe|item1=Crash Powder|machine=Fabricator|result=Flare|resultcount = 5}} |
{{Recipe|item1=Crash Powder|machine=Fabricator|result=Flare|resultcount = 5}} |
||
| ⚫ | |||
{{Recipe|item1= |
{{Recipe|item1=Advanced Wiring Kit|item2=Battery|machine=Fabricator|result=Builder}} |
||
| ⚫ | |||
{{Recipe|item1= |
{{Recipe|item1=Diamond|count1=2|item2=Battery|item3=Titanium|item4=Crash_Powder|machine=Fabricator|result=Laser Cutter}} |
||
| ⚫ | |||
| ⚫ | |||
{{Recipe|item1=Battery|item2=Titanium|item3=Glass|machine=Fabricator|result=LED Light}} |
{{Recipe|item1=Battery|item2=Titanium|item3=Glass|machine=Fabricator|result=LED Light}} |
||
</div> |
</div> |
||
| Line 133: | Line 175: | ||
{{Recipe|item1=Battery|item2=Lubricant|item3=Copper Wire|item4=Titanium|machine=Fabricator|result=Seaglide}} |
{{Recipe|item1=Battery|item2=Lubricant|item3=Copper Wire|item4=Titanium|machine=Fabricator|result=Seaglide}} |
||
{{Recipe|item1=Titanium Ingot|item2=Lubricant|item3=Power Cell|machine=Fabricator|result=Mobile Vehicle Bay}} |
{{Recipe|item1=Titanium Ingot|item2=Lubricant|item3=Power Cell|machine=Fabricator|result=Mobile Vehicle Bay}} |
||
{{Recipe|item1 = Silver Ore|item2 = Titanium|machine = Fabricator|result = Beacon}} |
{{Recipe|item1 = Silver Ore|item2 = Titanium|machine = Fabricator|result = Beacon}} |
||
{{Recipe|item1=Titanium|count1 = 3|machine=Fabricator|result=Waterproof Locker}} |
{{Recipe|item1=Titanium|count1 = 3|machine=Fabricator|result=Waterproof Locker}} |
||
| ⚫ | |||
{{Recipe|item1=Battery|item2=Copper Ore|item3=Titanium|machine=Fabricator|result=Gravsphere}} |
|||
{{Recipe|item1=Titanium|count1 = 3|item3=Wiring Kit|machine=Fabricator|result=Creature Decoy|resultcount=3}} |
|||
</div> |
</div> |
||
Revision as of 21:23, 4 October 2017
.png)
|
Read at own risk This article contains unmarked spoilers. Players new to the game would want to avoid or be cautious toward this article. |

|
This seems new This article contains information that is updated for the latest Experimental Version of Subnautica. Players using stable mode may find this information inaccurate. |
<infobox>
<title source="title1"><default>Fabricator (Subnautica)</default></title>
<image source="image4"></image> <label>Category</label> <label>Category</label> <label>Description</label> <label>Hull Integrity</label> <label>Health</label> <label>Blueprint Source</label> <label>Acquired From</label> <label>Fragments</label> <label>Build Time</label> <label>Size</label> <label>Damage</label> <label>Drill Yield</label> <label>Biome</label> <label>Location</label> <label>Coordinates</label> <label>Perks</label> <label>Penalties</label> <label>Attribute</label> <label>Drops</label>
<label>Debug Spawn</label> <format> * {{#explode:fabricator||1}} </format> <label>Debug Spawn</label> <format> * {{#explode:{{{item_id}}}||1}} </format><label>Music</label> <group layout="horizontal"> <label>Food</label> <label>H2O</label> </group> <label>Bioreactor</label> <label>Byproduct</label> <group collapse="open" class="tab-fragment"> <header>Fragments</header> <image source="image2"></image> <label>Item</label> <label>Description</label> <label>Location</label> <label>Fragments</label> <label>Attribute</label> <label>Debug Spawn</label> <format>{{{debugspawn2}}}</format> <image source="image3"></image> <label>Item</label> <label>Description</label> <label>Location</label> <label>Fragments</label> <label>Attribute</label> <label>Debug Spawn</label> <format>{{{debugspawn3}}}</format> <image source="image5"></image> <label>Item</label> <label>Description</label> <label>Location</label> <label>Fragments</label> <label>Attribute</label> <label>Debug Spawn</label> <format>{{{debugspawn4}}}</format> </group> <group collapse="open" class="tab-fragment"> <header>Data Boxes</header> <image source="image6"></image> <label>Location</label> </group> </infobox>The Fabricator is an appliance which can be used to craft food & water, equipment, tools and machines from raw, basic or advanced materials. One Fabricator can be found in Lifepod 5. Lifepod 5 is the player's starting location, so the use of this Fabricator is vital towards the player's progress and survival. Additional Fabricators can be constructed with the Habitat Builder and placed inside a Cyclops or a Seabase module. Within the Vehicle Modification Station, Scanner Room and Cyclops are unique fabricators, which only fabricate Seamoth/Prawn Suit upgrades, Scanner Room upgrades and Cyclops upgrades, respectively.
Usage
When activated with LMB, it will display an interface from which the player can choose an item to craft. If the player has the required materials to craft an item, the item will be in color and highlighted in blue; otherwise, the item will be greyed out and highlighted in grey.
When the Fabricator finishes crafting an item, it will usually place it in the player's inventory. However, if the player moves away from the Fabricator during the crafting process, the newly crafted item will remain in the Fabricator, and the player must come back and manually pick it up. In this case, the player will receive a notification that their item is ready. Bulkier items, such as the Waterproof Locker, also remain in the Fabricator until the player picks them up manually. The Fabricator cannot be used to craft items while there are still items in it that have not been picked up.
By default, the Fabricator interface disappears while it is crafting an item and reappears when it finishes crafting the item. The player can hold Shift when they select an item to craft to leave the interface open during crafting.
The Fabricator requires Energy to operate, and will consume 10 Energy per item crafted from whatever it is built inside. If there is not enough Energy, the Fabricator cannot be used. The Fabricator does not require energy to operate in Creative Mode.
Recipe


Fabricator Crafting Sections
The Fabricator has four main recipe categories:
Resources


Sustenance


Personal


Deployables


Data Bank Entry
|
Fabrication technology is the power to rearrange matter at the atomic level. It was the catalyst behind the great expansion, and remains the backbone of the modern world. Fabricators come in all shapes and sizes, but the most common are small enough to be wall-mounted, and are used for everything from constructing everyday implements to cooking dinner. It is common today for households to keep a store of generic base materials on hand for any eventuality. |
Gallery
<tabber> Screenshots=
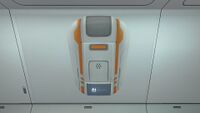
A Fabricator
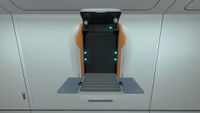
An open Fabricator

The Fabricator opening
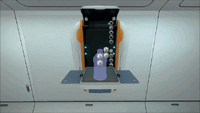
The Fabricator crafting Bleach


|-| Concept Art=
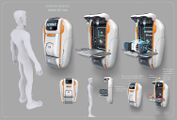
Fabricator Concept Art

|-| Other=
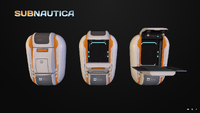
Fabricator Models from Sketchfab

</tabber>
Lua error in package.lua at line 80: module 'Dev:Navbox' not found.