
Fabricator (Subnautica): Difference between revisions
UnderseaDee (talk | contribs) No edit summary |
(Added link to BZ version) Tag: 2017 source edit |
||
| (87 intermediate revisions by 42 users not shown) | |||
| Line 1: | Line 1: | ||
{{SubnauticaLink|the Fabricator}} |
|||
{{Spoiler}} |
|||
{{Craftable |
|||
{{Craftable|title1 = Fabricator|image4 = Fabricator.png|tab = [[Interior Modules]]|description = Basic survival fabricator. Atomically rearranges raw resources into useful objects.|crafting =[[File:Titanium.png|30px|link=Titanium]] [[File:Gold.png|30px|link=Gold]] [[File:Table Coral Sample.png|30px|link=Table Coral Sample]]|debugspawn = fabricator}}The '''Fabricator''' is an [[Interior Modules|appliance]] which can be used to craft [[Food & Water|food & water]], [[equipment]], [[tools]] and [[Deployables|machines]] from [[Raw Materials|raw]], [[Basic Materials|basic]] or [[Advanced Materials|advanced]] materials. |
|||
|title1 = Fabricator |
|||
|image4 = Fabricator.png |
|||
|tab = Interior Modules |
|||
|description = Basic survival fabricator. Atomically rearranges raw resources into useful objects. |
|||
|crafting = [[File:Titanium.png|30px|link=Titanium]] [[File:Gold.png|30px|link=Gold]] [[File:Table Coral Sample.png|30px|link=Table Coral Sample]] |
|||
|debugspawn = fabricator}} |
|||
The '''Fabricator''' is an [[Interior Modules|appliance]] that can be used to craft [[Food & Water]], [[Equipment]], [[Tools]], and [[Deployables]] from [[Raw Materials (Subnautica)|Raw Materials]], [[Basic Materials (Subnautica)|Basic Materials]], [[Advanced Materials]], and [[Electronics]]. |
|||
One |
One Fabricator can be found in [[Lifepod 5]]; as is the [[Ryley Robinson|player]]'s starting location, the use of this Fabricator is vital toward the player's progress and survival. Additional Fabricators can be constructed with the [[Habitat Builder (Subnautica)|Habitat Builder]] and placed inside a [[Cyclops]] or a [[Seabases (Subnautica)|Seabase]] module. Broken fabricators can be found in most of the Destroyed lifepods. |
||
The [[Vehicle Upgrade Console (Subnautica)|Vehicle Upgrade Console]], [[Scanner Room (Subnautica)|Scanner Room]], and [[Cyclops]] include special fabricators specific to those rooms, which only fabricate [[Seamoth]]/[[Prawn Suit (Subnautica)|Prawn Suit]] upgrades, Scanner Room upgrades and Cyclops upgrades, respectively. |
|||
== Usage == |
== Usage == |
||
When activated with {{Key|LMB}} |
When activated with {{Key|LMB}} or ,it will display an interface from which the player can choose an item to craft. If the player has the required materials to craft an item, the item will be in color and highlighted in blue; otherwise, the item will be greyed out and highlighted in grey. The player can cancel out of the interface with {{Key|RMB}} or {{Key/Xbox|B}} [[File:CyclopsExt1.jpg|1px]]. |
||
When the |
When the Fabricator finishes crafting an item, it will usually place it in the player's inventory. However, if the player moves away from the Fabricator during the crafting process, the newly crafted item will remain in the Fabricator, and the player must come back and manually pick it up. In this case, the player will receive a notification that their item is ready. The Fabricator cannot be used to craft items while there are still items in it that have not been picked up. By default, the Fabricator interface disappears while it is crafting an item and reappears when it is finished. The player can hold the key for sprinting (by default: {{Key|Shift}}[[File:CyclopsExt1.jpg|1px]]) when they select an item to craft to leave the interface open during crafting. |
||
The Fabricator requires [[Energy]] to work and will consume 5 Energy per item crafted from a Seabase or Cyclops. If there is not enough Energy, the Fabricator cannot be used. The Fabricator does not require energy to operate in [[Game Modes|Creative Mode]]. |
|||
By default, the '''Fabricator''' interface disappears while it is crafting an item and reappears when it finishes crafting the item. The player can hold {{Key|Shift}} when they select an item to craft to leave the interface open during crafting. |
|||
== Recipe == |
|||
The '''Fabricator''' requires [[Energy]] to operate, and will consume 10 Energy per item crafted from whatever it is built inside. If there is not enough Energy, the '''Fabricator''' cannot be used. The '''Fabricator''' does not require energy to operate in [[Game Modes|Creative Mode]]. |
|||
{{Recipe2}} |
|||
{{Clear}} |
|||
== Fabricator Crafting Sections == |
|||
==Recipe== |
|||
{{Recipe|item1=Titanium|count1 = 1|item2=Gold|count2 = 1|item3=Table Coral Sample|count3 = 1|machine=Builder|result=Fabricator}} |
|||
==Fabricator Crafting Sections== |
|||
The Fabricator has four main recipe categories: |
The Fabricator has four main recipe categories: |
||
===Resources=== |
=== Resources === |
||
<div class="mw-collapsible mw-collapsed">{{Clear}} |
|||
==== [[Basic Materials (Subnautica)|Basic Materials]] ==== |
|||
{{Recipe2|page=Titanium}} |
|||
{{Recipe2|page=Titanium Ingot}} |
|||
{{Recipe2|page=Fiber Mesh}} |
|||
{{Recipe2|page=Silicone Rubber}} |
|||
{{Recipe2|page=Glass}} |
|||
{{Recipe2|page=Bleach}} |
|||
{{Recipe2|page=Lubricant}} |
|||
{{Recipe2|page=Enameled Glass}} |
|||
{{Recipe2|page=Plasteel Ingot}} |
|||
==== [[Advanced Materials]] ==== |
|||
{{Recipe2|page = Hydrochloric Acid}} |
|||
{{Recipe2|page = Benzene}} |
|||
{{Recipe2|page = Synthetic Fibers}} |
|||
<div class="mw-collapsible mw-collapsed"> |
|||
{{Recipe2|page = Aerogel}} |
|||
====[[Basic Materials]]==== |
|||
{{Recipe|item1=Metal Salvage|machine=Fabricator|result=Titanium|resultcount = 4|item = |count1 = 1}} |
|||
{{Recipe|item1=Titanium|count1 = 10|machine=Fabricator|result=Titanium Ingot}} |
|||
{{Recipe|item1=Creepvine Sample|count1 = 2|machine=Fabricator|result=Fiber Mesh}} |
|||
{{Recipe|item1=Creepvine Seed Cluster|machine=Fabricator|result=Silicone Rubber|resultcount=2}} |
|||
{{Recipe|item1=Quartz|count1 = 2|machine=Fabricator|result=Glass}} |
|||
{{Recipe|item1=Salt Deposit|item2=Coral Sample|machine=Fabricator|result=Bleach}} |
|||
{{Recipe|item1=Creepvine Seed Cluster|machine=Fabricator|result=Lubricant}} |
|||
{{Recipe|item1=Stalker Tooth|item2=Glass|machine=Fabricator|result=Enameled Glass}} |
|||
{{Recipe|item1=Titanium Ingot|item2=Lithium|count2 = 2|machine=Fabricator|result=Plasteel Ingot}} |
|||
{{Recipe2|page = Polyaniline}} |
|||
====[[Advanced Materials]]==== |
|||
{{Recipe|item1=Deep Shroom|count1 = 3|item2=Salt Deposit|machine=Fabricator|result=Hydrochloric Acid}} |
|||
{{Recipe|item1=Blood Oil|count1 = 3|machine=Fabricator|result=Benzene}} |
|||
{{Recipe|item1=Benzene|item2=Fiber Mesh|machine=Fabricator|result=Synthetic Fibers}} |
|||
{{Recipe|item1=Jelly Plant|count1 = 1|item2=Aluminum Oxide Crystal|machine=Fabricator|result=Aerogel}} |
|||
{{Recipe|item1=Gold|item2=Hydrochloric Acid|machine=Fabricator|result=Polyaniline}} |
|||
====[[Electronics]]==== |
====[[Electronics]]==== |
||
{{ |
{{Recipe2|page=Copper Wire}} |
||
{{Recipe2|page=Battery}} |
|||
{{Recipe|item1=Acid Mushroom|count1 = 2|item2=Copper Ore|machine=Fabricator|result=Battery}} |
|||
{{Recipe2|page=Power Cell}} |
|||
{{Recipe|item1=Ion Crystal|item2=Copper Ore|machine=Fabricator|result=Ion Battery}} |
|||
{{Recipe2|page=Computer Chip}} |
|||
{{Recipe|item1=Battery|count1 = 2|item2=Silicone Rubber|machine=Fabricator|result=Power Cell}} |
|||
{{Recipe2|page=Wiring Kit}} |
|||
{{Recipe|item1=Ion Crystal|count1 = 2|item2=Silicone Rubber|item3=Copper Ore|machine=Fabricator|result=Ion Power Cell}} |
|||
{{Recipe2|page=Advanced Wiring Kit}} |
|||
{{Recipe|item1=Table Coral Sample|count1 = 2|item2=Gold|item3=Copper Wire|machine=Fabricator|result=Computer Chip}} |
|||
{{Recipe2|page=Reactor Rod}} |
|||
{{Recipe|item1=Silver Ore|count1 = 2|machine=Fabricator|result=Wiring Kit}} |
|||
{{ExtraSpoilersection|{{Recipe2|page=Ion Battery}} |
|||
{{Recipe|item1=Wiring Kit|count1 = 1|item2=Gold|count2 = 2|item3=Computer Chip|machine=Fabricator|result=Advanced Wiring Kit}} |
|||
{{Recipe2|page=Ion Power Cell}}}}</div> |
|||
{{Recipe|item1=Uraninite Crystal|count1=3|item2=Lead|count2=1|item3=Titanium|count3=1|item4=Glass|count4=1|machine=Fabricator|result=Reactor Rod}} |
|||
</div> |
|||
===Sustenance=== |
|||
<br> |
|||
<div class="mw-collapsible mw-collapsed"> |
|||
=== Sustenance === |
|||
====[[Food & Water#Water|Water]]==== |
|||
<div class="mw-collapsible mw-collapsed">{{Clear}} |
|||
{{Recipe|item1=Bladderfish|machine=Fabricator|result=Filtered Water}} |
|||
{{Recipe|item1=Bleach|machine=Fabricator|result=Disinfected Water|resultcount=2}} |
|||
====[[Food & Water# |
==== [[Food & Water#Water|Water]] ==== |
||
{{Recipe|item1=Holefish|machine=Fabricator|result=Cooked Holefish}} |
|||
{{Recipe|item1=Peeper|machine=Fabricator|result=Cooked Peeper}} |
|||
{{Recipe|item1=Bladderfish|machine=Fabricator|result=Cooked Bladderfish}} |
|||
{{Recipe|item1=Garryfish|machine=Fabricator|result=Cooked Garryfish}} |
|||
{{Recipe|item1=Hoverfish|machine=Fabricator|result=Cooked Hoverfish}} |
|||
{{Recipe|item1=Reginald|machine=Fabricator|result=Cooked Reginald}} |
|||
{{Recipe|item1=Spadefish|machine=Fabricator|result=Cooked Spadefish}} |
|||
{{Recipe|item1=Boomerang|machine=Fabricator|result=Cooked Boomerang}} |
|||
{{Recipe|item1=Lava Boomerang|machine=Fabricator|result=Cooked Lava Boomerang}} |
|||
{{Recipe|item1=Eyeye|machine=Fabricator|result=Cooked Eyeye}} |
|||
{{Recipe|item1=Lava Eyeye|machine=Fabricator|result=Cooked Lava Eyeye}} |
|||
{{Recipe|item1=Oculus|machine=Fabricator|result=Cooked Oculus}} |
|||
{{Recipe|item1=Hoopfish|machine=Fabricator|result=Cooked Hoopfish}} |
|||
{{Recipe|item1=Spinefish|machine=Fabricator|result=Cooked Spinefish}} |
|||
{{Recipe2|page = Filtered Water}} |
|||
====[[Food & Water#Cured|Cured Food]]==== |
|||
{{Recipe|item1=Holefish|item2=Salt Deposit|machine=Fabricator|result=Cured Holefish}} |
|||
{{Recipe|item1=Peeper|item2=Salt Deposit|machine=Fabricator|result=Cured Peeper}} |
|||
{{Recipe|item1=Bladderfish|item2=Salt Deposit|machine=Fabricator|result=Cured Bladderfish}} |
|||
{{Recipe|item1=Garryfish|item2=Salt Deposit|machine=Fabricator|result=Cured Garryfish}} |
|||
{{Recipe|item1=Hoverfish|item2=Salt Deposit|machine=Fabricator|result=Cured Hoverfish}} |
|||
{{Recipe|item1=Reginald|item2=Salt Deposit|machine=Fabricator|result=Cured Reginald}} |
|||
{{Recipe|item1=Spadefish|item2=Salt Deposit|machine=Fabricator|result=Cured Spadefish}} |
|||
{{Recipe|item1=Boomerang|item2=Salt Deposit|machine=Fabricator|result=Cured Boomerang}} |
|||
{{Recipe|item1=Lava Boomerang|item2=Salt Deposit|machine=Fabricator|result=Cured Magmarang}} |
|||
{{Recipe|item1=Eyeye|item2=Salt Deposit|machine=Fabricator|result=Cured Eyeye}} |
|||
{{Recipe|item1=Lava Eyeye|item2=Salt Deposit|machine=Fabricator|result=Cured Red Eyeye}} |
|||
{{Recipe|item1=Oculus|item2=Salt Deposit|machine=Fabricator|result=Cured Oculus}} |
|||
{{Recipe|item1=Hoopfish|item2=Salt Deposit|machine=Fabricator|result=Cured Hoopfish}} |
|||
{{Recipe|item1=Spinefish|item2=Salt Deposit|machine=Fabricator|result=Cured Spinefish}} |
|||
</div> |
|||
{{Recipe2|page = Disinfected Water}} |
|||
===Personal=== |
|||
==== [[Food & Water#Cooked Food|Cooked Food]] ==== |
|||
<div class="mw-collapsible mw-collapsed"> |
|||
{{Recipe2|page=Cooked Holefish}} |
|||
====[[Equipment]]==== |
|||
{{Recipe2|page=Cooked Peeper}} |
|||
{{Recipe|item1=Titanium|count1 = 3|machine=Fabricator|result=Tank}} |
|||
{{Recipe2|page=Cooked Bladderfish}} |
|||
{{Recipe|item1=Tank|item2=Glass|count2=2||item3=Titanium||count3=4|item4=Silver Ore|machine=Fabricator|result=High Capacity O₂ Tank}} |
|||
{{Recipe2|page=Cooked Garryfish}} |
|||
{{Recipe|item1=Silicone Rubber|count1 = 2|machine=Fabricator|result=Fins}} |
|||
{{Recipe2|page=Cooked Hoverfish}} |
|||
{{Recipe|item1=Fiber Mesh|count1 = 2|item2=Lead|count2 = 2|machine=Fabricator|result=Radiation Suit|result2 = Radiation Gloves|result3 = Radiation Helmet}} |
|||
{{Recipe2|page=Cooked Reginald}} |
|||
{{Recipe|item1=Synthetic Fibers|count1 = 2|machine=Fabricator|result=Reinforced Dive Suit|result2 = Reinforced Gloves}} |
|||
{{Recipe2|page=Cooked Spadefish}} |
|||
{{Recipe|item1=Fiber Mesh|count1 = 2|item2=Silver Ore|count2 = 2|machine=Fabricator|result=Stillsuit}} |
|||
{{Recipe2|page=Cooked Boomerang}} |
|||
{{Recipe|item1=Fiber Mesh|machine=Fabricator|result=First Aid Kit}} |
|||
{{Recipe2|page=Cooked Magmarang}} |
|||
{{Recipe|item1=Titanium|count1 = 3|machine=Fabricator|result=Fire Extinguisher}} |
|||
{{Recipe2|page=Cooked Eyeye}} |
|||
{{Recipe|item1=Wiring Kit|item2=Fiber Mesh|machine=Fabricator|result=Rebreather}} |
|||
{{Recipe2|page=Cooked Red Eyeye}} |
|||
{{Recipe|item1=Copper Wire|item2=Wiring Kit|machine=Fabricator|result=Compass}} |
|||
{{Recipe2|page=Cooked Oculus}} |
|||
{{Recipe|item1=Titanium|count1 = 2|machine=Fabricator|result=Pipe|resultcount = 5}} |
|||
{{Recipe2|page=Cooked Hoopfish}} |
|||
{{Recipe|item1=Titanium|count1 = 2|machine=Fabricator|result=Pipe Surface Floater}} |
|||
{{Recipe2|page=Cooked Spinefish}} |
|||
{{Recipe|item1 = Ion Crystal|item2 = Diamond|count2 = 2|machine = Fabricator|result = Purple Artifact}} |
|||
==== [[Food & Water#Cured Food|Cured Food]] ==== |
|||
{{Recipe|item1 = Ion Crystal|item2 = Kyanite|count2 = 2|machine = Fabricator|result = Blue Artifact}} |
|||
{{Recipe2|page=Cured Holefish}} |
|||
{{Recipe|item1 = Ion Crystal|item2 = Diamond|count2 = 2|machine = Fabricator|result = Orange Artifact}} |
|||
{{Recipe2|page=Cured Peeper}} |
|||
====[[Tools]]==== |
|||
{{Recipe2|page=Cured Bladderfish}} |
|||
{{Recipe|item1=Battery|item2=Titanium|machine=Fabricator|result=Scanner}} |
|||
{{Recipe2|page=Cured Garryfish}} |
|||
{{Recipe|item1=Silicone Rubber|count1=1|item2=Crash Powder|item3=Titanium|machine=Fabricator|result=Repair Tool}} |
|||
{{Recipe2|page=Cured Hoverfish}} |
|||
{{Recipe|item1=Battery|item2=Glass|machine=Fabricator|result=Flashlight}} |
|||
{{Recipe2|page=Cured Reginald}} |
|||
{{Recipe|item1=Silicone Rubber|item2=Titanium|machine=Fabricator|result=Survival Knife}} |
|||
{{Recipe2|page=Cured Spadefish}} |
|||
{{Recipe|item1=Creepvine Sample|count1 = 5|item2=Titanium|machine=Fabricator|result=Dive Reel}} |
|||
{{Recipe2|page=Cured Boomerang}} |
|||
{{Recipe|item1=Silicone Rubber|item2=Bladderfish|machine=Fabricator|result=Air Bladder}} |
|||
{{Recipe2|page=Cured Magmarang}} |
|||
{{Recipe|item1=Crash Powder|machine=Fabricator|result=Flare|resultcount = 5}} |
|||
{{Recipe2|page=Cured Eyeye}} |
|||
{{Recipe|item1=Advanced Wiring Kit|item2=Battery|machine=Fabricator|result=Builder}} |
|||
{{Recipe2|page=Cured Red Eyeye}} |
|||
{{Recipe|item1=Diamond|count1=2|item2=Battery|item3=Titanium|item4=Crash_Powder|machine=Fabricator|result=Laser Cutter}} |
|||
{{Recipe2|page=Cured Oculus}} |
|||
{{Recipe|item1=Computer Chip|item2=Battery|item3=Titanium|item4=Magnetite|machine=Fabricator|result=Stasis Rifle}} |
|||
{{Recipe2|page=Cured Hoopfish}} |
|||
{{Recipe|item1=Wiring Kit|item2=Battery|item3=Titanium|item4=Magnetite|machine=Fabricator|result=Propulsion Cannon}} |
|||
{{Recipe2|page=Cured Spinefish}}</div> |
|||
{{Recipe|item1=Battery|item2=Titanium|item3=Glass|machine=Fabricator|result=LED Light}} |
|||
</div> |
|||
===[[Deployables]]=== |
|||
<br> |
|||
<div class="mw-collapsible mw-collapsed"> |
|||
=== Personal === |
|||
<div class="mw-collapsible mw-collapsed">{{Clear}} |
|||
==== [[Equipment]] ==== |
|||
{{Recipe|item1=Battery|item2=Lubricant|item3=Copper Wire|item4=Titanium|machine=Fabricator|result=Seaglide}} |
|||
{{Recipe2|page = Standard O₂ Tank}} |
|||
{{Recipe|item1=Titanium Ingot|item2=Lubricant|item3=Power Cell|machine=Fabricator|result=Mobile Vehicle Bay}} |
|||
{{Recipe2|page = High Capacity O₂ Tank}} |
|||
{{Recipe|item1 = Silver Ore|item2 = Titanium|machine = Fabricator|result = Beacon}} |
|||
{{Recipe2|page = Fins}} |
|||
{{Recipe|item1=Titanium|count1 = 3|machine=Fabricator|result=Waterproof Locker}} |
|||
{{Recipe2|page = Radiation Suit}} |
|||
{{Recipe|item1=Battery|item2=Copper Ore|item3=Titanium|machine=Fabricator|result=Gravsphere}} |
|||
{{Recipe2|page = Reinforced Dive Suit}} |
|||
{{Recipe|item1=Titanium|count1 = 3|item3=Wiring Kit|machine=Fabricator|result=Creature Decoy|resultcount=3}} |
|||
</div> |
|||
==Data Bank Entry== |
|||
{| class="article-table sortable" style="width: 100%;" cellspacing="1" cellpadding="1" border="0" |
|||
|- |
|||
! class="unsortable" style="width: 100%; text-align: center;" | |
|||
|- |
|||
| style="text-align:left; font-size:12px;" | |
|||
Fabrication technology is the power to rearrange matter at the atomic level. It was the catalyst behind the great expansion, and remains the backbone of the modern world. |
|||
{{Recipe2|page = Water Filtration Suit}} |
|||
Fabricators come in all shapes and sizes, but the most common are small enough to be wall-mounted, and are used for everything from constructing everyday implements to cooking dinner. It is common today for households to keep a store of generic base materials on hand for any eventuality. |
|||
|} |
|||
{{Recipe2|page = First Aid Kit}} |
|||
==Gallery== |
|||
{{Recipe2|page = Fire Extinguisher}} |
|||
{{Recipe2|page = Rebreather}} |
|||
{{Recipe2|page = Compass}} |
|||
{{Recipe2|page = Pipe}} |
|||
{{Recipe2|page = Pipe Surface Floater}} |
|||
{{ExtraSpoilersection|{{Recipe2|page=Purple Tablet}} |
|||
{{Recipe2|page=Blue Tablet}} |
|||
{{Recipe2|page=Orange Tablet}}}} |
|||
{{Clear}} |
|||
==== [[Tools]] ==== |
|||
{{Recipe2|page = Scanner}} |
|||
{{Recipe2|page = Repair Tool}} |
|||
{{Recipe2|page = Flashlight}} |
|||
{{Recipe2|page = Survival Knife}} |
|||
{{Recipe2|page = Pathfinder Tool}} |
|||
{{Recipe2|page = Air Bladder}} |
|||
{{Recipe2|page = Flare}} |
|||
{{Recipe2|page = Habitat Builder}} |
|||
{{Recipe2|page = Laser Cutter}} |
|||
{{Recipe2|page = Stasis Rifle}} |
|||
{{Recipe2|page = Propulsion Cannon}} |
|||
{{Recipe2|page = Light Stick}}</div> |
|||
<br> |
|||
=== [[Deployables]] === |
|||
<div class="mw-collapsible mw-collapsed">{{Clear}} |
|||
{{Recipe2|page = Seaglide}} |
|||
{{Recipe2|page = Mobile Vehicle Bay}} |
|||
{{Recipe2|page = Beacon}} |
|||
{{Recipe2|page = Waterproof Locker}} |
|||
{{Recipe2|page = Grav Trap}} |
|||
{{Recipe2|page = Creature Decoy}}</div> |
|||
<br> |
|||
== Data Bank Entry == |
|||
{{Databank2|Fabricator}} |
|||
== Gallery == |
|||
<tabber> |
<tabber> |
||
Screenshots= |
|-|Screenshots= |
||
<gallery widths="200" spacing="small"> |
<gallery widths="200" spacing="small" hideaddbutton="true"> |
||
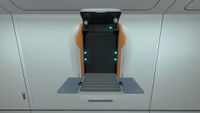
Fabricator_1.jpg|A |
Fabricator_1.jpg|A Fabricator |
||
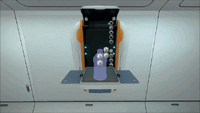
Fabricator_2.jpg|An open |
Fabricator_2.jpg|An open Fabricator |
||
Fabricator_3.gif|The |
Fabricator_3.gif|The Fabricator opening |
||
Fabricator_4.gif|The |
Fabricator_4.gif|The Fabricator crafting [[Bleach]] |
||
</gallery> |
</gallery> |
||
|-|Concept Art= |
|||
<gallery widths="200" spacing="small" hideaddbutton="true"> |
|||
|-| |
|||
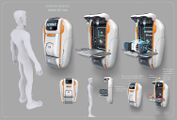
Concept Art |
Fabricator FINAL LowRes.jpg|Fabricator [[Concept Art]] |
||
<gallery widths="200" spacing="small"> |
|||
Fabricator FINAL LowRes.jpg|'''Fabricator''' [[Concept Art]] |
|||
</gallery> |
</gallery> |
||
|-|Other= |
|||
<gallery widths="200" spacing="small" hideaddbutton="true"> |
|||
|-| |
|||
Fabricatormodels.png|Fabricator Models from [https://sketchfab.com/models/b3aff3bcce9e4d0d933361c03dcbe0d9 Sketchfab] |
|||
Other= |
|||
<gallery widths="200" spacing="small"> |
|||
Fabricatormodels.png|'''Fabricator''' Models from [https://sketchfab.com/models/b3aff3bcce9e4d0d933361c03dcbe0d9 Sketchfab] |
|||
</gallery> |
</gallery> |
||
</tabber> |
</tabber> |
||
== Trivia == |
|||
* The Fabricator used to require a [[Computer Chip (Subnautica)|Computer Chip]] to create with the Habitat Builder. This was changed in an update shortly before release to requiring [[Gold (Subnautica)|Gold]] and a [[Table Coral Sample (Subnautica)|Table Coral Sample]] instead. |
|||
* Fabricators inside [[Destroyed Lifepods]] cannot be used, most likely due to the fact that either there is no power or they were destroyed. |
|||
{{Navbox Seabase Modules}} |
{{Navbox Seabase Modules}} |
||
<!-- Interwiki Language Links --> |
|||
[[de:Fabrikator]] |
|||
[[es:Fabricador]] |
|||
[[fr:Fabricateur]] |
|||
[[pl:Fabrykator]] |
[[pl:Fabrykator]] |
||
[[pt-br:Fabricador]] |
|||
[[ru:Изготовитель]] |
[[ru:Изготовитель]] |
||
<!-- Categories --> |
|||
[[Category:Crafted with Titanium]] |
|||
[[Category:Constructed with Habitat Builder]] |
|||
[[Category:Requires Blueprint]] |
|||
[[Category:Uses Energy]] |
[[Category:Uses Energy]] |
||
[[Category:Seabase Module]] |
[[Category:Seabase Module]] |
||
[[Category: |
[[Category:Constructed with Habitat Builder]] |
||
[[Category:Crafted with Titanium]] |
|||
[[Category:Crafted with Gold]] |
|||
[[Category:Crafted with Table Coral Sample]] |
|||
[[Category:Story]] |
|||
Latest revision as of 01:06, 19 February 2024
<infobox> <title source="title1"><default>Fabricator (Subnautica)</default></title>
<image source="image4"></image> <label>Category</label> <label>Category</label> <label>Description</label> <label>Hull Integrity</label> <label>Health</label> <label>Blueprint Source</label> <label>Acquired From</label> <label>Fragments</label> <label>Build Time</label> <label>Size</label> <label>Damage</label> <label>Drill Yield</label> <label>Biome</label> <label>Location</label> <label>Coordinates</label> <label>Perks</label> <label>Penalties</label> <label>Attribute</label> <label>Drops</label>
<label>Debug Spawn</label> <format> * {{#explode:fabricator||1}} </format> <label>Debug Spawn</label> <format> * {{#explode:{{{item_id}}}||1}} </format><label>Music</label> <group layout="horizontal"> <label>Food</label> <label>H2O</label> </group> <label>Bioreactor</label> <label>Byproduct</label> <group collapse="open" class="tab-fragment"> <header>Fragments</header> <image source="image2"></image> <label>Item</label> <label>Description</label> <label>Location</label> <label>Fragments</label> <label>Attribute</label> <label>Debug Spawn</label> <format>{{{debugspawn2}}}</format> <image source="image3"></image> <label>Item</label> <label>Description</label> <label>Location</label> <label>Fragments</label> <label>Attribute</label> <label>Debug Spawn</label> <format>{{{debugspawn3}}}</format> <image source="image5"></image> <label>Item</label> <label>Description</label> <label>Location</label> <label>Fragments</label> <label>Attribute</label> <label>Debug Spawn</label> <format>{{{debugspawn4}}}</format> </group> <group collapse="open" class="tab-fragment"> <header>Data Boxes</header> <image source="image6"></image> <label>Location</label> </group> </infobox> The Fabricator is an appliance that can be used to craft Food & Water, Equipment, Tools, and Deployables from Raw Materials, Basic Materials, Advanced Materials, and Electronics. One Fabricator can be found in Lifepod 5; as is the player's starting location, the use of this Fabricator is vital toward the player's progress and survival. Additional Fabricators can be constructed with the Habitat Builder and placed inside a Cyclops or a Seabase module. Broken fabricators can be found in most of the Destroyed lifepods. The Vehicle Upgrade Console, Scanner Room, and Cyclops include special fabricators specific to those rooms, which only fabricate Seamoth/Prawn Suit upgrades, Scanner Room upgrades and Cyclops upgrades, respectively.
Usage
When activated with LMB or ,it will display an interface from which the player can choose an item to craft. If the player has the required materials to craft an item, the item will be in color and highlighted in blue; otherwise, the item will be greyed out and highlighted in grey. The player can cancel out of the interface with RMB or 
![]() .
.
When the Fabricator finishes crafting an item, it will usually place it in the player's inventory. However, if the player moves away from the Fabricator during the crafting process, the newly crafted item will remain in the Fabricator, and the player must come back and manually pick it up. In this case, the player will receive a notification that their item is ready. The Fabricator cannot be used to craft items while there are still items in it that have not been picked up. By default, the Fabricator interface disappears while it is crafting an item and reappears when it is finished. The player can hold the key for sprinting (by default: Shift![]() ) when they select an item to craft to leave the interface open during crafting.
) when they select an item to craft to leave the interface open during crafting.
The Fabricator requires Energy to work and will consume 5 Energy per item crafted from a Seabase or Cyclops. If there is not enough Energy, the Fabricator cannot be used. The Fabricator does not require energy to operate in Creative Mode.
Recipe
(no target detected)
Fabricator Crafting Sections
The Fabricator has four main recipe categories:
Resources
Basic Materials


 ×4
×10
×4
×10


Advanced Materials


Electronics


|
Spoiler alert: The following section contains story related material. |
|---|
 

|
Sustenance


Personal


Deployables

 ×4
×4


Data Bank Entry
| Fabricator |
| <poem>Fabrication technology is the power to rearrange matter at the atomic level. It was the catalyst behind the great expansion, and remains the backbone of the modern world.
Fabricators come in all shapes and sizes, but the most common are small enough to be wall-mounted, and are used for everything from constructing everyday implements to cooking dinner. It is common today for households to keep a store of generic base materials on hand for any eventuality.</poem> |
| Source: Unlocked by default |
Gallery
<tabber> |-|Screenshots=

A Fabricator
An open Fabricator

The Fabricator opening
The Fabricator crafting Bleach


|-|Concept Art=
Fabricator Concept Art

|-|Other=
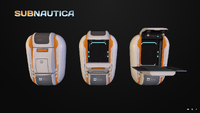
Fabricator Models from Sketchfab

</tabber>
Trivia
- The Fabricator used to require a Computer Chip to create with the Habitat Builder. This was changed in an update shortly before release to requiring Gold and a Table Coral Sample instead.
- Fabricators inside Destroyed Lifepods cannot be used, most likely due to the fact that either there is no power or they were destroyed.
Lua error in package.lua at line 80: module 'Dev:Navbox' not found.