
Fabricator (Subnautica): Difference between revisions
ComicalSkate (talk | contribs) (Lubricant said it took x10 creepvine seed clusters to craft. I fixed it) Tags: Visual edit apiedit |
Tags: Visual edit apiedit |
||
| Line 72: | Line 72: | ||
====Cured Food==== |
====Cured Food==== |
||
* [[Cured Food]] |
* [[Cured Food]] |
||
{{Recipe|item1=Holefish|machine=Fabricator|result=Cured Holefish}} |
{{Recipe|item1=Holefish|item2=Salt Deposit|machine=Fabricator|result=Cured Holefish}} |
||
{{Recipe|item1=Peeper|machine=Fabricator|result=Cured Peeper}} |
{{Recipe|item1=Peeper|item2=Salt Deposit|machine=Fabricator|result=Cured Peeper}} |
||
{{Recipe|item1=Bladderfish|machine=Fabricator|result=Cured Airsack}} |
{{Recipe|item1=Bladderfish|item2=Salt Deposit|machine=Fabricator|result=Cured Airsack}} |
||
{{Recipe|item1=Garryfish|machine=Fabricator|result=Cured Garryfish}} |
{{Recipe|item1=Garryfish|item2=Salt Deposit|machine=Fabricator|result=Cured Garryfish}} |
||
{{Recipe|item1=Hoverfish|machine=Fabricator|result=Cured Hoverfish}} |
{{Recipe|item1=Hoverfish|item2=Salt Deposit|machine=Fabricator|result=Cured Hoverfish}} |
||
{{Recipe|item1=Reginald|machine=Fabricator|result=Cured Reginald}} |
{{Recipe|item1=Reginald|item2=Salt Deposit|machine=Fabricator|result=Cured Reginald}} |
||
{{Recipe|item1=Spadefish|machine=Fabricator|result=Cured Spadefish}} |
{{Recipe|item1=Spadefish|item2=Salt Deposit|machine=Fabricator|result=Cured Spadefish}} |
||
{{Recipe|item1=Boomerang|machine=Fabricator|result=Cured Boomerang}} |
{{Recipe|item1=Boomerang|item2=Salt Deposit|machine=Fabricator|result=Cured Boomerang}} |
||
{{Recipe|item1=Lava Boomerang|machine=Fabricator|result=Cured Lava Boomerang}} |
{{Recipe|item1=Lava Boomerang|item2=Salt Deposit|machine=Fabricator|result=Cured Lava Boomerang}} |
||
{{Recipe|item1=Eyeye|machine=Fabricator|result=Cured Eyeye}} |
{{Recipe|item1=Eyeye|item2=Salt Deposit|machine=Fabricator|result=Cured Eyeye}} |
||
{{Recipe|item1=Lava Eyeye|machine=Fabricator|result=Cured Lava Eyeye}} |
{{Recipe|item1=Lava Eyeye|item2=Salt Deposit|machine=Fabricator|result=Cured Lava Eyeye}} |
||
{{Recipe|item1=Oculus|machine=Fabricator|result=Cured Oculus}} |
{{Recipe|item1=Oculus|item2=Salt Deposit|machine=Fabricator|result=Cured Oculus}} |
||
{{Recipe|item1=Hoopfish|machine=Fabricator|result=Cured Hoopfish}} |
{{Recipe|item1=Hoopfish|item2=Salt Deposit|machine=Fabricator|result=Cured Hoopfish}} |
||
{{Recipe|item1=Spinefish|machine=Fabricator|result=Cured Spinefish}} |
{{Recipe|item1=Spinefish|item2=Salt Deposit|machine=Fabricator|result=Cured Spinefish}} |
||
</div> |
</div> |
||
Revision as of 08:55, 20 August 2016

|
This seems new This article contains information that is updated for the latest Experimental Version of Subnautica. Players using stable mode may find this information inaccurate. |
<infobox> <title source="title1"><default>Fabricator (Subnautica)</default></title>
<image source="image4"></image> <label>Category</label> <label>Category</label> <label>Description</label> <label>Hull Integrity</label> <label>Health</label> <label>Blueprint Source</label> <label>Acquired From</label> <label>Fragments</label> <label>Build Time</label> <label>Size</label> <label>Damage</label> <label>Drill Yield</label> <label>Biome</label> <label>Location</label> <label>Coordinates</label> <label>Perks</label> <label>Penalties</label> <label>Attribute</label> <label>Drops</label>
<label>Debug Spawn</label> <format> * {{#explode:{{{debugspawn}}}||1}} </format> <label>Debug Spawn</label> <format> * {{#explode:{{{item_id}}}||1}} </format><label>Music</label> <group layout="horizontal"> <label>Food</label> <label>H2O</label> </group> <label>Bioreactor</label> <label>Byproduct</label> <group collapse="open" class="tab-fragment"> <header>Fragments</header> <image source="image2"></image> <label>Item</label> <label>Description</label> <label>Location</label> <label>Fragments</label> <label>Attribute</label> <label>Debug Spawn</label> <format>{{{debugspawn2}}}</format> <image source="image3"></image> <label>Item</label> <label>Description</label> <label>Location</label> <label>Fragments</label> <label>Attribute</label> <label>Debug Spawn</label> <format>{{{debugspawn3}}}</format> <image source="image5"></image> <label>Item</label> <label>Description</label> <label>Location</label> <label>Fragments</label> <label>Attribute</label> <label>Debug Spawn</label> <format>{{{debugspawn4}}}</format> </group> <group collapse="open" class="tab-fragment"> <header>Data Boxes</header> <image source="image6"></image> <label>Location</label> </group> </infobox> The Fabricator is an Appliance item which can be used to craft Food, Equipment, Tools and Machines from Raw and Crafted Materials. Some items, based off the size or complexity of the item that was selected, can take varying amounts of time to craft. Depending on the item, it may not be automatically transported into your inventory and it is required to pick the item off the bed of the Fabricator to obtain it. The Fabricator can be constructed with the Habitat Builder and placed inside the Cyclops or a Seabase Module. In addition there is one located in the player's starting location, Lifepod 5, however for it to function, a fire must be put out. The fabricator menu has an auto-close feature, after it has crafted an item (you hold "shift" button to prevent this), and that allows player to reopen menu during the fabrication. The Fabricator will drain Energy from whatever it is built inside. If energy levels drop to 0% then the Fabricator cannot be used. The Fabricator does not require energy to operate in Freedom Mode or Creative Mode.
Recipe


Fabricator Crafting Sections
The Fabricator has five main recipe categories:
Resources
Basic Materials
 ×4
×10
×4
×10


Advanced Materials


Electronics


Sustenance


Personal


Deployables


Submarine

Gallery
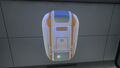
A Fabricator in the closed position
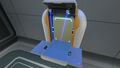
An open Fabricator in the process of crafting an item
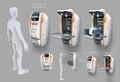
Fabricator Concept Art
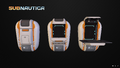
Fabricator Models from SketchFab


Lua error in package.lua at line 80: module 'Dev:Navbox' not found.