
Large Resource Deposits (Subnautica): Difference between revisions
Googleplex23 (talk | contribs) m (added trivia) |
MilotronZeta (talk | contribs) m (fixed links to go to the subnautica pages as opposed to disambig pages) |
||
| (34 intermediate revisions by 24 users not shown) | |||
| Line 1: | Line 1: | ||
{{SubnauticaLink}} |
|||
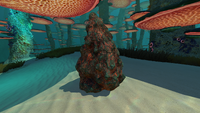
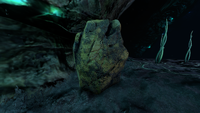
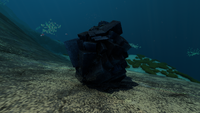
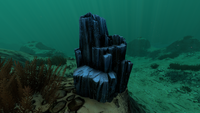
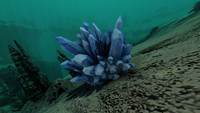
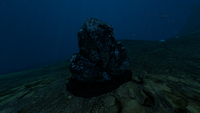
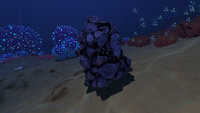
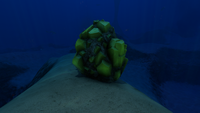
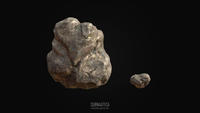
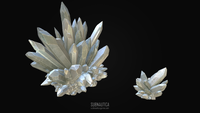
'''Large Resource Deposits''' are large quantities of a single [[Raw Materials|Raw Material]] found in ''[[Subnautica]]''. Unlike [[Harvesting Nodes|stone outcrops]], the materials cannot be harvested by hand; instead they must be broken down using the [[Prawn Suit Drill Arm]]. |
|||
'''Large Resource Deposits''' are large quantities of a single [[Raw Materials (Subnautica)|Raw Material]] found in ''[[Subnautica]]''. Unlike [[Harvesting Nodes|stone outcrops]], the materials cannot be harvested by hand; instead they must be broken down using the [[Prawn Suit Drill Arm (Subnautica)|Prawn Suit Drill Arm]]. |
|||
==Types of Deposits== |
== Types of Deposits == |
||
{| class="article-table" style="width:100%; border:0; border-spacing:0" |
|||
! style="width:20%; text-align:center" | Appearance |
|||
{| class="article-table sortable" style="width: 100%;" cellspacing="1" cellpadding="1" border="0" |
|||
! style="width:20%; text-align:center" | Material |
|||
|- |
|||
! |
! style="width:20%; text-align:center" | Quantity |
||
! |
! style="width:40%; text-align:center" | Biome(s) |
||
|- style="text-align:center; font-size:12px" |
|||
| [[File:Drillable_Copper_Ore_Deposit.png|150px|center]] |
|||
! class="unsortable" style="width: 40%; text-align: center;" |Biome(s) |
|||
| [[File:Copper_Ore.png|50px|center|link=Copper Ore (Subnautica)]][[Copper Ore (Subnautica)|Copper Ore]] |
|||
|- |
|||
| style=" |
| style="font-size:14px" | 8 - 16 |
||
| style="text-align: |
| style="text-align:left" | |
||
| style="text-align:center; font-size:14px;" |8 - 16 |
|||
| style="text-align:left; font-size:12px;" | |
|||
* [[Blood Kelp Caves]] |
* [[Blood Kelp Caves]] |
||
* [[Blood Kelp Zone]] |
* [[Blood Kelp Zone]] |
||
| Line 20: | Line 19: | ||
* [[Inactive Lava Zone]] |
* [[Inactive Lava Zone]] |
||
* [[Lost River]] |
* [[Lost River]] |
||
** [[Lost River|Junction]] |
|||
* [[Mushroom Forest]] |
* [[Mushroom Forest]] |
||
|- style="text-align:center; font-size:12px" |
|||
|- |
|||
| |
| [[File:Drillable_Gold_Deposit.png|140px|center]] |
||
| |
| [[File:Gold.png|50px|center|link=Gold (Subnautica)]][[Gold (Subnautica)|Gold]] |
||
| style=" |
| style="font-size:14px" | 9 - 18 |
||
| style="text-align:left |
| style="text-align:left" | |
||
* [[Blood Kelp Caves]] |
* [[Blood Kelp Caves]] |
||
* [[Blood Kelp Zone]] |
* [[Blood Kelp Zone]] |
||
| Line 33: | Line 33: | ||
* [[Jellyshroom Cave]] |
* [[Jellyshroom Cave]] |
||
* [[Lost River]] |
* [[Lost River]] |
||
** [[Lost River|Bones Fields]] |
|||
** [[Lost River|Tree Cove]] |
|||
** [[Lost River|Junction]] |
|||
* [[Underwater Islands]] |
* [[Underwater Islands]] |
||
|- style="text-align:center; font-size:12px" |
|||
|- |
|||
| |
| [[File:Drillable Kyanite.png|135px|center]] |
||
| |
| [[File:Kyanite.png|50px|center|link=Kyanite (Subnautica)]][[Kyanite (Subnautica)|Kyanite]] |
||
| style=" |
| style="font-size:14px" | 6 - 12 (Short)<br/>11 - 22 (Tall) |
||
| style="text-align:left" | |
|||
0 - 22 (Tall) |
|||
| style="text-align:left; font-size:12px;" | |
|||
* [[Inactive Lava Zone]] |
* [[Inactive Lava Zone]] |
||
* [[Lava Lakes]] |
* [[Lava Lakes]] |
||
|- style="text-align:center; font-size:12px" |
|||
|- |
|||
| |
| [[File:LeadLarge2.png|150px|center]] |
||
| |
| [[File:Lead.png|50px|center|link=Lead (Subnautica)]][[Lead (Subnautica)|Lead]] |
||
| style=" |
| style="font-size:14px" | 8 - 16 |
||
| style="text-align:left |
| style="text-align:left" | |
||
* [[Blood Kelp Zone]] |
* [[Blood Kelp Zone]] |
||
* [[Crash Zone]] |
* [[Crash Zone]] |
||
| Line 53: | Line 55: | ||
* [[Inactive Lava Zone]] |
* [[Inactive Lava Zone]] |
||
* [[Lost River]] |
* [[Lost River]] |
||
** [[Lost River|Ghost Forest]] |
|||
** [[Lost River|Junction]] |
|||
* [[Mountain Island]] |
* [[Mountain Island]] |
||
* [[Mountains]] |
* [[Mountains]] |
||
* [[Sparse Reef]] |
* [[Sparse Reef]] |
||
|- style="text-align:center; font-size:12px" |
|||
|- |
|||
| |
| [[File:DrillableLithium.png|150px|center]] |
||
| |
| [[File:Lithium.png|50px|center|link=Lithium (Subnautica)]][[Lithium (Subnautica)|Lithium]] |
||
| style=" |
| style="font-size:14px" | 8 - 16 |
||
| style="text-align:left |
| style="text-align:left" | |
||
* [[Bone Fields Caves]] |
* [[Bone Fields Caves]] |
||
* [[Bulb Zone]] |
* [[Bulb Zone]] |
||
| Line 66: | Line 70: | ||
* [[Jellyshroom Cave]] |
* [[Jellyshroom Cave]] |
||
* [[Lost River]] |
* [[Lost River]] |
||
** [[Lost River|Bone Fields]] |
|||
** [[Lost River|Tree Cove]] |
|||
* [[Mushroom Forest Caves]] |
* [[Mushroom Forest Caves]] |
||
* [[Mushroom Forest]] |
* [[Mushroom Forest]] |
||
* [[Sea Treader's Tunnel Caves]] |
* [[Sea Treader's Tunnel Caves]] |
||
* [[Sparse Reef]] |
* [[Sparse Reef]] |
||
|- style="text-align:center; font-size:12px" |
|||
|- |
|||
| |
| [[File:MagnetiteResourceDepositsNew.png|140px|center]] |
||
| |
| [[File:Magnetite.png|50px|center|link=Magnetite (Subnautica)]][[Magnetite (Subnautica)|Magnetite]] |
||
| style=" |
| style="font-size:14px" | 7 - 14 |
||
| style="text-align:left |
| style="text-align:left" | |
||
* [[Jellyshroom Cave]] |
* [[Jellyshroom Cave]] |
||
|- style="text-align:center; font-size:12px" |
|||
|- |
|||
| |
| [[File:NickelLRS.png|150px|center]] |
||
| |
| [[File:Nickel Ore.png|50px|center|link=Nickel Ore (Subnautica)]][[Nickel Ore (Subnautica)|Nickel Ore]] |
||
| style=" |
| style="font-size:14px" | 8 - 16 |
||
| style="text-align:left |
| style="text-align:left" | |
||
* [[Inactive Lava Zone]] |
|||
* [[Lost River]] |
* [[Lost River]] |
||
** [[Lost River|Bone Fields]] |
|||
|- |
|||
** [[Lost River|Ghost Canyon]] |
|||
| style="text-align:center; font-size:12px;" |[[File:QuartzLargeTrue.png|130px|center]] |
|||
** [[Lost River|Ghost Forest]] |
|||
| style="text-align:center; font-size:12px;" |[[File:Quartz.png|50px|center|link=Quartz]][[Quartz]] |
|||
** [[Lost River|Junction]] |
|||
| style="text-align:center; font-size:14px;" |7 - 14 |
|||
| style="text-align: |
|- style="text-align:center; font-size:12px" |
||
| [[File:QuartzLargeTrue.png|130px|center]] |
|||
| [[File:Quartz.png|50px|center|link=Quartz (Subnautica)]][[Quartz (Subnautica)|Quartz]] |
|||
| style="font-size:14px" | 7 - 14 |
|||
| style="text-align:left" | |
|||
* [[Crag Field]] |
* [[Crag Field]] |
||
* [[Dunes]] |
* [[Dunes]] |
||
| Line 93: | Line 104: | ||
* [[Inactive Lava Zone]] |
* [[Inactive Lava Zone]] |
||
* [[Lost River]] |
* [[Lost River]] |
||
** [[Lost River|Junction]] |
|||
** [[Lost River|Mountains Corridor]] |
|||
* [[Mountains Caves]] |
* [[Mountains Caves]] |
||
* [[Sparse Reef]] |
* [[Sparse Reef]] |
||
|- style="text-align:center; font-size:12px" |
|||
|- |
|||
| |
| [[File:DrillableSalt.png|170px|center]] |
||
| |
| [[File:Salt Deposit.png|50px|center|link=Salt Deposit (Subnautica)]][[Salt Deposit (Subnautica)|Salt Deposit]] |
||
| style=" |
| style="font-size:14px" | 7 - 14 |
||
| style="text-align:left |
| style="text-align:left" | |
||
* [[Crag Field]] |
* [[Crag Field]] |
||
* [[Crash Zone Mesas]] |
* [[Crash Zone Mesas]] |
||
| Line 107: | Line 120: | ||
* [[Mountains]] |
* [[Mountains]] |
||
* [[Mushroom Forest]] |
* [[Mushroom Forest]] |
||
|- style="text-align:center; font-size:12px" |
|||
|- |
|||
| |
| [[File:DrillableSilver.png|160px|center]] |
||
| |
| [[File:Silver Ore.png|50px|center|link=Silver Ore (Subnautica)]][[Silver Ore (Subnautica)|Silver Ore]] |
||
| style=" |
| style="font-size:14px" | 9 - 18 |
||
| style="text-align:left |
| style="text-align:left" | |
||
* [[Crag Field]] |
* [[Crag Field]] |
||
* [[Dunes Caves]] |
* [[Dunes Caves]] |
||
* [[Dunes]] |
* [[Dunes]] |
||
* [[Inactive Lava Zone]] |
* [[Inactive Lava Zone]] |
||
* [[Jellyshroom Cave]] |
|||
* [[Lost River]] |
* [[Lost River]] |
||
** [[Lost River|Bone Fields]] |
|||
** [[Lost River|Ghost Forest]] |
|||
** [[Lost River|Junction]] |
|||
* [[Mountains]] |
* [[Mountains]] |
||
* [[Underwater Islands]] |
* [[Underwater Islands]] |
||
|- style="text-align:center; font-size:12px" |
|||
* [[Jellyshroom Cave]] |
|||
| [[File:Drillable_Titanium_Deposit.png|150px|center]] |
|||
|- |
|||
| [[File:Titanium.png|50px|center|link=Titanium (Subnautica)]][[Titanium (Subnautica)|Titanium]] |
|||
| style="text-align:center; font-size:12px;" |[[File:Drillable_Titanium_Deposit.png|150px|center]] |
|||
| style=" |
| style="font-size:14px" | 8 - 16 |
||
| style="text-align: |
| style="text-align:left" | |
||
| style="text-align:left; font-size:12px;" | |
|||
* [[Bulb Zone]] |
* [[Bulb Zone]] |
||
* [[Crash Zone]] |
* [[Crash Zone]] |
||
| Line 133: | Line 149: | ||
* [[Inactive Lava Zone]] |
* [[Inactive Lava Zone]] |
||
* [[Lost River]] |
* [[Lost River]] |
||
** [[Lost River|Bone Fields]] |
|||
|- |
|||
** [[Lost River|Corridor]] |
|||
| style="text-align:center; font-size:12px;" |[[File:UraniniteLargeNew.png|130px|center]] |
|||
** [[Lost River|Ghost Canyon]] |
|||
| style="text-align:center; font-size:12px;" |[[File:Uraninite Crystal.png|50px|center|link=Uraninite Crystal]][[Uraninite Crystal]] |
|||
** [[Lost River|Ghost Forest]] |
|||
| style="text-align:center; font-size:14px;" |7 - 14 |
|||
** [[Lost River|Tree Cove]] |
|||
| style="text-align:left; font-size:12px;" | |
|||
** [[Lost River|Junction]] |
|||
** [[Lost River|Mountains Corridor]] |
|||
|- style="text-align:center; font-size:12px" |
|||
| [[File:UraniniteLargeNew.png|130px|center]] |
|||
| [[File:Uraninite Crystal.png|50px|center|link=Uraninite Crystal (Subnautica)]][[Uraninite Crystal (Subnautica)|Uraninite Crystal]] |
|||
| style="font-size:14px" | 7 - 14 |
|||
| style="text-align:left" | |
|||
* [[Blood Kelp Caves]] |
* [[Blood Kelp Caves]] |
||
* [[Inactive Lava Zone]] |
* [[Inactive Lava Zone]] |
||
* [[Lost River]] |
* [[Lost River]] |
||
** [[Lost River|Bone Fields]] |
|||
** [[Lost River|Tree Cove]] |
|||
* [[Underwater Islands]] |
* [[Underwater Islands]] |
||
|} |
|} |
||
==Unique Deposits== |
== Unique Deposits == |
||
{{ExtraSpoilersection|1= |
{{ExtraSpoilersection|1= |
||
<table class="article-table"> |
<table class="article-table"> |
||
<tr style="text-align: |
<tr style="text-align:center"> |
||
<td>Large Deposit</td> |
<td>Large Deposit</td> |
||
<td>Minerals</td> |
<td>Minerals</td> |
||
| Line 153: | Line 178: | ||
<td>Locations</td> |
<td>Locations</td> |
||
</tr> |
</tr> |
||
<tr style="text-align:center; font-size:12px |
<tr style="text-align:center; font-size:12px"> |
||
<td>[[File:Drillable_Ion_Cube_Cluster.png|135px|center]]</td> |
<td>[[File:Drillable_Ion_Cube_Cluster.png|135px|center]]</td> |
||
<td>[[File:Ion Crystal.png|50px|center|link=Ion Cube]][[Ion Cube]]</td> |
<td>[[File:Ion Crystal.png|50px|center|link=Ion Cube (Subnautica)]][[Ion Cube (Subnautica)|Ion Cube]]</td> |
||
<td> |
<td>3 - 12</td> |
||
<td> |
<td> |
||
* [[Alien Thermal Plant]] |
* [[Alien Thermal Plant]] |
||
| Line 164: | Line 189: | ||
</table> |
</table> |
||
}} |
}} |
||
== Gallery == |
|||
== [[Ruby (Subnautica)|Gallery]] == |
|||
<tabber> |
<tabber> |
||
Screenshots= |
Screenshots= |
||
<gallery widths="200" spacing="small"> |
<gallery widths="200" spacing="small"> |
||
Large_Copper_Ore_Deposit.png|The large form of [[Copper Ore|Copper]] |
Large_Copper_Ore_Deposit.png|The large form of [[Copper Ore (Subnautica)|Copper]] |
||
Large_Gold_Deposit.png|The large form of [[Gold]] |
Large_Gold_Deposit.png|The large form of [[Gold (Subnautica)|Gold]] |
||
Kyanite Deposit.png|The large form of [[Kyanite]] |
Kyanite Deposit.png|The large form of [[Kyanite (Subnautica)|Kyanite]] |
||
Large Lead Deposit.png|The large form of [[Lead]] |
Large Lead Deposit.png|The large form of [[Lead (Subnautica)|Lead]] |
||
Large Lithium Deposit.png|The large form of [[Lithium]] |
Large Lithium Deposit.png|The large form of [[Lithium (Subnautica)|Lithium]] |
||
Large Magnetite Deposit.png|The large form of [[Magnetite]] |
Large Magnetite Deposit.png|The large form of [[Magnetite (Subnautica)|Magnetite]] |
||
LargeNewNickleOre.jpg|The large form of [[Nickel Ore|Nickel]] |
LargeNewNickleOre.jpg|The large form of [[Nickel Ore (Subnautica)|Nickel]] |
||
Large Quartz Deposit.png|The large form of [[Quartz]] |
Large Quartz Deposit.png|The large form of [[Quartz (Subnautica)|Quartz]] |
||
Large Salt Deposit.png|The large form of [[Salt Deposit|Salt]] |
Large Salt Deposit.png|The large form of [[Salt Deposit (Subnautica)|Salt]] |
||
Large Silver Ore Deposit.png|The large form of [[Silver Ore]] |
Large Silver Ore Deposit.png|The large form of [[Silver Ore (Subnautica)|Silver Ore]] |
||
Large_Titanium_Deposit.png|The large form of [[Titanium]] |
Large_Titanium_Deposit.png|The large form of [[Titanium (Subnautica)|Titanium]] |
||
Large Uraninite Crystal Deposit.png|The large form of [[Uraninite Crystal|Uraninite]] |
Large Uraninite Crystal Deposit.png|The large form of [[Uraninite Crystal (Subnautica)|Uraninite]] |
||
Raw materials p1 in game.jpg|Image found on trello featuring unused large [[Ruby]] and [[Crystalline Sulfur]] deposits |
Raw materials p1 in game.jpg|Image found on trello featuring unused large [[Ruby (Subnautica)|Ruby]] and [[Crystalline Sulfur (Subnautica)|Crystalline Sulfur]] deposits |
||
Raw materials p2 in game.jpg|Image found on trello featuring an unused large [[Cut Content|Mercury Ore]] deposit, modeled prior to Mercury's removal from the game |
Raw materials p2 in game.jpg|Image found on trello featuring an unused large [[Cut Content (Subnautica)|Mercury Ore]] deposit, modeled prior to Mercury's removal from the game |
||
</gallery> |
</gallery> |
||
|-| |
|-| |
||
Unique Deposits= |
Unique Deposits= |
||
<gallery widths="200" spacing="small"> |
<gallery widths="200" spacing="small" height="100"> |
||
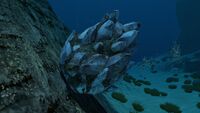
Ion Cube Cluster.png|The large form of the [[Ion Cube]] in the Alien Thermal Plant |
Ion Cube Cluster.png|The large form of the [[Ion Cube (Subnautica)|Ion Cube]] in the Alien Thermal Plant |
||
IonCrystalConceptArt.JPG|[[Concept Art]] comparing an ion Cube and a Large Resource Deposit of the same material |
|||
</gallery> |
</gallery> |
||
|-| |
|-| |
||
| Line 198: | Line 225: | ||
Removed Deposits= |
Removed Deposits= |
||
<gallery widths="200" spacing="small"> |
<gallery widths="200" spacing="small"> |
||
NewLargeDiamond.jpg|Large [[Diamond]] deposit which has been removed from the game. |
NewLargeDiamond.jpg|Large [[Diamond (Subnautica)|Diamond]] deposit which has been removed from the game. |
||
</gallery> |
</gallery> |
||
</tabber> |
</tabber> |
||
==Trivia== |
== Trivia == |
||
#There is a 0.000000471431432% chance for a large Kyanite deposit to yield 22 Kyanite pieces. |
|||
*Kyanite is one of the few resources in ''Subnautica'' that is not guaranteed to eject smaller pieces when drilling chunks from a large node. This is not a bug. |
|||
# There are four Large Resource Deposit models that currently do not appear in Subnautica: the large [[Diamond (Subnautica)|Diamond]], [[Ruby (Subnautica)|Ruby]], [[Crystalline Sulfur (Subnautica)|Crystalline Sulfur]] and Mercury deposits.<ref>https://trello.com/c/udrs7pku/6192-rawmaterials</ref><ref>[https://sketchfab.com/models/91eaf1b93a5447e4afa21d342f53c208 Diamond model by Fox3D] on Sketchfab</ref> |
|||
**On the other hand, there is a 0.000000471431432% chance for a large Kyanite deposit to yield 22 Kyanite pieces. |
|||
#* However, the Large Ruby Deposit and the Large Diamond Deposit were repurposed for [[Subnautica: Below Zero]]. |
|||
*There are three Large Resource Deposit models that currently do not appear in Subnautica: the large [[Diamond]], [[Ruby]] and [[Crystalline Sulfur]] deposits.<ref>https://trello.com/c/udrs7pku/6192-rawmaterials</ref><ref>[https://sketchfab.com/models/91eaf1b93a5447e4afa21d342f53c208 Diamond model by Fox3D] on Sketchfab</ref> |
|||
#There used to be Large Resource Deposits of Diamonds generated on the map, before raw resources got new models. |
|||
#Over the course of the development of Subnautica, the models for Large Resourse Deposits have often changed. |
|||
#Large Silver Deposits have been found in the Jellyshroom Cave, but it is unknown if this is intentional or a bug. |
|||
== References == |
|||
<references/> |
|||
==References== |
|||
<references />[[ru:Большие ресурсные залежи]][[fr:Grands dépôts de ressources]] |
|||
__STATICREDIRECT__ |
__STATICREDIRECT__ |
||
[[de:Große Rohstoffvorkommen]] |
|||
[[fr:Grands dépôts de ressources]] |
|||
[[pt-br:Grandes depósitos de recursos]] |
|||
[[pl:Wielkie złoża surowców]] |
|||
[[ru:Большие ресурсные залежи]] |
|||
[[Category:Alien Technology]] |
[[Category:Alien Technology]] |
||
[[Category:Blood Kelp Zone]] |
[[Category:Blood Kelp Zone]] |
||
| Line 238: | Line 272: | ||
[[Category:Underwater Islands]] |
[[Category:Underwater Islands]] |
||
[[Category:Mountains Caves]] |
[[Category:Mountains Caves]] |
||
[[Category:Primary Containment Facility]] |
|||
[[Category:Alien Thermal Plant]] |
|||
[[Category:Sparse Reef]] |
|||
[[Category:From Wikimedia]] |
|||
Latest revision as of 15:04, 10 March 2025
Large Resource Deposits are large quantities of a single Raw Material found in Subnautica. Unlike stone outcrops, the materials cannot be harvested by hand; instead they must be broken down using the Prawn Suit Drill Arm.
Types of Deposits
| Appearance | Material | Quantity | Biome(s) |
|---|---|---|---|
 |
 |
8 - 16 | |
 |
 |
9 - 18 | |
 |
 |
6 - 12 (Short) 11 - 22 (Tall) |
|
 |
 |
8 - 16 | |
 |
 |
8 - 16 | |
 |
 |
7 - 14 | |
 |
 |
8 - 16 | |
 |
 |
7 - 14 | |
 |
 |
7 - 14 | |
 |
 |
9 - 18 | |
 |
 |
8 - 16 | |
 |
 |
7 - 14 |
Unique Deposits
|
Spoiler alert: The following section contains story related material. | ||||||||
|---|---|---|---|---|---|---|---|---|
|


Gallery
<tabber> Screenshots=
The large form of Copper
The large form of Gold
The large form of Kyanite
The large form of Lead
The large form of Lithium
The large form of Magnetite
The large form of Nickel
The large form of Quartz

The large form of Salt
The large form of Silver Ore
The large form of Titanium
The large form of Uraninite
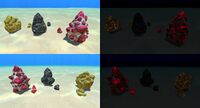
Image found on trello featuring unused large Ruby and Crystalline Sulfur deposits
Image found on trello featuring an unused large Mercury Ore deposit, modeled prior to Mercury's removal from the game


|-| Unique Deposits=
The large form of the Ion Cube in the Alien Thermal Plant
Concept Art comparing an ion Cube and a Large Resource Deposit of the same material


|-| Sketchfab Models=
The Large Lead Deposit model from Sketchfab
The Large Nickel Deposit model from Sketchfab
The Large Quartz Deposit model from Sketchfab


|-| Removed Deposits=
Large Diamond deposit which has been removed from the game.

</tabber>
Trivia
- There is a 0.000000471431432% chance for a large Kyanite deposit to yield 22 Kyanite pieces.
- There are four Large Resource Deposit models that currently do not appear in Subnautica: the large Diamond, Ruby, Crystalline Sulfur and Mercury deposits.[1][2]
- However, the Large Ruby Deposit and the Large Diamond Deposit were repurposed for Subnautica: Below Zero.
- There used to be Large Resource Deposits of Diamonds generated on the map, before raw resources got new models.
- Over the course of the development of Subnautica, the models for Large Resourse Deposits have often changed.
- Large Silver Deposits have been found in the Jellyshroom Cave, but it is unknown if this is intentional or a bug.
References
- Alien Technology
- Blood Kelp Zone
- Blood Kelp Caves
- Bone Fields Caves
- Bulb Zone
- Bulb Zone Caves
- Crag Field
- Crash Zone
- Deep Grand Reef
- Deep Sparse Reef
- Dunes
- Dunes Caves
- Floating Island
- Grand Reef
- Grand Reef Caves
- Grassy Plateaus
- Inactive Lava Zone
- Jellyshroom Cave
- Lava Lakes
- Lost River
- Mountains
- Mountain Island
- Mushroom Forest
- Raw Material
- Underwater Islands
- Mountains Caves
- Primary Containment Facility
- Alien Thermal Plant
- Sparse Reef
- From Wikimedia