
Coral: Difference between revisions
| Line 14: | Line 14: | ||
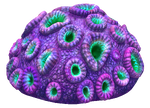
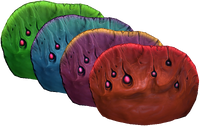
| style="text-align:center; font-size:12px;" |[[File:Purple Brain Coral Fauna.png|150px|center|link=Brain Coral]][[Brain Coral]] |
| style="text-align:center; font-size:12px;" |[[File:Purple Brain Coral Fauna.png|150px|center|link=Brain Coral]][[Brain Coral]] |
||
| style="text-align:center; font-size:12px;" | |
| style="text-align:center; font-size:12px;" | |
||
[[Category:Harvestable|Harvestable]] |
[[:Category:Harvestable|Harvestable]] |
||
| style="text-align:left; font-size:12px;" | |
| style="text-align:left; font-size:12px;" | |
||
* [[Bulb Zone]] |
* [[Bulb Zone]] |
||
| Line 36: | Line 36: | ||
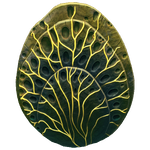
| style="text-align:center; font-size:12px;" |[[File:Shell Plate Fauna.png|150px|center|link=Coral Shell Plate]][[Coral Shell Plate]] |
| style="text-align:center; font-size:12px;" |[[File:Shell Plate Fauna.png|150px|center|link=Coral Shell Plate]][[Coral Shell Plate]] |
||
| style="text-align:center; font-size:12px;" | |
| style="text-align:center; font-size:12px;" | |
||
[[Category: |
[[:Category:Harvestable|Harvestable]] |
||
| style="text-align:left; font-size:12px;" | |
| style="text-align:left; font-size:12px;" | |
||
* [[Floating Island]] |
* [[Floating Island]] |
||
| Line 53: | Line 53: | ||
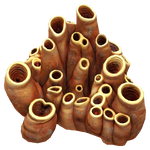
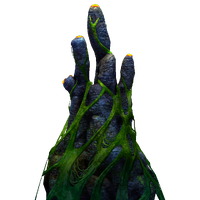
| style="text-align:center; font-size:12px;" |[[File:Earthen Coral Tubes.png|150px|center|link=Earthen Coral Tubes]][[Earthen Coral Tubes]] |
| style="text-align:center; font-size:12px;" |[[File:Earthen Coral Tubes.png|150px|center|link=Earthen Coral Tubes]][[Earthen Coral Tubes]] |
||
| style="text-align:center; font-size:12px;" | |
| style="text-align:center; font-size:12px;" | |
||
[[Category:Non-harvestable|Non-harvestable]] |
[[:Category:Non-harvestable|Non-harvestable]] |
||
| style="text-align:left; font-size:12px;" | |
| style="text-align:left; font-size:12px;" | |
||
* [[Bulb Zone Caves]] |
* [[Bulb Zone Caves]] |
||
| Line 64: | Line 64: | ||
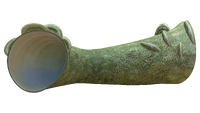
| style="text-align:center; font-size:12px;" |[[File:Coral_Tube_Fauna.png|200px|center|link=Giant Coral Tubes]][[Giant Coral Tubes]] |
| style="text-align:center; font-size:12px;" |[[File:Coral_Tube_Fauna.png|200px|center|link=Giant Coral Tubes]][[Giant Coral Tubes]] |
||
| style="text-align:center; font-size:12px;" | |
| style="text-align:center; font-size:12px;" | |
||
[[Category:Harvestable|Harvestable]] |
[[:Category:Harvestable|Harvestable]] |
||
| style="text-align:left; font-size:12px;" | |
| style="text-align:left; font-size:12px;" | |
||
* [[Crash Zone]] |
* [[Crash Zone]] |
||
| Line 78: | Line 78: | ||
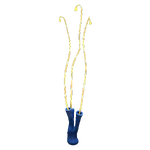
| style="text-align:center; font-size:12px;" |[[File:Blue Coral Tubes Fauna.png|150px|center|link=Jordi's Tung]][[Jordi's Tung]] |
| style="text-align:center; font-size:12px;" |[[File:Blue Coral Tubes Fauna.png|150px|center|link=Jordi's Tung]][[Jordi's Tung]] |
||
| style="text-align:center; font-size:12px;" | |
| style="text-align:center; font-size:12px;" | |
||
[[Category:Non-harvestable|Non-harvestable]] |
[[:Category:Non-harvestable|Non-harvestable]] |
||
| style="text-align:left; font-size:12px;" | |
| style="text-align:left; font-size:12px;" | |
||
* [[Grassy Plateaus]] |
* [[Grassy Plateaus]] |
||
| Line 88: | Line 88: | ||
| style="text-align:center; font-size:12px;" |[[File:Pyrocoral Fauna.png|200px|center|link=Pyrocoral]][[Pyrocoral]] |
| style="text-align:center; font-size:12px;" |[[File:Pyrocoral Fauna.png|200px|center|link=Pyrocoral]][[Pyrocoral]] |
||
| style="text-align:center; font-size:12px;" | |
| style="text-align:center; font-size:12px;" | |
||
[[Category:Non-harvestable|Non-harvestable]] |
[[:Category:Non-harvestable|Non-harvestable]] |
||
| style="text-align:left; font-size:12px;" | |
| style="text-align:left; font-size:12px;" | |
||
* [[Lost River]] |
* [[Lost River]] |
||
| Line 98: | Line 98: | ||
| style="text-align:center; font-size:12px;" |[[File:Slanted Shell Plate Fauna.png|200px|center|link=Slanted Shell Plate]][[Slanted Shell Plate]] |
| style="text-align:center; font-size:12px;" |[[File:Slanted Shell Plate Fauna.png|200px|center|link=Slanted Shell Plate]][[Slanted Shell Plate]] |
||
| style="text-align:center; font-size:12px;" | |
| style="text-align:center; font-size:12px;" | |
||
[[Category:Non-harvestable|Non-harvestable]] |
[[:Category:Non-harvestable|Non-harvestable]] |
||
| style="text-align:left; font-size:12px;" | |
| style="text-align:left; font-size:12px;" | |
||
* [[Crash Zone Mesas]] |
* [[Crash Zone Mesas]] |
||
| Line 117: | Line 117: | ||
|- |
|- |
||
| style="text-align:center; font-size:12px;" |[[File:Table Coral Flora.png|200px|center|link=Table Coral]][[Table Coral]] |
| style="text-align:center; font-size:12px;" |[[File:Table Coral Flora.png|200px|center|link=Table Coral]][[Table Coral]] |
||
| style="text-align: |
| style="text-align:center; font-size:12px;" | |
||
[[Category:Harvestable|Harvestable]] |
[[:Category:Harvestable|Harvestable]] |
||
| style="text-align:left; font-size:12px;" | |
| style="text-align:left; font-size:12px;" | |
||
* [[Bulb Zone]] |
* [[Bulb Zone]] |
||
| Line 135: | Line 135: | ||
|- |
|- |
||
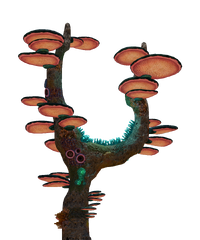
| style="text-align:center; font-size:12px;" |[[File:Coral Tree Fauna.png|200px|center|link=Tree Mushroom]][[Tree Mushroom]] |
| style="text-align:center; font-size:12px;" |[[File:Coral Tree Fauna.png|200px|center|link=Tree Mushroom]][[Tree Mushroom]] |
||
| style="text-align: |
| style="text-align:center; font-size:12px;" | |
||
[[Category:Harvestable|Harvestable]] |
[[:Category:Harvestable|Harvestable]] |
||
| style="text-align:left; font-size:12px;" | |
| style="text-align:left; font-size:12px;" | |
||
* [[Mushroom Forest]] |
* [[Mushroom Forest]] |
||
| Line 144: | Line 144: | ||
| style="text-align:center; font-size:12px;" |[[File:BrainCoralInfobox.png|150px|center]] Unnamed Coral Species A |
| style="text-align:center; font-size:12px;" |[[File:BrainCoralInfobox.png|150px|center]] Unnamed Coral Species A |
||
| style="text-align:center; font-size:12px;" | |
| style="text-align:center; font-size:12px;" | |
||
[[Category:Non-harvestable|Non-harvestable]] |
[[:Category:Non-harvestable|Non-harvestable]] |
||
| style="text-align:left; font-size:12px;" | |
| style="text-align:left; font-size:12px;" | |
||
* [[Deep Sparse Reef]] |
* [[Deep Sparse Reef]] |
||
| Line 153: | Line 153: | ||
| style="text-align:center; font-size:12px;" |[[File:Skull Coral Fauna.png|130px|center]] Unnamed Coral Species B |
| style="text-align:center; font-size:12px;" |[[File:Skull Coral Fauna.png|130px|center]] Unnamed Coral Species B |
||
| style="text-align:center; font-size:12px;" | |
| style="text-align:center; font-size:12px;" | |
||
[[Category:Non-harvestable|Non-harvestable]] |
[[:Category:Non-harvestable|Non-harvestable]] |
||
| style="text-align:left; font-size:12px;" | |
| style="text-align:left; font-size:12px;" | |
||
* [[Lost River]] |
* [[Lost River]] |
||
| Line 161: | Line 161: | ||
| style="text-align:center; font-size:12px;" |[[File:Lost River Cave Coral Fauna.png|150px|center]] Unnamed Coral Species C |
| style="text-align:center; font-size:12px;" |[[File:Lost River Cave Coral Fauna.png|150px|center]] Unnamed Coral Species C |
||
| style="text-align:center; font-size:12px;" | |
| style="text-align:center; font-size:12px;" | |
||
[[Category:Non-harvestable|Non-harvestable]] |
[[:Category:Non-harvestable|Non-harvestable]] |
||
| style="text-align:left; font-size:12px;" | |
| style="text-align:left; font-size:12px;" | |
||
* [[Bone Fields Caves]] |
* [[Bone Fields Caves]] |
||
| Line 169: | Line 169: | ||
| style="text-align:center; font-size:12px;" |[[File:Lost River Brine Coral Fauna.png|150px|center]] Unnamed Coral Species D |
| style="text-align:center; font-size:12px;" |[[File:Lost River Brine Coral Fauna.png|150px|center]] Unnamed Coral Species D |
||
| style="text-align:center; font-size:12px;" | |
| style="text-align:center; font-size:12px;" | |
||
[[Category:Non-harvestable|Non-harvestable]] |
[[:Category:Non-harvestable|Non-harvestable]] |
||
| style="text-align:left; font-size:12px;" | |
| style="text-align:left; font-size:12px;" | |
||
* [[Lost River]] |
* [[Lost River]] |
||
| Line 175: | Line 175: | ||
* Decor |
* Decor |
||
|} |
|} |
||
[[Category:Harvestable|Harvestable]] |
|||
[[Category:Non-harvestable|Non-harvestable]] |
|||
==Currently Unused Coral== |
==Currently Unused Coral== |
||
Revision as of 14:39, 18 January 2019
| This article is about Coral in Subnautica. For the related article on the Below Zero Wiki, see Coral. |
.png)
|
Read at own risk This article contains unmarked spoilers. Players new to the game would want to avoid or be cautious toward this article. |
Coral are life forms found all over the world. Samples can be harvested from some of them using the Survival Knife or the Thermoblade, although most are unharvestable.
Currently Available Corals
| Coral | Classification | Locations | Comment |
|---|---|---|---|
 |
| ||
 |
| ||
 |
| ||
 |
| ||
 |
| ||
 |
| ||
 |
| ||
 |
| ||
 |
| ||
 |
| ||
 |
| ||
 |
| ||
 |
|
Currently Unused Coral
| Coral | Biome |
|---|---|
 |
- |
 |
- |
Trivia
- Unnamed Coral Species C, D and E were originally meant to spawn on the backs of Reefback Leviathans[1], but C and D were moved to the 'Lost River. it is currently unknown where E will spawn if it does get added.
- Although coral and fauna are sorted separately in the PDA, corals are actually animals. This is because they do not make their own food and eat microscopic creatures instead. The "skeleton" of a coral is actually just limestone.
References
Lua error in package.lua at line 80: module 'Dev:Navbox' not found.