
Wrecks: Difference between revisions
Mesmerized (talk | contribs) (Updated data box locations & removed wreck that doesn't exist) Tag: sourceedit |
Tag: rte-wysiwyg |
||
| Line 17: | Line 17: | ||
|- |
|- |
||
|[[File:SafeShallowsWreck-1.jpg|thumb]] |
|[[File:SafeShallowsWreck-1.jpg|thumb]] |
||
| style="text-align:center; font-size:12px;" | |
| style="text-align:center; font-size:12px;" | |
||
| style="text-align:left; font-size:12px;" | |
| style="text-align:left; font-size:12px;" | |
||
*[[Seamoth| |
*[[Seamoth| Fragments]] |
||
*[[Mobile Vehicle Bay| |
*[[Mobile Vehicle Bay| Fragments]] |
||
*[[Chair| |
*[[Chair| 1]] |
||
*[[Chair| |
*[[Chair| 3]] |
||
*[[Desk]] |
*[[Desk]] |
||
*[[Data_Downloads#Search_.26_Rescue:_Paul_Torgal|Abandoned PDA - Search & Rescue: Paul Torgal]] (-44 -29 -404) |
*[[Data_Downloads#Search_.26_Rescue:_Paul_Torgal|Abandoned PDA - Search & Rescue: Paul Torgal]] (-44 -29 -404) |
||
| Line 28: | Line 28: | ||
|- |
|- |
||
|[[File:SafeShallowsWreck-2.jpg|thumb]] |
|[[File:SafeShallowsWreck-2.jpg|thumb]] |
||
| style="text-align:center; font-size:12px;" | |
| style="text-align:center; font-size:12px;" | |
||
| style="text-align:left; font-size:12px;" | |
| style="text-align:left; font-size:12px;" | |
||
*[[Seamoth| |
*[[Seamoth| Fragments]] |
||
*[[Mobile Vehicle Bay| |
*[[Mobile Vehicle Bay| Fragments]] |
||
*[[Bioreactor| |
*[[Bioreactor| Fragments]] |
||
* |
|||
*[[Chair]] |
|||
*[[Chair| |
*[[Chair| 2]] |
||
*[[Desk]] |
*[[Desk]] |
||
| style="text-align:center; font-size:13px;" | 366 -6 -203 |
| style="text-align:center; font-size:13px;" | 366 -6 -203 |
||
|- |
|- |
||
|[[File:KelpForestWreck-1.jpg|thumb]] |
|[[File:KelpForestWreck-1.jpg|thumb]] |
||
| style="text-align:center; font-size:12px;" | |
| style="text-align:center; font-size:12px;" | |
||
| style="text-align:left; font-size:12px;" | |
| style="text-align:left; font-size:12px;" | |
||
*[[Mobile Vehicle Bay| |
*[[Mobile Vehicle Bay| Fragments]] |
||
*[[Bioreactor| |
*[[Bioreactor| Fragments]] |
||
*[[Stillsuit| |
*[[Stillsuit| Fragments]] |
||
* |
|||
*[[Bench]] |
|||
* |
|||
*[[Chair]] |
|||
*[[Desk]] |
*[[Desk]] |
||
| style="text-align:center; font-size:13px;" | 320 -40 -336 |
| style="text-align:center; font-size:13px;" | 320 -40 -336 |
||
|- |
|- |
||
|[[File:KelpForestWreck-3.jpg|thumb]] |
|[[File:KelpForestWreck-3.jpg|thumb]] |
||
| style="text-align:center; font-size:12px;" | |
| style="text-align:center; font-size:12px;" | |
||
| style="text-align:left; font-size:12px;" | |
| style="text-align:left; font-size:12px;" | |
||
*[[Stillsuit| |
*[[Stillsuit| Fragments]] |
||
* |
|||
*[[Chair]] |
|||
*[[Desk]] |
*[[Desk]] |
||
*[[Compass|Data Box - Compass]] |
*[[Compass|Data Box - Compass]] |
||
| Line 59: | Line 59: | ||
|- |
|- |
||
|[[File:KelpForestWreck-4.jpg|thumb]] |
|[[File:KelpForestWreck-4.jpg|thumb]] |
||
| style="text-align:center; font-size:12px;" | |
| style="text-align:center; font-size:12px;" | |
||
| style="text-align:left; font-size:12px;" | |
| style="text-align:left; font-size:12px;" | |
||
*[[Mobile Vehicle Bay| |
*[[Mobile Vehicle Bay| Fragments]] |
||
* |
|||
*[[Bench]] |
|||
* |
|||
*[[Chair]] |
|||
*[[Desk]] |
*[[Desk]] |
||
*[[Floodlight]] |
*[[Floodlight]] |
||
| Line 72: | Line 72: | ||
| style="text-align:center; font-size:12px;" |[[Grassy Plateaus]] |
| style="text-align:center; font-size:12px;" |[[Grassy Plateaus]] |
||
| style="text-align:left; font-size:12px;" | |
| style="text-align:left; font-size:12px;" | |
||
*[[Mobile Vehicle Bay| |
*[[Mobile Vehicle Bay| Fragments]] |
||
*[[Battery Charger|Battery Charger Fragments]] |
*[[Battery Charger|Battery Charger Fragments]] |
||
*[[Bioreactor| |
*[[Bioreactor| Fragments]] |
||
*[[Ultra Glide Fins|Data Box - Ultra Glide Fins]] |
*[[Ultra Glide Fins|Data Box - Ultra Glide Fins]] |
||
*[[Seamoth| |
*[[Seamoth| Fragments]] |
||
*[[Chair| |
*[[Chair| 1]] |
||
*[[Chair| |
*[[Chair| 3]] |
||
*[[Desk]] |
*[[Desk]] |
||
*[[Floodlight]] |
*[[Floodlight]] |
||
| Line 89: | Line 89: | ||
| style="text-align:center; font-size:12px;" |[[Grassy Plateaus]] |
| style="text-align:center; font-size:12px;" |[[Grassy Plateaus]] |
||
| style="text-align:left; font-size:12px;" | |
| style="text-align:left; font-size:12px;" | |
||
*[[Mobile Vehicle Bay| |
*[[Mobile Vehicle Bay| Fragments]] |
||
*[[Battery Charger|Battery Charger Fragments]] |
*[[Battery Charger|Battery Charger Fragments]] |
||
*[[Bioreactor| |
*[[Bioreactor| Fragments]] |
||
*[[Light Stick|Light Stick Fragments]] |
*[[Light Stick|Light Stick Fragments]] |
||
*[[Stillsuit| |
*[[Stillsuit| Fragments]] |
||
*[[Propulsion Cannon|Propulsion Cannon Fragments]] |
*[[Propulsion Cannon|Propulsion Cannon Fragments]] |
||
* |
|||
*[[Bench]] |
|||
*[[Floodlight]] |
*[[Floodlight]] |
||
*[[Picture Frame]] |
*[[Picture Frame]] |
||
| Line 108: | Line 108: | ||
| style="text-align:center; font-size:12px;" |[[Grassy Plateaus]] |
| style="text-align:center; font-size:12px;" |[[Grassy Plateaus]] |
||
| style="text-align:left; font-size:12px;" | |
| style="text-align:left; font-size:12px;" | |
||
*[[Seamoth| |
*[[Seamoth| Fragments]] |
||
*[[Battery Charger|Battery Charger Fragments]] |
*[[Battery Charger|Battery Charger Fragments]] |
||
*[[Bioreactor| |
*[[Bioreactor| Fragments]] |
||
*[[Stillsuit| |
*[[Stillsuit| Fragments]] |
||
*[[Propulsion Cannon|Propulsion Cannon Fragments]] |
*[[Propulsion Cannon|Propulsion Cannon Fragments]] |
||
*[[Chair| |
*[[Chair| 1]] |
||
*[[Desk]] |
*[[Desk]] |
||
| style="text-align:center; font-size:13px;" | -390 -120 648 |
| style="text-align:center; font-size:13px;" | -390 -120 648 |
||
| Line 120: | Line 120: | ||
| style="text-align:center; font-size:12px;" |[[Grassy Plateaus]] |
| style="text-align:center; font-size:12px;" |[[Grassy Plateaus]] |
||
| style="text-align:left; font-size:12px;" | |
| style="text-align:left; font-size:12px;" | |
||
*[[Seamoth| |
*[[Seamoth| Fragments]] |
||
*[[Battery Charger|Battery Charger Fragments]] |
*[[Battery Charger|Battery Charger Fragments]] |
||
*[[Bioreactor| |
*[[Bioreactor| Fragments]] |
||
*[[Stillsuit| |
*[[Stillsuit| Fragments]] |
||
*[[Mobile Vehicle Bay| |
*[[Mobile Vehicle Bay| Fragments]] |
||
*[[Prawn Suit|Prawn Suit Claw Arm Fragments]] |
*[[Prawn Suit|Prawn Suit Claw Arm Fragments]] |
||
* |
|||
*[[Bench]] |
|||
*[[Chair| |
*[[Chair| 1]] |
||
*[[Chair| |
*[[Chair| 3]] |
||
*[[Desk]] |
*[[Desk]] |
||
*[[Picture Frame]] |
*[[Picture Frame]] |
||
| Line 141: | Line 141: | ||
| style="text-align:left; font-size:12px;" | |
| style="text-align:left; font-size:12px;" | |
||
*[[Battery Charger|Battery Charger Fragments]] |
*[[Battery Charger|Battery Charger Fragments]] |
||
*[[Bioreactor| |
*[[Bioreactor| Fragments]] |
||
*[[Stillsuit| |
*[[Stillsuit| Fragments]] |
||
*[[Mobile Vehicle Bay| |
*[[Mobile Vehicle Bay| Fragments]] |
||
*[[Chair| |
*[[Chair| 1]] |
||
*[[Chair| |
*[[Chair| 3]] |
||
*[[Desk]] |
*[[Desk]] |
||
*[[Ultra High Capacity Tank|Data Box - Ultra High Capacity Tank]] |
*[[Ultra High Capacity Tank|Data Box - Ultra High Capacity Tank]] |
||
| Line 155: | Line 155: | ||
*[[Light Stick|Light Stick Fragments]] |
*[[Light Stick|Light Stick Fragments]] |
||
*[[Stasis Rifle|Stasis Rifle Fragments]] |
*[[Stasis Rifle|Stasis Rifle Fragments]] |
||
*[[ |
*[[Modification Station|Modification Station Fragments]] |
||
*[[Stillsuit| |
*[[Stillsuit| Fragments]] |
||
*[[Power Transmitter|Power Transmitter Fragments]] |
*[[Power Transmitter|Power Transmitter Fragments]] |
||
*[[Interior Growbed]] |
*[[Interior Growbed]] |
||
| Line 162: | Line 162: | ||
*[[Plant Pot|Basic Plant Pot]] |
*[[Plant Pot|Basic Plant Pot]] |
||
*[[Plant Pot|Chic Plant Pot]] |
*[[Plant Pot|Chic Plant Pot]] |
||
*[[Chair| |
*[[Chair| 1]] |
||
*[[Chair| |
*[[Chair| 3]] |
||
* |
|||
*[[Bench]] |
|||
*[[Cyclops Sonar Upgrade|Data Box - Cyclops Sonar Upgrade]] |
*[[Cyclops Sonar Upgrade|Data Box - Cyclops Sonar Upgrade]] |
||
*[[Data_Downloads#The_Charter|Abandoned PDA - The Charter]] (912 -202 610) |
*[[Data_Downloads#The_Charter|Abandoned PDA - The Charter]] (912 -202 610) |
||
| Line 181: | Line 181: | ||
*[[Prawn Suit Propulsion Cannon|Prawn Suit Propulsion Cannon Fragments]] |
*[[Prawn Suit Propulsion Cannon|Prawn Suit Propulsion Cannon Fragments]] |
||
*[[Propulsion Cannon|Propulsion Cannon Fragments]] |
*[[Propulsion Cannon|Propulsion Cannon Fragments]] |
||
*[[Chair| |
*[[Chair| 1]] |
||
*[[Chair| |
*[[Chair| 3]] |
||
* |
|||
*[[Bench]] |
|||
*[[Data Boxes|Data Box]] |
*[[Data Boxes|Data Box]] |
||
*[[Desk]] |
*[[Desk]] |
||
| Line 200: | Line 200: | ||
*[[Modification Station|Modification Station Fragments]] |
*[[Modification Station|Modification Station Fragments]] |
||
*[[Vehicle Modification Station|Vehicle Modification Station Fragments]] |
*[[Vehicle Modification Station|Vehicle Modification Station Fragments]] |
||
*[[Stillsuit| |
*[[Stillsuit| Fragments]] |
||
*[[Moonpool|Moonpool Fragments]] |
*[[Moonpool|Moonpool Fragments]] |
||
*[[Reinforced Dive Suit|Reinforced Dive Suit Fragments]] |
*[[Reinforced Dive Suit|Reinforced Dive Suit Fragments]] |
||
| Line 222: | Line 222: | ||
| style="text-align:left; font-size:12px;" | |
| style="text-align:left; font-size:12px;" | |
||
*[[Cyclops|Cyclops Engine Fragments]] |
*[[Cyclops|Cyclops Engine Fragments]] |
||
*[[Stillsuit| |
*[[Stillsuit| Fragments]] |
||
*[[Moonpool|Moonpool Fragments]] |
*[[Moonpool|Moonpool Fragments]] |
||
*[[Reinforced Dive Suit|Reinforced Dive Suit Fragments]] |
*[[Reinforced Dive Suit|Reinforced Dive Suit Fragments]] |
||
| Line 229: | Line 229: | ||
*[[Prawn Suit Grappling Arm|Prawn Suit Grappling Arm Fragments]] |
*[[Prawn Suit Grappling Arm|Prawn Suit Grappling Arm Fragments]] |
||
*[[Prawn Suit Torpedo Arm|Prawn Suit Torpedo Arm Fragments]] |
*[[Prawn Suit Torpedo Arm|Prawn Suit Torpedo Arm Fragments]] |
||
*[[Chair| |
*[[Chair| 2]] |
||
*[[Desk]] |
*[[Desk]] |
||
*[[Floodlight]] |
*[[Floodlight]] |
||
| Line 243: | Line 243: | ||
*[[Power Transmitter|Power Transmitter Fragments]] |
*[[Power Transmitter|Power Transmitter Fragments]] |
||
*[[Vehicle Modification Station|Vehicle Modification Station Fragments]] |
*[[Vehicle Modification Station|Vehicle Modification Station Fragments]] |
||
* |
|||
*[[Bench]] |
|||
*[[Chair| |
*[[Chair| 2]] |
||
*[[Chair| |
*[[Chair| 3]] |
||
*[[Desk]] |
*[[Desk]] |
||
*[[Floodlight]] |
*[[Floodlight]] |
||
| Line 265: | Line 265: | ||
*[[Prawn Suit Grappling Arm|Prawn Suit Grappling Arm Fragments]] |
*[[Prawn Suit Grappling Arm|Prawn Suit Grappling Arm Fragments]] |
||
*[[Prawn Suit Drill Arm|Prawn Suit Drill Arm Fragments]] |
*[[Prawn Suit Drill Arm|Prawn Suit Drill Arm Fragments]] |
||
* |
|||
*[[Bench]] |
|||
*[[Chair| |
*[[Chair| 1]] |
||
*[[Chair| |
*[[Chair| 3]] |
||
*[[Desk]] |
*[[Desk]] |
||
*[[Floodlight]] |
*[[Floodlight]] |
||
| Line 285: | Line 285: | ||
*[[Prawn Suit Propulsion Cannon|Prawn Suit Propulsion Cannon Fragments]] |
*[[Prawn Suit Propulsion Cannon|Prawn Suit Propulsion Cannon Fragments]] |
||
*[[Nuclear Reactor|Nuclear Reactor Fragments]] |
*[[Nuclear Reactor|Nuclear Reactor Fragments]] |
||
*[[Stillsuit| |
*[[Stillsuit| Fragments]] |
||
* |
|||
*[[Bench]] |
|||
*[[Chair| |
*[[Chair| 1]] |
||
*[[Desk]] |
*[[Desk]] |
||
*[[Floodlight]] |
*[[Floodlight]] |
||
| Line 311: | Line 311: | ||
*[[Nuclear Reactor|Nuclear Reactor Fragments]] |
*[[Nuclear Reactor|Nuclear Reactor Fragments]] |
||
*[[Reinforced Dive Suit|Reinforced Dive Suit Fragments]] |
*[[Reinforced Dive Suit|Reinforced Dive Suit Fragments]] |
||
*[[Chair| |
*[[Chair| 2]] |
||
*[[Desk]] |
*[[Desk]] |
||
*[[Floodlight]] |
*[[Floodlight]] |
||
| Line 330: | Line 330: | ||
*[[Thermal Plant|Thermal Plant Fragments]] |
*[[Thermal Plant|Thermal Plant Fragments]] |
||
*[[Reinforced Dive Suit|Reinforced Dive Suit Fragments]] |
*[[Reinforced Dive Suit|Reinforced Dive Suit Fragments]] |
||
*[[Chair| |
*[[Chair| 1]] |
||
*[[Desk]] |
*[[Desk]] |
||
*[[Cyclops Docking Bay Repair Module|Data Box - Cyclops Docking Bay Repair Module]] |
*[[Cyclops Docking Bay Repair Module|Data Box - Cyclops Docking Bay Repair Module]] |
||
| Line 349: | Line 349: | ||
*[[Reinforced Dive Suit|Reinforced Dive Suit Fragments]] |
*[[Reinforced Dive Suit|Reinforced Dive Suit Fragments]] |
||
*[[Beds|Bed 1]] |
*[[Beds|Bed 1]] |
||
*[[Chair| |
*[[Chair| 1]] |
||
*[[Chair 3]] |
*[[Chair 3| 3]] |
||
*[[Desk]] |
*[[Desk]] |
||
*[[Cyclops Decoy Tube Upgrade|Data Box - Cyclops Decoy Tube Upgrade]] |
*[[Cyclops Decoy Tube Upgrade|Data Box - Cyclops Decoy Tube Upgrade]] |
||
Revision as of 13:23, 14 May 2017
.png)
|
Read at own risk This article contains unmarked spoilers. Players new to the game would want to avoid or be cautious toward this article. |
Template:Infobox Biome The Wrecks are explorable pieces of debris from the Aurora[1]. They have wide range of sizes. Large Wrecks contain valuable technology in the form of Fragments and sometimes Data Boxes, while Small Wrecks contain only Vac-packs.
Large Wrecks
There are 21 Large Wrecks spread throughout the ocean after the Aurora explodes. Each of them are surrounded by their local Flora and Fauna and possess their own unique challenges. Many of them include sections that are only accessible with the Laser Cutter. While each contains a unique set of fragments, there are common items found in many Wrecks, for example, chairs and desks.
Large Wreck List


Small Wrecks
Small Wrecks can be found surrounding the Large Wrecks and inside the Crash Zone. They can contain useful items and fragments.
| Image | Biome | Items | Coordinates |
|---|---|---|---|
| Safe Shallows | 20 -10 300 | ||
| Safe Shallows | 90 -20 120 | ||
| Safe Shallows | 65 -10 -85 | ||
| Safe Shallows | -160 -20 -225 | ||
| Safe Shallows | 175 -23 -253 | ||
| Safe Shallows | 310 -23 -119 | ||
| Grassy Plateaus | 165 -86 -520 | ||
| Grassy Plateaus | 322 -90 222 | ||
| Grassy Plateaus | 270 -85 70 | ||
| Grassy Plateaus | -370 -100 475 | ||
| Grassy Plateaus | -284 -93 606 | ||
| Grassy Plateaus | -520 -90 -215 |


Future Plans
Gallery
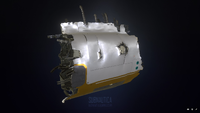
Large Explorable Wreck Model from Sketchfab
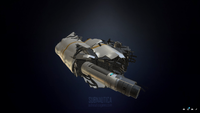
Another Large Explorable Wreck Model from Sketchfab

Small Explorable Wreck's Model from Sketchfab
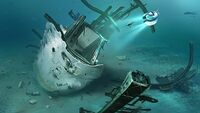
Large Explorable Wreck's Concept Art
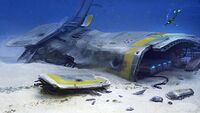
Small Explorable Wreck's Concept Art

Small Wreckage, found in the Crash Zone


.jpg)
For a more complete gallery, see Wrecks/Gallery.