
Wrecks: Difference between revisions
(Named more PDAs and fixed more fragment lists.) Tags: Visual edit apiedit |
(Named remaining PDAs and updated last bunch of fragments. Also, tidied up the small wrecks.) Tags: Visual edit apiedit |
||
| Line 144: | Line 144: | ||
*[[Data Downloads|Abandoned PDA]] |
*[[Data Downloads|Abandoned PDA]] |
||
*Search & Rescue: Marguerit Maida |
*Search & Rescue: Marguerit Maida |
||
| style="text-align:center; font-size:13px;" | - |
| style="text-align:center; font-size:13px;" | -635 -50 -2 |
||
|- |
|- |
||
|[[File:GrassyPlateausWreck-5.jpg|thumb|160px]] |
|[[File:GrassyPlateausWreck-5.jpg|thumb|160px]] |
||
| Line 260: | Line 260: | ||
*[[Cyclops|Cyclops Hull Fragments]] |
*[[Cyclops|Cyclops Hull Fragments]] |
||
*[[Cyclops|Cyclops Bridge Fragments]] |
*[[Cyclops|Cyclops Bridge Fragments]] |
||
| ⚫ | |||
*[[Prawn Suit|Prawn Suit Fragments]] |
*[[Prawn Suit|Prawn Suit Fragments]] |
||
*[[Nuclear Reactor|Nuclear Reactor Fragments]] |
*[[Nuclear Reactor|Nuclear Reactor Fragments]] |
||
*[[Stillsuit|Stillsuit Fragments]] |
*[[Stillsuit|Stillsuit Fragments]] |
||
*[[Bench]] |
*[[Bench]] |
||
*[[Chair]] |
*[[Chair|Chair 1]] |
||
*[[Desk]] |
*[[Desk]] |
||
*[[Floodlight]] |
*[[Floodlight]] |
||
| Line 271: | Line 270: | ||
*[[Plant Pot 2]] |
*[[Plant Pot 2]] |
||
*[[Plant Shelf]] |
*[[Plant Shelf]] |
||
*[[Data Downloads|Abandoned PDA]] |
|||
*Alterra Alms Pamphlet |
|||
| style="text-align:center; font-size:13px;" | -1083 -190 -735 |
| style="text-align:center; font-size:13px;" | -1083 -190 -735 |
||
|- |
|- |
||
| Line 277: | Line 278: | ||
| style="text-align:left; font-size:12px;" | |
| style="text-align:left; font-size:12px;" | |
||
*[[Alien Containment|Alien Containment Fragments]] |
*[[Alien Containment|Alien Containment Fragments]] |
||
| ⚫ | |||
| ⚫ | |||
*[[Cyclops Pressure Compensator|Cyclops Pressure Compensator Fragments]] |
*[[Cyclops Pressure Compensator|Cyclops Pressure Compensator Fragments]] |
||
*[[Power Transmitter|Power Transmitter Fragments]] |
|||
*[[Modification Station|Modification Station Fragments]] |
*[[Modification Station|Modification Station Fragments]] |
||
| ⚫ | |||
*[[Nuclear Reactor|Nuclear Reactor Fragments]] |
*[[Nuclear Reactor|Nuclear Reactor Fragments]] |
||
*[[Reinforced Dive Suit|Reinforced Dive Suit Fragments]] |
|||
*[[Chair|Chair 2]] |
|||
*[[Desk]] |
|||
*[[Floodlight]] |
*[[Floodlight]] |
||
*[[Data Downloads|Abandoned PDA]] |
*[[Data Downloads|Abandoned PDA]] |
||
*Join Alterra's Board of Directors |
|||
| style="text-align:center; font-size:13px;" | -1208 -332 -390 |
| style="text-align:center; font-size:13px;" | -1208 -332 -390 |
||
|- |
|- |
||
| Line 295: | Line 302: | ||
*[[Thermal Plant|Thermal Plant Fragments]] |
*[[Thermal Plant|Thermal Plant Fragments]] |
||
*[[Reinforced Dive Suit|Reinforced Dive Suit Fragments]] |
*[[Reinforced Dive Suit|Reinforced Dive Suit Fragments]] |
||
*[[Chair]] |
*[[Chair|Chair 1]] |
||
*[[Desk]] |
*[[Desk]] |
||
*[[Data Downloads|Abandoned PDA]] |
|||
*Torgal Corp. |
|||
| style="text-align:center; font-size:13px;" | -284 -250 -850 |
| style="text-align:center; font-size:13px;" | -284 -250 -850 |
||
|- |
|- |
||
| Line 303: | Line 312: | ||
| style="text-align:left; font-size:12px;" | |
| style="text-align:left; font-size:12px;" | |
||
*[[Cyclops Pressure Compensator|Cyclops Pressure Compensator Fragments]] |
*[[Cyclops Pressure Compensator|Cyclops Pressure Compensator Fragments]] |
||
| ⚫ | |||
| ⚫ | |||
*[[Moonpool|Moonpool Fragments]] |
*[[Moonpool|Moonpool Fragments]] |
||
*[[Scanner Room|Scanner Room Fragments]] |
*[[Scanner Room|Scanner Room Fragments]] |
||
*[[Vehicle Modification Station|Vehicle Modification Station Fragments]] |
|||
*[[Thermal Plant|Thermal Plant Fragments]] |
*[[Thermal Plant|Thermal Plant Fragments]] |
||
*[[Reinforced Dive Suit|Reinforced Dive Suit Fragments]] |
|||
*[[Bed 1]] |
*[[Bed 1]] |
||
*[[Chair]] |
*[[Chair|Chair 1]] |
||
*[[Chair 3]] |
*[[Chair 3]] |
||
*[[Desk]] |
*[[Desk]] |
||
*[[Wall Shelves]] |
|||
| ⚫ | |||
* [[Data Downloads|Abandoned PDA]] x2 |
* [[Data Downloads|Abandoned PDA]] x2 |
||
* Surveillance Log, Leisure Deck #2 |
|||
* Surveillance Log, Leisure Deck #3 |
|||
| style="text-align:center; font-size:13px;" | -865 -430 -1420 |
| style="text-align:center; font-size:13px;" | -865 -430 -1420 |
||
|} |
|} |
||
| Line 336: | Line 346: | ||
|[[File:SafeShallowsSmallWreck-2.jpg|thumb|160px]] |
|[[File:SafeShallowsSmallWreck-2.jpg|thumb|160px]] |
||
| style="text-align:center; font-size:12px;" |[[Safe Shallows]] |
| style="text-align:center; font-size:12px;" |[[Safe Shallows]] |
||
| style="text-align:left; font-size:12px;" | |
| style="text-align:left; font-size:12px;" | |
||
| style="text-align:center; font-size:13px;" | 90 -20 120 |
| style="text-align:center; font-size:13px;" | 90 -20 120 |
||
|- |
|- |
||
| Line 348: | Line 358: | ||
| style="text-align:center; font-size:12px;" |[[Safe Shallows]] |
| style="text-align:center; font-size:12px;" |[[Safe Shallows]] |
||
| style="text-align:left; font-size:12px;" | |
| style="text-align:left; font-size:12px;" | |
||
*[[Luggage Bag]] x2 |
|||
*[[Lab Counter]] |
*[[Lab Counter]] |
||
| style="text-align:center; font-size:13px;" | -160 -20 -225 |
| style="text-align:center; font-size:13px;" | -160 -20 -225 |
||
| Line 358: | Line 367: | ||
*[[Trash Can]] |
*[[Trash Can]] |
||
*[[Biohazard Trash Can]] |
*[[Biohazard Trash Can]] |
||
*[[Lab Equipment]] |
*[[Lab Equipment]] |
||
*[[Luggage Bag]] x2 |
|||
| style="text-align:center; font-size:13px;" | 175 -23 -253 |
| style="text-align:center; font-size:13px;" | 175 -23 -253 |
||
|- |
|- |
||
| Line 366: | Line 374: | ||
| style="text-align:left; font-size:12px;" | |
| style="text-align:left; font-size:12px;" | |
||
*[[Coffee Vending Machine]] |
*[[Coffee Vending Machine]] |
||
*[[Luggage Bag]] |
|||
| style="text-align:center; font-size:13px;" | 310 -23 -119 |
| style="text-align:center; font-size:13px;" | 310 -23 -119 |
||
|- |
|||
|[[File:SafeShallowsSmallWreck-7.jpg|thumb|160px]] |
|||
| style="text-align:center; font-size:12px;" |[[Safe Shallows]] |
|||
| style="text-align:left; font-size:12px;" | |
|||
*[[Supply Crate]]s |
|||
| style="text-align:center; font-size:13px;" | 527 -23 -43 |
|||
|- |
|- |
||
|[[File:GrassyPlateausSmallWreck-1.jpg|thumb|160px]] |
|[[File:GrassyPlateausSmallWreck-1.jpg|thumb|160px]] |
||
| style="text-align:center; font-size:12px;" |[[Grassy Plateaus]] |
| style="text-align:center; font-size:12px;" |[[Grassy Plateaus]] |
||
| style="text-align:left; font-size:12px;" | |
| style="text-align:left; font-size:12px;" | |
||
| ⚫ | |||
| style="text-align:center; font-size:13px;" | 165 -86 -520 |
| style="text-align:center; font-size:13px;" | 165 -86 -520 |
||
|- |
|- |
||
| Line 384: | Line 385: | ||
| style="text-align:center; font-size:12px;" |[[Grassy Plateaus]] |
| style="text-align:center; font-size:12px;" |[[Grassy Plateaus]] |
||
| style="text-align:left; font-size:12px;" | |
| style="text-align:left; font-size:12px;" | |
||
| ⚫ | |||
*[[Bioreactor|Bioreactor Fragments]] |
|||
*[[Coffee Vending Machine]] |
|||
*[[Bar Table]] |
*[[Bar Table]] |
||
*[[Trash Can]] |
*[[Trash Can]] |
||
| style="text-align:center; font-size:13px;" | |
| style="text-align:center; font-size:13px;" | 322 -90 222 |
||
|- |
|- |
||
|[[File:GrassyPlateausSmallWreck-3.jpg|thumb|160px]] |
|[[File:GrassyPlateausSmallWreck-3.jpg|thumb|160px]] |
||
| style="text-align:center; font-size:12px;" |[[Grassy Plateaus]] |
| style="text-align:center; font-size:12px;" |[[Grassy Plateaus]] |
||
| style="text-align:left; font-size:12px;" | |
| style="text-align:left; font-size:12px;" | |
||
| ⚫ | |||
| ⚫ | |||
*[[Biohazard Trash Can]] |
*[[Biohazard Trash Can]] |
||
| style="text-align:center; font-size:13px;" | 270 -85 70 |
| style="text-align:center; font-size:13px;" | 270 -85 70 |
||
| Line 400: | Line 400: | ||
| style="text-align:center; font-size:12px;" |[[Grassy Plateaus]] |
| style="text-align:center; font-size:12px;" |[[Grassy Plateaus]] |
||
| style="text-align:left; font-size:12px;" | |
| style="text-align:left; font-size:12px;" | |
||
*[[ |
*[[Bioreactor|Bioreactor Fragments]] |
||
| style="text-align:center; font-size:13px;" | -370 -100 475 |
| style="text-align:center; font-size:13px;" | -370 -100 475 |
||
|- |
|- |
||
| Line 406: | Line 406: | ||
| style="text-align:center; font-size:12px;" |[[Grassy Plateaus]] |
| style="text-align:center; font-size:12px;" |[[Grassy Plateaus]] |
||
| style="text-align:left; font-size:12px;" | |
| style="text-align:left; font-size:12px;" | |
||
| ⚫ | |||
*[[Bioreactor|Bioreactor Fragments]] |
|||
| ⚫ | |||
| style="text-align:center; font-size:13px;" | -284 -93 606 |
| style="text-align:center; font-size:13px;" | -284 -93 606 |
||
|- |
|- |
||
| Line 414: | Line 412: | ||
| style="text-align:center; font-size:12px;" |[[Grassy Plateaus]] |
| style="text-align:center; font-size:12px;" |[[Grassy Plateaus]] |
||
| style="text-align:left; font-size:12px;" | |
| style="text-align:left; font-size:12px;" | |
||
| ⚫ | |||
*[[Luggage Bag]] |
|||
*[[Vending Machine]] |
*[[Vending Machine]] |
||
| style="text-align:center; font-size:13px;" | -520 -90 -215 |
| style="text-align:center; font-size:13px;" | -520 -90 -215 |
||
Revision as of 04:04, 5 February 2017

|
This seems new This article contains information that is updated for the latest Experimental Version of Subnautica. Players using stable mode may find this information inaccurate. |
Template:Infobox Biome The Wrecks are explorable pieces of debris from the Aurora, which can only be located after its explosion. They have wide range of sizes. Large Wrecks contain valuable technology in the form of Fragments while Small Wrecks contain only Supply Crates.
Large Wrecks
There are 20 Large Wrecks spread throughout the ocean after the Aurora explodes. Each of them are surrounded by their local Flora and Fauna and possess their own unique challenges. Many of them include sections that are only accessible with the Laser Cutter. While each contains a unique set of fragments, there are common items found in many wrecks.
Large Wreck List


Small Wrecks
Small Wrecks can be found surrounding the Large Wrecks and inside the Crash Zone. They can contain useful items and fragments.
| Image | Biome | Items | Coordinates |
|---|---|---|---|
| Safe Shallows | 20 -10 300 | ||
| Safe Shallows | 90 -20 120 | ||
| Safe Shallows | 65 -10 -85 | ||
| Safe Shallows | -160 -20 -225 | ||
| Safe Shallows | 175 -23 -253 | ||
| Safe Shallows | 310 -23 -119 | ||
| Grassy Plateaus | 165 -86 -520 | ||
| Grassy Plateaus | 322 -90 222 | ||
| Grassy Plateaus | 270 -85 70 | ||
| Grassy Plateaus | -370 -100 475 | ||
| Grassy Plateaus | -284 -93 606 | ||
| Grassy Plateaus | -520 -90 -215 |


Gallery
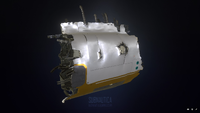
Large Explorable Wreck Model from Sketchfab
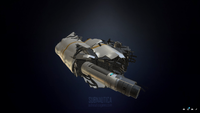
Another Large Explorable Wreck Model from Sketchfab

Small Explorable Wreck's Model from Sketchfab
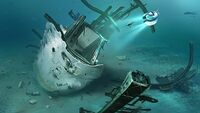
Large Explorable Wreck's Concept Art
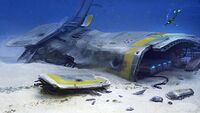
Small Explorable Wreck's Concept Art

Small wreckage, found in the Crash Zone


.jpg)
For a more complete gallery, see Wrecks/Gallery.