
Harvesting Nodes: Difference between revisions
Tags: Visual edit apiedit |
Tags: Visual edit apiedit |
||
| Line 4: | Line 4: | ||
==Harvesting Nodes== |
==Harvesting Nodes== |
||
{| class=" |
{| style="width: 100%;" class="article-table sortable" border="0" cellpadding="1" cellspacing="1" |
||
|- |
|- |
||
! class="unsortable" style="width: 20%; text-align: center;" |Nodes |
|||
! scope="col" |Image |
|||
! class="unsortable" style="width: 40%; text-align: left;" |Content |
|||
! scope="col" |Type |
|||
! class="unsortable" style="width: 40%; text-align: left;" |Biomes |
|||
! scope="col" |Content |
|||
! scope="col" |Biomes |
|||
|- |
|- |
||
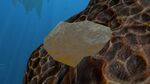
|[[File:Basalt1.jpg| |
| style="text-align:center; font-size:12px;" |[[File:Basalt1.jpg|150px|center|link=Basalt Outcrop]] |
||
[[Basalt Outcrop]] |
|||
| style="text-align:left; font-size:12px;" | |
|||
|[[Diamond]], [[Gold]], [[Uranium]] |
|||
| ⚫ | |||
|[[Caves]], [[Grand Reef]], [[Lava Geyser]], [[Mushroom Forest]], [[Underwater Islands]], |
|||
* [[Gold]] |
|||
| style="text-align:left; font-size:12px;" | |
|||
* [[Caves]] |
|||
* [[Grand Reef]] |
|||
* [[Lava Geyser]] |
|||
* [[Mushroom Forest]] |
|||
* [[Underwater Islands]] |
|||
|- |
|- |
||
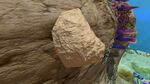
|[[File:Limestone01.jpg| |
| style="text-align:center; font-size:12px;" |[[File:Limestone01.jpg|150px|center|link=Limestone Outcrop]] |
||
[[Limestone Outcrop]] |
|||
| style="text-align:left; font-size:12px;" | |
|||
|[[Copper Ore]], [[Titanium]], [[Lead]] |
|||
* [[Titanium]] |
|||
|[[Caves]], [[Inactive Lava Zone]], [[Kelp Forest]], [[Safe Shallows]], [[Sparse Reef]], [[Underwater Islands]] |
|||
* [[Lead]] |
|||
* [[Copper Ore]] |
|||
| style="text-align:left; font-size:12px;" | |
|||
* [[Caves]] |
|||
| ⚫ | |||
* [[Kelp Forest]] |
|||
* [[Safe Shallows]] |
|||
* [[Sparse Reef]] |
|||
* [[Underwater Islands]] |
|||
|- |
|- |
||
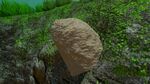
|[[File:Sandstone1.jpg| |
| style="text-align:center; font-size:12px;" |[[File:Sandstone1.jpg|150px|center|link=Sandstone Outcrop]] |
||
[[Sandstone Outcrop]] |
|||
| style="text-align:left; font-size:12px;" | |
|||
| ⚫ | |||
* [[Gold]] |
|||
|[[Caves]], [[Dunes]], [[Grassy Plateaus]], [[Kelp Forest]], [[Kelp Forest Caves]], [[Mushroom Forest]], [[Safe Shallows Caves]], [[Safe Shallows]] |
|||
| ⚫ | |||
| style="text-align:left; font-size:12px;" | |
|||
* [[Caves]] |
|||
* [[Dunes]] |
|||
* [[Grassy Plateaus]] |
|||
* [[Kelp Forest]] |
|||
* [[Kelp Forest Caves]] |
|||
* [[Mushroom Forest]] |
|||
* [[Safe Shallows Caves]] |
|||
* [[Safe Shallows]] |
|||
|- |
|- |
||
|[[File:Shale01.jpg| |
| style="text-align:center; font-size:12px;" |[[File:Shale01.jpg|150px|center|link=Shale Outcrop]] |
||
[[Shale Outcrop]] |
|||
| style="text-align:left; font-size:12px;" | |
|||
| ⚫ | |||
* [[Gold]] |
|||
|[[Jelly Shroom Caves]], [[Koosh Zone]], [[Lava Caves]], [[Mushroom Forest Caves]] |
|||
| ⚫ | |||
| style="text-align:left; font-size:12px;" | |
|||
* [[Jelly Shroom Caves]] |
|||
* [[Koosh Zone]] |
|||
* [[Lava Caves]] |
|||
* [[Mushroom Forest Caves]] |
|||
|- |
|- |
||
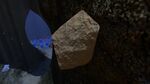
|[[File:ObsidianOutcrop.jpg| |
| style="text-align:center; font-size:12px;" |[[File:ObsidianOutcrop.jpg|150px|center|link=Obsidian Outcrop]] |
||
[[Obsidian Outcrop]] |
|||
| style="text-align:left; font-size:12px;" | |
|||
| ⚫ | |||
* Diamond |
|||
| ⚫ | |||
| style="text-align:left; font-size:12px;" | |
|||
* [[Inactive Lava Zone]] |
|||
|} |
|} |
||
Revision as of 01:09, 9 August 2016
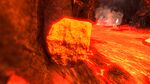
Harvesting Nodes are mineral deposits that can be broken up by the player to reveal the materials inside. Each Harvesting Node drops a different set of Raw Materials. All Harvesting Nodes use the same textures but vary slightly in size.
While Harvesting Nodes can be broken by the players hands, many tools have bash animations to break them. Breaking a node with the knife will decrement the knife's durability. Harvesting Nodes, despite their static nature, can be picked up and launched by the Propulsion Cannon. They will break on impact.
Harvesting Nodes
| Nodes | Content | Biomes |
|---|---|---|
 |
||
 |
||
 |
||
 |
||
 |
|
Gallery
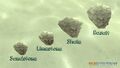
Size difference
