
Wrecks: Difference between revisions
(Corrected Vac-Pack) |
m (Fixed links) |
||
| Line 21: | Line 21: | ||
|[[File:BloodKelpWreck-1.jpg|thumb]] |
|[[File:BloodKelpWreck-1.jpg|thumb]] |
||
| style="text-align:left; font-size:12px;" | |
| style="text-align:left; font-size:12px;" | |
||
*[[ |
*[[Databank#Join Alterra.27s Board of Directors|Abandoned PDA - Join Alterra's Board of Directors]] (-1210 -340 -394) |
||
*[[Bench]] |
*[[Bench]] |
||
*[[Chair|Command Chair]] |
*[[Chair|Command Chair]] |
||
| Line 50: | Line 50: | ||
|[[File:20170604125129_1.jpg|thumb]] |
|[[File:20170604125129_1.jpg|thumb]] |
||
| style="text-align:left; font-size:12px;" | |
| style="text-align:left; font-size:12px;" | |
||
*[[ |
*[[Databank#The Charter|Abandoned PDA - The Charter]] (912 -202 610) |
||
*[[Plant Pot|Basic Plant Pot]] |
*[[Plant Pot|Basic Plant Pot]] |
||
*[[Bench]] |
*[[Bench]] |
||
| Line 108: | Line 108: | ||
|[[File:DunesWreck-1.jpg|thumb]] |
|[[File:DunesWreck-1.jpg|thumb]] |
||
| style="text-align:left; font-size:12px;" | |
| style="text-align:left; font-size:12px;" | |
||
*[[ |
*[[Databank#Profitability Projections|Abandoned PDA - Profitability Projections]] (-1397 -330 729) |
||
*[[Bench]] |
*[[Bench]] |
||
*[[Chair|Swivel Chair]] |
*[[Chair|Swivel Chair]] |
||
| Line 179: | Line 179: | ||
|[[File:Grand Reef Wreck 1.png|thumb]] |
|[[File:Grand Reef Wreck 1.png|thumb]] |
||
| style="text-align:left; font-size:12px;" | |
| style="text-align:left; font-size:12px;" | |
||
*[[ |
*[[Databank#Corporate Profile: Torgal Corp.|Abandoned PDA - Corporate Profile: Torgal Corp.]] (-273 -254 -788) |
||
*[[Bench]] |
*[[Bench]] |
||
*[[Chair|Command Chair]] |
*[[Chair|Command Chair]] |
||
| Line 198: | Line 198: | ||
|[[File:Grand Reef Wreck 2.png|thumb]] |
|[[File:Grand Reef Wreck 2.png|thumb]] |
||
| style="text-align:left; font-size:12px;" | |
| style="text-align:left; font-size:12px;" | |
||
*[[ |
*[[Databank#Surveillance Log.2C Leisure Deck B|Abandoned PDA - Surveillance Log, Leisure Deck B]] (-888 -446 -1422) |
||
*[[Caps|Blue Cap]] |
*[[Caps|Blue Cap]] |
||
*[[Carry-all]] |
*[[Carry-all]] |
||
| Line 233: | Line 233: | ||
|[[File:Grassy_Plateaus_Wreck_no1.jpg|thumb]] |
|[[File:Grassy_Plateaus_Wreck_no1.jpg|thumb]] |
||
| style="text-align:left; font-size:12px;" | |
| style="text-align:left; font-size:12px;" | |
||
*[[ |
*[[Databank#Trans-Gov Profile: Mongolian Independent States|Abandoned PDA - Trans-Gov Profile: Mongolian Independent States]] (-28 -106 -607) |
||
*[[Bar Table]] |
*[[Bar Table]] |
||
*[[Battery Charger|Battery Charger Fragments]] |
*[[Battery Charger|Battery Charger Fragments]] |
||
| Line 297: | Line 297: | ||
|[[File:GrassyPlateausWreck-4.jpg|thumb]] |
|[[File:GrassyPlateausWreck-4.jpg|thumb]] |
||
| style="text-align:left; font-size:12px;" | |
| style="text-align:left; font-size:12px;" | |
||
*[[ |
*[[Databank#Alterra Citizen Testimonials|Abandoned PDA - Alterra Citizen Testimonials]] (-642 -111 -19) |
||
*[[ |
*[[Databank#Degasi Crew Manifest: Marguerit Maida|Abandoned PDA - Degasi Crew Manifest: Marguerit Maida]] (-632 -74 -9) |
||
*[[Battery Charger|Battery Charger Fragments]] |
*[[Battery Charger|Battery Charger Fragments]] |
||
*[[Bench]] |
*[[Bench]] |
||
| Line 363: | Line 363: | ||
|[[File:KelpForestWreck-4.jpg|thumb]] |
|[[File:KelpForestWreck-4.jpg|thumb]] |
||
| style="text-align:left; font-size:12px;" | |
| style="text-align:left; font-size:12px;" | |
||
*[[ |
*[[Databank#Degasi Crew Manifest: Bart Torgal|Abandoned PDA - Degasi Crew Manifest: Bart Torgal]] (62 -38 383) |
||
*[[Bench]] |
*[[Bench]] |
||
*[[Desk]] |
*[[Desk]] |
||
| Line 445: | Line 445: | ||
|[[File:MushroomForestWreck-1.jpg|thumb]] |
|[[File:MushroomForestWreck-1.jpg|thumb]] |
||
| style="text-align:left; font-size:12px;" | |
| style="text-align:left; font-size:12px;" | |
||
*[[ |
*[[Databank#Aurora Scanner Room Voice Log 2|Abandoned PDA - Aurora Scanner Room Voice Log]] (-662 -113 778) |
||
<!--*Aurora Scanner Room Voice Log (Encrypted Public Version) (-652 -122 782)--><!--This thing's a crate now...--> |
<!--*Aurora Scanner Room Voice Log (Encrypted Public Version) (-652 -122 782)--><!--This thing's a crate now...--> |
||
*[[Bench]] |
*[[Bench]] |
||
| Line 477: | Line 477: | ||
|[[File:SafeShallowsWreck-1.jpg|thumb]] |
|[[File:SafeShallowsWreck-1.jpg|thumb]] |
||
| style="text-align:left; font-size:12px;" | |
| style="text-align:left; font-size:12px;" | |
||
*[[ |
*[[Databank#Degasi Crew Manifest: Paul Torgal|Abandoned PDA - Degasi Crew Manifest: Paul Torgal]] (-44 -29 -404) |
||
*[[Beacon|Beacon Fragments]] |
*[[Beacon|Beacon Fragments]] |
||
*[[Grav Trap|Grav Trap Fragments]] |
*[[Grav Trap|Grav Trap Fragments]] |
||
| Line 516: | Line 516: | ||
|[[File:SeaTreadersWreck-1.jpg|thumb]] |
|[[File:SeaTreadersWreck-1.jpg|thumb]] |
||
| style="text-align:left; font-size:12px;" | |
| style="text-align:left; font-size:12px;" | |
||
*[[ |
*[[Databank#Alterra Alms Pamphlet|Abandoned PDA - Alterra Alms Pamphlet]] (-1139 -157 -733) |
||
*[[Bench]] |
*[[Bench]] |
||
*[[Chair|Command Chair]] |
*[[Chair|Command Chair]] |
||
Revision as of 17:08, 17 June 2020
.png)
|
Read at own risk This article contains unmarked spoilers. Players new to the game would want to avoid or be cautious toward this article. |
<infobox layout="stacked">
 <title source="title1">
   <default>Wrecks</default>
 </title>
 <image source="image1">
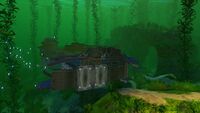
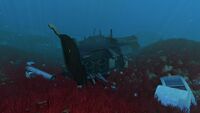
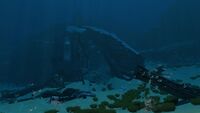
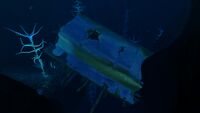
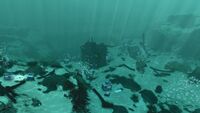
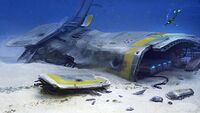
</image> <label>Tab</label> <label>Type</label> <label>Biome</label> <label>Depth Range</label> <label>Temperature Range</label> <label>Biome ID</label> <label>Harvesting Nodes</label> <label>goto ID</label> <label>Coordinates</label> <label>Base ID</label> <group> <label>Point of Interest</label> <label>Music</label> </group> </infobox> The Wrecks are explorable pieces of debris from the Aurora.[1] They have a wide range of sizes. Large Wrecks contain valuable technology in the form of Fragments and sometimes Data Boxes or Supply Crates, while Small Wrecks contain only a limited amount of fragments. Note: Certain fragments or data boxes won't spawn if one has already obtained the Blueprints and didn't load the area/wreck/biome beforehand. This does not include miscellaneous or some decorative interior or exterior modules such as Plant Pots or Beds.
Large Wrecks
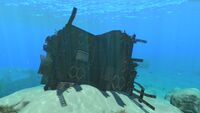
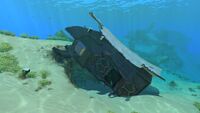
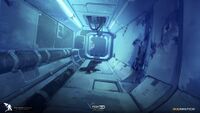
There are twenty-three Large Wrecks spread throughout the ocean at the beginning of the game. Each of them are surrounded by their local Flora and Fauna and possess their own unique challenges. Many of them include sections that are only accessible with the Laser Cutter or a Repair Tool or require unblocking the passage blocked with Cargo Crates or other debris with a Propulsion Cannon. While each contains a unique set of fragments, there are common items found in many Wrecks, for example chairs and desks.
Large Wreck List
Blood Kelp Trench=

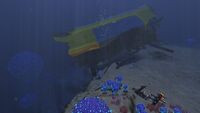
|-| Bulb Zone=


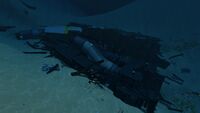
|-| Dunes=


|-| Grand Reef=


|-| Grassy Plateaus=


|-| Kelp Forest=
| Image | Items | Coordinates |
|---|---|---|
| -320 -57 252
(wreck18) | ||
| 65 -25 385
(wreck17) |


|-| Mountains=


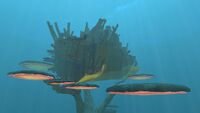
|-| Northwestern Mushroom Forest=

|-| Safe Shallows=
| Image | Items | Coordinates |
|---|---|---|
| -40 -14 -400
(wreck15) | ||
| 366 -6 -203
(wreck16) |


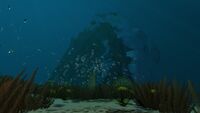
|-| Sea Treader's Path=

|-| Sparse Reef=

|-| Underwater Islands=

Small Wrecks
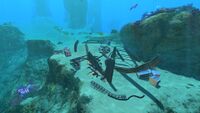
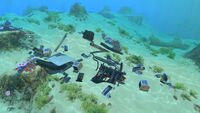
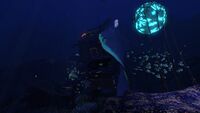
Small Wrecks, also known as Scatters, can be found surrounding the Large Wrecks. They can contain useful items and fragments.
Safe Shallows=
| Image | Items | Coordinates |
|---|---|---|
| 20 -10 300
(scatter36) | ||
| 90 -20 120
(scatter39) | ||
| 65 -10 -85
(scatter38) | ||
| -160 -20 -225
(scatter40) | ||
| 175 -23 -253
(scatter41) | ||
| 310 -23 -119
(scatter37) |


|-| Grassy Plateaus=
| Image | Items | Coordinates |
|---|---|---|
| 165 -86 -520
(scatter32) | ||
| 322 -90 222
(scatter34) | ||
| 270 -85 70
(scatter35) | ||
| -370 -100 475
(scatter31) | ||
| -284 -93 606
(scatter42?) | ||
| -520 -90 -215
(scatter33) |


Gallery
<tabber> In Game View=
Safe Shallows Small Wreck 7
Safe Shallows Small Wreck 6
Safe Shallows Small Wreck 5

Safe Shallows Small Wreck 4
Safe Shallows Small Wreck 3
Safe Shallows Small Wreck 2
Safe Shallows Small Wreck 1
Safe Shallows Large Wreck 2
Safe Shallows Large Wreck 1
Kelp Forest Large Wreck 4
Kelp Forest Large Wreck 3

Kelp Forest Large Wreck 2 (Removed)
Kelp Forest Large Wreck 1 (Removed)
Grassy Plateaus Large Wreck 4
Grassy Plateaus Large Wreck 5
Grassy Plateaus Large Wreck 3
Grassy Plateaus Large Wreck 2
Grassy Plateaus Large Wreck 1
Bulb Zone Large Wreck 1
Mushroom Forest Large Wreck 1

Underwater Islands Large Wreck 1
Dunes Large Wreck 1
Sea Treader's Path Large Wreck 1
Mountains Large Wreck 1
Blood Kelp Zone Large Wreck 1

Grand Reef Large Wreck 1
Grand Reef Large Wreck 2
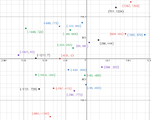
Location of all large wrecks with coordinates attached
Sparse Reef Large Wreck20


|-| Sketchfab Models=
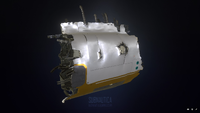
Large Explorable Wreck Model from Sketchfab
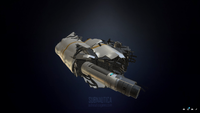
Another Large Explorable Wreck Model from Sketchfab

Small Explorable Wreck's Model from Sketchfab


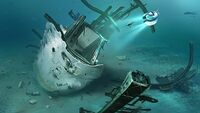
|-| Concept Art=
Large Explorable Wreck's Concept art
Small Explorable Wreck's Concept Art
The destroyed interior of a Wreck Concept Art


</tabber>
Trivia
- Wreck 1 (Grassy Plateaus) plays a distinct ambiance soundtrack when entered that isn't played in any other wreck.
- Wrecks 2, 4, 5, 6 and 7 all share the same U-shape wreck model.
- Wrecks 1, 3, 8, 9 and 10 also share a similar model. The same goes for Wreck 18 and 20.
- There used to be 4 small wrecks scattered to the west of the Aurora that yielded only Supply Crates. These were removed at some point, and Supply Crates can be found across all of the Crash Zone as of now.
- Non-scannable Picture Frames are present in the second Bulb Zone wreck and the third Dunes wreck. It is unknown whether this is intended or not.