
Biomes (Subnautica): Difference between revisions
UnderseaDee (talk | contribs) No edit summary |
UnderseaDee (talk | contribs) No edit summary |
||
| Line 18: | Line 18: | ||
* 200 - 580 meters (Northern) |
* 200 - 580 meters (Northern) |
||
| style="text-align:center; font-size:12px;" | |
| style="text-align:center; font-size:12px;" | |
||
* [[ |
* [[Shale Outcrop]] |
||
| style="text-align:left; font-size:12px;" | |
| style="text-align:left; font-size:12px;" | |
||
* [[Wrecks|Large Wreck]] (1) (Trench) |
* [[Wrecks|Large Wreck]] (1) (Trench) |
||
| Line 40: | Line 40: | ||
* 125 - 460 meters |
* 125 - 460 meters |
||
| style="text-align:center; font-size:12px;" | |
| style="text-align:center; font-size:12px;" | |
||
* [[ |
* [[Shale Outcrop]] |
||
* [[Limestone Outcrop]] |
* [[Limestone Outcrop]] |
||
| style="text-align:left; font-size:12px;" | |
| style="text-align:left; font-size:12px;" | |
||
| Line 82: | Line 82: | ||
* 150 - 480 meters |
* 150 - 480 meters |
||
| style="text-align:center; font-size:12px;" | |
| style="text-align:center; font-size:12px;" | |
||
* [[ |
* [[Shale Outcrop]] |
||
| style="text-align:left; font-size:12px;" | |
| style="text-align:left; font-size:12px;" | |
||
* [[Wrecks|Large Wrecks]] (2) |
* [[Wrecks|Large Wrecks]] (2) |
||
| Line 114: | Line 114: | ||
| style="text-align:center; font-size:12px;" | |
| style="text-align:center; font-size:12px;" | |
||
* [[Sandstone Outcrop]] |
* [[Sandstone Outcrop]] |
||
* [[ |
* [[Shale Outcrop]] |
||
| style="text-align:left; font-size:12px;" | |
| style="text-align:left; font-size:12px;" | |
||
* [[Wrecks|Large Wreck]] (1) |
* [[Wrecks|Large Wreck]] (1) |
||
| Line 126: | Line 126: | ||
* 125 - 200 meters (Northeastern) |
* 125 - 200 meters (Northeastern) |
||
| style="text-align:center; font-size:12px;" | |
| style="text-align:center; font-size:12px;" | |
||
* [[Basalt Outcrop]] |
|||
* [[Limestone Outcrop]] |
* [[Limestone Outcrop]] |
||
* [[Purple Pinecone]] |
* [[Purple Pinecone]] |
||
| Line 153: | Line 152: | ||
* 170 - 360 meters |
* 170 - 360 meters |
||
| style="text-align:center; font-size:12px;" | |
| style="text-align:center; font-size:12px;" | |
||
* [[ |
* [[Shale Outcrop]] |
||
| style="text-align:left; font-size:12px;" | |
| style="text-align:left; font-size:12px;" | |
||
* [[Wrecks|Large Wreck]] (1) |
* [[Wrecks|Large Wreck]] (1) |
||
|- |
|- |
||
| style="text-align:center; font-size:12px;" |[[File: |
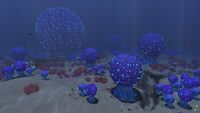
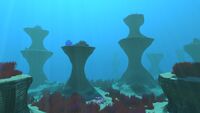
| style="text-align:center; font-size:12px;" |[[File:sparse polish 02.jpg|200px|center|link=Sparse Reef]][[Sparse Reef]] |
||
| style="text-align:center; font-size:12px;" | |
| style="text-align:center; font-size:12px;" | |
||
* 40 - 310 meters |
* 40 - 310 meters |
||
| Line 169: | Line 168: | ||
* 35 - 500 meters |
* 35 - 500 meters |
||
| style="text-align:center; font-size:12px;" | |
| style="text-align:center; font-size:12px;" | |
||
* [[ |
* [[Shale Outcrop]] |
||
* [[Limestone Outcrop]] |
* [[Limestone Outcrop]] |
||
| style="text-align:left; font-size:12px;" | |
| style="text-align:left; font-size:12px;" | |
||
| Line 198: | Line 197: | ||
* Above sea level |
* Above sea level |
||
| style="text-align:center; font-size:12px;" | |
| style="text-align:center; font-size:12px;" | |
||
* [[ |
* [[Shale Outcrop]] |
||
* [[Sandstone Outcrop]] |
* [[Sandstone Outcrop]] |
||
| style="text-align:left; font-size:12px;" | |
| style="text-align:left; font-size:12px;" | |
||
| Line 218: | Line 217: | ||
* 430 - 675 meters |
* 430 - 675 meters |
||
| style="text-align:center; font-size:12px;" | |
| style="text-align:center; font-size:12px;" | |
||
* [[ |
* [[Shale Outcrop]] |
||
| style="text-align:left; font-size:12px;" | - |
| style="text-align:left; font-size:12px;" | - |
||
|- |
|- |
||
| Line 233: | Line 232: | ||
* 220 - 315 meters |
* 220 - 315 meters |
||
| style="text-align:center; font-size:12px;" | |
| style="text-align:center; font-size:12px;" | |
||
* [[Basalt Outcrop]] |
|||
* [[Shale Outcrop]] |
* [[Shale Outcrop]] |
||
| style="text-align:left; font-size:12px;" | |
| style="text-align:left; font-size:12px;" | |
||
| Line 243: | Line 241: | ||
| style="text-align:center; font-size:12px;" | |
| style="text-align:center; font-size:12px;" | |
||
* [[Purple Pinecone]] |
* [[Purple Pinecone]] |
||
* [[ |
* [[Shale Outcrop]] |
||
| style="text-align:left; font-size:12px;" | |
| style="text-align:left; font-size:12px;" | |
||
*[[Degasi Seabases|Degasi Seabase]] (1) |
*[[Degasi Seabases|Degasi Seabase]] (1) |
||
| Line 331: | Line 329: | ||
* 0 - 380 meters |
* 0 - 380 meters |
||
| style="text-align:center; font-size:12px;" | |
| style="text-align:center; font-size:12px;" | |
||
* [[ |
* [[Shale Outcrop]] |
||
| style="text-align:left; font-size:12px;" | |
| style="text-align:left; font-size:12px;" | |
||
* Thermal Vents (?) |
* Thermal Vents (?) |
||
| Line 356: | Line 354: | ||
* 200 - 340 meters |
* 200 - 340 meters |
||
| style="text-align:center; font-size:12px;" | |
| style="text-align:center; font-size:12px;" | |
||
* [[ |
* [[Shale Outcrop]] |
||
| style="text-align:left; font-size:12px;" | |
| style="text-align:left; font-size:12px;" | |
||
- |
- |
||
| Line 364: | Line 362: | ||
* 205 - 255 meters |
* 205 - 255 meters |
||
| style="text-align:center; font-size:12px;" | |
| style="text-align:center; font-size:12px;" | |
||
* [[ |
* [[Shale Outcrop]] |
||
* [[Limestone Outcrop]] |
* [[Limestone Outcrop]] |
||
| style="text-align:left; font-size:12px;" | |
| style="text-align:left; font-size:12px;" | |
||
| Line 391: | Line 389: | ||
* Varies |
* Varies |
||
| style="text-align:center; font-size:12px;" | |
| style="text-align:center; font-size:12px;" | |
||
* [[ |
* [[Shale Outcrop]] |
||
* [[Sandstone Outcrop]] |
* [[Sandstone Outcrop]] |
||
* [[Limestone Outcrop]] |
* [[Limestone Outcrop]] |
||
| Line 460: | Line 458: | ||
==Trivia== |
==Trivia== |
||
* |
* Early development footages of '''biome''' generation can be seen [https://www.youtube.com/playlist?list=PLZmVk4US70ohuD_LO46SQlbRuorDjM1Ey on a playlist] from Russel Maekim's YouTube channel. |
||
* The game considers the inside of an [[Observatory]], [[Lifepod 5|Lifepod]], and [[Scanner Room]] to be separate '''biomes''' |
* The game considers the inside of an [[Observatory]], [[Lifepod 5|Lifepod]], and [[Scanner Room]] to be separate '''biomes'''. |
||
* Early '''biome''' concepts |
* Early surface '''biome''' concepts were divided into '''Kelp Forest''', '''Dense Kelp Forest''', '''Sunny Kelp Forest''', '''Coral Reef''', '''Danger Reef''', '''Safe Shallows''', '''Grand Reefs''', and '''Floating Island'''. |
||
* Early |
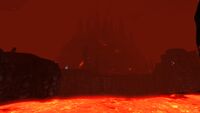
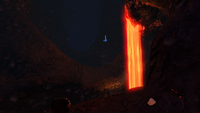
* Early lava zone '''biome''' concepts were divided into '''Lava Zone''', '''Lava Bridges''', '''Inactive Lava Zones '''and '''Thermal Vents'''. |
||
* Early lava zone '''biome''' concepts were divided into '''Lava Zone''', '''Lava Bridges''', '''Inactive Lava Zones '''and '''Thermal Vents'''. These were all implemented in some form, though the '''Thermal Vents''' have been reduced to geological features rather than a full '''biome'''. |
|||
{{Navbox Biomes}} |
{{Navbox Biomes}} |
||
Revision as of 23:59, 12 October 2017
.png)
|
Read at own risk This article contains unmarked spoilers. Players new to the game would want to avoid or be cautious toward this article. |
Subnautica features a wide range of Biomes to explore and coexist with, which represent miniature ecosystems from the real world.
There is a very diverse range of Biomes, from the vibrant Kelp Forest to the sizzling depths of the enigmatic Lava Lakes. Each Biome contains its own set of Flora and Fauna to discover and resources to harvest.
Biomes
Surface Biomes
| Biome | Depth Range | Harvesting Nodes | Points of Interest |
|---|---|---|---|
 |
|
| |
 |
|
| |
 |
|
||
 |
|
||
 |
|
None |
None |
 |
|
| |
 |
|
| |
 |
|
| |
 |
|
| |
 |
|
| |
 |
|
| |
 |
|
| |
 |
|
| |
 |
|
||
 |
|
Islands
| Biome | Depth Range | Harvesting Nodes | Points of Interest |
|---|---|---|---|
 |
|
- |
|
 |
|
Cave Biomes
| Biome | Depth Range | Harvesting Nodes | Points of Interest |
|---|---|---|---|
 |
|
- | |
 |
|
- |
- |
 |
|
| |
 |
|
| |
 |
|
||
 |
|
- | |
 |
|
- | |
 |
|
- | |
 |
|
||
 |
|
| |
 |
|
- | |
 |
|
||
 |
|
- |
|
 |
|
| |
 |
|
- | |
 |
|
- | |
 |
|
- | |
 |
|
- |
Mini-Biomes
| Biome | Depth Range | Harvesting Nodes | Points of Interest |
|---|---|---|---|
 |
|
- | |
 |
|
- | |
 |
|
||
 |
|
- |
Possible Expansion Pack Biomes
| Biome | Depth Range | Harvesting Nodes | Points of Interest |
|---|---|---|---|
 |
Unknown |
Unknown |
Unknown |
 |
Unknown |
Unknown |
Unknown |
 |
Unknown |
Unknown |
Unknown |
Gallery
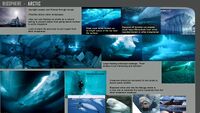
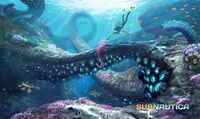
Arctic biome's reference sheet, made by the developers
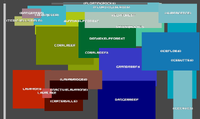
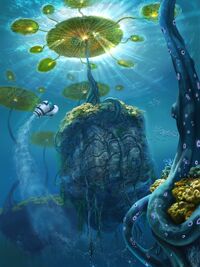
Early development biomes' reference sheet
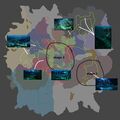
The Lost River's early map
(Outdated) Latest Subnautica map (17/12/2016)

(Outdated) Latest clean Subnautica map (17/12/2016)

(Outdated) Latest clean Subnautica map (25/02/2017)

(Outdated) Latest clean Subnautica Map (19/05/2017)

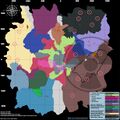
Latest clean Subnautica Map (19/07/2017)

(Outdated) Latest Subnautica map with ILZ - made by pie1055


Trivia
- Early development footages of biome generation can be seen on a playlist from Russel Maekim's YouTube channel.
- The game considers the inside of an Observatory, Lifepod, and Scanner Room to be separate biomes.
- Early surface biome concepts were divided into Kelp Forest, Dense Kelp Forest, Sunny Kelp Forest, Coral Reef, Danger Reef, Safe Shallows, Grand Reefs, and Floating Island.
- Early lava zone biome concepts were divided into Lava Zone, Lava Bridges, Inactive Lava Zones and Thermal Vents.
Lua error in package.lua at line 80: module 'Dev:Navbox' not found.