
Wrecks: Difference between revisions
(There's two PDAs in the deeper Grand Reef wreck.) Tags: Visual edit apiedit |
(Named some PDAs and updated many fragment locations.) Tags: Visual edit apiedit |
||
| Line 19: | Line 19: | ||
| style="text-align:center; font-size:12px;" |[[Safe Shallows]] |
| style="text-align:center; font-size:12px;" |[[Safe Shallows]] |
||
| style="text-align:left; font-size:12px;" | |
| style="text-align:left; font-size:12px;" | |
||
*[[ |
*[[Seaglide|Seaglide Fragments]] |
||
| ⚫ | |||
* [[Stasis Rifle|Stasis Rifle Fragments]] |
|||
| ⚫ | |||
*[[Chair]] |
*[[Chair]] |
||
*[[Desk]] |
*[[Desk]] |
||
*[[Data Downloads|Abandoned PDA]] |
*[[Data Downloads|Abandoned PDA]] |
||
*Search & Rescue: Paul Torgal |
|||
| style="text-align:center; font-size:13px;" | -40 -14 -400 |
| style="text-align:center; font-size:13px;" | -40 -14 -400 |
||
|- |
|- |
||
| Line 31: | Line 29: | ||
| style="text-align:center; font-size:12px;" |[[Safe Shallows]] |
| style="text-align:center; font-size:12px;" |[[Safe Shallows]] |
||
| style="text-align:left; font-size:12px;" | |
| style="text-align:left; font-size:12px;" | |
||
*[[ |
*[[Seamoth|Seamoth Fragments]] |
||
| ⚫ | |||
| ⚫ | |||
*[[Chair]] |
*[[Chair]] |
||
| ⚫ | |||
*[[Desk]] |
*[[Desk]] |
||
| style="text-align:center; font-size:13px;" | 366 -6 -203 |
| style="text-align:center; font-size:13px;" | 366 -6 -203 |
||
| Line 39: | Line 40: | ||
| style="text-align:center; font-size:12px;" |[[Kelp Forest]] |
| style="text-align:center; font-size:12px;" |[[Kelp Forest]] |
||
| style="text-align:left; font-size:12px;" | |
| style="text-align:left; font-size:12px;" | |
||
*[[ |
*[[Mobile Vehicle Bay|Mobile Vehicle Bay Fragments]] |
||
| ⚫ | |||
| ⚫ | |||
*[[Bench]] |
*[[Bench]] |
||
*[[Chair]] |
*[[Chair]] |
||
| Line 49: | Line 52: | ||
| style="text-align:left; font-size:12px;" | |
| style="text-align:left; font-size:12px;" | |
||
*[[Mobile Vehicle Bay|Mobile Vehicle Bay Fragments]] |
*[[Mobile Vehicle Bay|Mobile Vehicle Bay Fragments]] |
||
*[[ |
*[[Bioreactor|Bioreactor Fragments]] |
||
| ⚫ | |||
*[[Chair]] |
*[[Chair]] |
||
*[[Desk]] |
*[[Desk]] |
||
| Line 58: | Line 62: | ||
| style="text-align:center; font-size:12px;" |[[Kelp Forest]] |
| style="text-align:center; font-size:12px;" |[[Kelp Forest]] |
||
| style="text-align:left; font-size:12px;" | |
| style="text-align:left; font-size:12px;" | |
||
*[[ |
*[[Stillsuit|Stillsuit Fragments]] |
||
*[[Seaglide|Seaglide Fragments]] |
|||
*[[Chair]] |
*[[Chair]] |
||
*[[Desk]] |
*[[Desk]] |
||
| Line 67: | Line 70: | ||
| style="text-align:center; font-size:12px;" |[[Kelp Forest]] |
| style="text-align:center; font-size:12px;" |[[Kelp Forest]] |
||
| style="text-align:left; font-size:12px;" | |
| style="text-align:left; font-size:12px;" | |
||
| ⚫ | |||
| ⚫ | |||
*[[Mobile Vehicle Bay|Mobile Vehicle Bay Fragments]] |
*[[Mobile Vehicle Bay|Mobile Vehicle Bay Fragments]] |
||
*[[Seaglide|Seaglide Fragments]] |
|||
| ⚫ | |||
*[[Bench]] |
*[[Bench]] |
||
*[[Chair]] |
*[[Chair]] |
||
| Line 77: | Line 76: | ||
*[[Floodlight]] |
*[[Floodlight]] |
||
*[[Data Downloads|Abandoned PDA]] |
*[[Data Downloads|Abandoned PDA]] |
||
*Search & Rescue: Bart Torgal |
|||
| style="text-align:center; font-size:13px;" | 65 -25 385 |
| style="text-align:center; font-size:13px;" | 65 -25 385 |
||
|- |
|- |
||
| Line 82: | Line 82: | ||
| style="text-align:center; font-size:12px;" |[[Grassy Plateaus]] |
| style="text-align:center; font-size:12px;" |[[Grassy Plateaus]] |
||
| style="text-align:left; font-size:12px;" | |
| style="text-align:left; font-size:12px;" | |
||
| ⚫ | |||
*[[Battery Charger|Battery Charger Fragments]] |
*[[Battery Charger|Battery Charger Fragments]] |
||
*[[Bioreactor|Bioreactor Fragments]] |
*[[Bioreactor|Bioreactor Fragments]] |
||
*[[Seamoth|Seamoth Fragments]] |
*[[Seamoth|Seamoth Fragments]] |
||
*[[Seaglide|Seaglide Fragments]] |
|||
*[[Bar Table]] |
|||
*[[Chair]] |
*[[Chair]] |
||
*[[Desk]] |
*[[Desk]] |
||
*[[Floodlight]] |
*[[Floodlight]] |
||
*[[Data Downloads|Abandoned PDA]] |
*[[Data Downloads|Abandoned PDA]] |
||
*Trans-Gov Profile: Mongolian Independant States |
|||
| style="text-align:center; font-size:13px;" | -25 -88 -615 |
| style="text-align:center; font-size:13px;" | -25 -88 -615 |
||
|- |
|- |
||
| Line 96: | Line 96: | ||
| style="text-align:center; font-size:12px;" |[[Grassy Plateaus]] |
| style="text-align:center; font-size:12px;" |[[Grassy Plateaus]] |
||
| style="text-align:left; font-size:12px;" | |
| style="text-align:left; font-size:12px;" | |
||
*[[Mobile Vehicle Bay|Mobile Vehicle Bay Fragments]] |
|||
*[[Battery Charger|Battery Charger Fragments]] |
*[[Battery Charger|Battery Charger Fragments]] |
||
*[[Bioreactor|Bioreactor Fragments]] |
*[[Bioreactor|Bioreactor Fragments]] |
||
*[[Light Stick|Light Stick Fragments]] |
*[[Light Stick|Light Stick Fragments]] |
||
*[[ |
*[[Stillsuit|Stillsuit Fragments]] |
||
*[[ |
*[[Propulsion Cannon|Propulsion Cannon Fragments]] |
||
*[[Prawn Suit Drill Arm|Prawn Suit Drill Arm Fragments]] |
|||
*[[Prawn Suit Torpedo Arm|Prawn Suit Torpedo Arm Fragments]] |
|||
*[[Bench]] |
*[[Bench]] |
||
*[[Floodlight]] |
*[[Floodlight]] |
||
*[[Picture Frame]] |
*[[Picture Frame]] |
||
*[[Plant Pot]] |
*[[Plant Pot|Plant Pot 1]] |
||
*[[Plant Pot|Plant Pot 2]] |
|||
*[[Plant Pot|Plant Pot 3]] |
|||
*[[Plant Shelf]] |
*[[Plant Shelf]] |
||
*[[Poster]] |
*[[Poster]] |
||
*Natural Selection II |
|||
*[[Supply Crate]]s |
|||
| style="text-align:center; font-size:13px;" | 320 -66 431 |
| style="text-align:center; font-size:13px;" | 320 -66 431 |
||
|- |
|- |
||
| Line 115: | Line 116: | ||
| style="text-align:center; font-size:12px;" |[[Grassy Plateaus]] |
| style="text-align:center; font-size:12px;" |[[Grassy Plateaus]] |
||
| style="text-align:left; font-size:12px;" | |
| style="text-align:left; font-size:12px;" | |
||
*[[Seaglide|Seaglide Fragments]] |
|||
*[[Seamoth|Seamoth Fragments]] |
*[[Seamoth|Seamoth Fragments]] |
||
| ⚫ | |||
*[[Bioreactor|Bioreactor Fragments]] |
*[[Bioreactor|Bioreactor Fragments]] |
||
*[[ |
*[[Stillsuit|Stillsuit Fragments]] |
||
*[[Propulsion Cannon|Propulsion Cannon Fragments]] |
|||
| ⚫ | |||
| ⚫ | |||
*[[Desk]] |
*[[Desk]] |
||
| style="text-align:center; font-size:13px;" | -390 -120 648 |
| style="text-align:center; font-size:13px;" | -390 -120 648 |
||
| Line 128: | Line 130: | ||
*[[Battery Charger|Battery Charger Fragments]] |
*[[Battery Charger|Battery Charger Fragments]] |
||
*[[Bioreactor|Bioreactor Fragments]] |
*[[Bioreactor|Bioreactor Fragments]] |
||
*[[ |
*[[Stillsuit|Stillsuit Fragments]] |
||
*[[Mobile Vehicle Bay|Mobile Vehicle Bay Fragments]] |
|||
*[[Propulsion Cannon|Propulsion Cannon Fragments]] |
|||
*[[Prawn Suit|Prawn Suit Claw Arm Fragments]] |
*[[Prawn Suit|Prawn Suit Claw Arm Fragments]] |
||
*[[Prawn Suit Torpedo Arm|Prawn Suit Torpedo Arm Fragments]] |
|||
*[[Seamoth|Seamoth Fragments]] |
|||
| ⚫ | |||
| ⚫ | |||
*[[Bench]] |
*[[Bench]] |
||
*[[Chair]] |
*[[Chair|Chair 1]] |
||
*[[Chair 3]] |
*[[Chair 3]] |
||
*[[Desk]] |
*[[Desk]] |
||
*[[Floodlight]] |
*[[Floodlight]] |
||
| ⚫ | |||
*[[Picture Frame]] |
|||
*Search & Rescue: Marguerit Maida |
|||
*[[Poster]] |
|||
| ⚫ | |||
| style="text-align:center; font-size:13px;" | -630 -50 -60 |
| style="text-align:center; font-size:13px;" | -630 -50 -60 |
||
|- |
|- |
||
| Line 147: | Line 146: | ||
| style="text-align:center; font-size:12px;" |[[Grassy Plateaus]] |
| style="text-align:center; font-size:12px;" |[[Grassy Plateaus]] |
||
| style="text-align:left; font-size:12px;" | |
| style="text-align:left; font-size:12px;" | |
||
*[[ |
*[[Battery Charger|Battery Charger Fragments]] |
||
| ⚫ | |||
*[[Bioreactor|Bioreactor Fragments]] |
*[[Bioreactor|Bioreactor Fragments]] |
||
*[[Stillsuit|Stillsuit Fragments]] |
*[[Stillsuit|Stillsuit Fragments]] |
||
*[[Mobile Vehicle Bay|Mobile Vehicle Bay Fragments]] |
|||
| ⚫ | |||
*[[Chair|Chair 1]] |
|||
*[[Chair|Chair 3]] |
|||
*[[Desk]] |
*[[Desk]] |
||
| style="text-align:center; font-size:13px;" | -432 -90 -268 |
| style="text-align:center; font-size:13px;" | -432 -90 -268 |
||
| Line 158: | Line 158: | ||
| style="text-align:center; font-size:12px;" |[[Koosh Zone]] |
| style="text-align:center; font-size:12px;" |[[Koosh Zone]] |
||
| style="text-align:left; font-size:12px;" | |
| style="text-align:left; font-size:12px;" | |
||
| ⚫ | |||
*[[Alien Containment|Alien Containment Fragments]] |
|||
*[[Water Filtration Machine|Water Filtration Machine Fragments]] |
|||
*[[Light Stick|Light Stick Fragments]] |
*[[Light Stick|Light Stick Fragments]] |
||
*[[Stasis Rifle|Stasis Rifle Fragments]] |
*[[Stasis Rifle|Stasis Rifle Fragments]] |
||
| ⚫ | |||
*[[Exterior Growbed]] |
|||
| ⚫ | |||
*[[Power Transmitter|Power Transmitter Fragments]] |
|||
*[[Interior Growbed]] |
*[[Interior Growbed]] |
||
*[[Floodlight]] |
*[[Floodlight]] |
||
*[[Plant Pot]] |
*[[Plant Pot|Plant Pot 1]] |
||
*[[Plant Pot|Plant Pot 3]] |
|||
*[[Chair|Chair 1]] |
|||
*[[Chair|Chair 3]] |
|||
*[[Bench]] |
*[[Bench]] |
||
*[[Data Downloads|Abandoned PDA]] |
*[[Data Downloads|Abandoned PDA]] |
||
*The Charter |
|||
| style="text-align:center; font-size:13px;" | 940 -198 593 |
| style="text-align:center; font-size:13px;" | 940 -198 593 |
||
|- |
|- |
||
Revision as of 12:03, 4 February 2017

|
This seems new This article contains information that is updated for the latest Experimental Version of Subnautica. Players using stable mode may find this information inaccurate. |
Template:Infobox Biome The Wrecks are explorable pieces of debris from the Aurora, which can only be located after its explosion. They have wide range of sizes. Large Wrecks contain valuable technology in the form of Fragments while Small Wrecks contain only Supply Crates.
Large Wrecks
There are 20 Large Wrecks spread throughout the ocean after the Aurora explodes. Each of them are surrounded by their local Flora and Fauna and possess their own unique challenges. Many of them include sections that are only accessible with the Laser Cutter. While each contains a unique set of fragments, there are common items found in many wrecks.
Large Wreck List


Small Wrecks
Small Wrecks can be found surrounding the Large Wrecks and inside the Crash Zone. They can contain useful items and fragments.
| Image | Biome | Items | Coordinates |
|---|---|---|---|
| Safe Shallows | 20 -10 300 | ||
| Safe Shallows | - | 90 -20 120 | |
| Safe Shallows | 65 -10 -85 | ||
| Safe Shallows | -160 -20 -225 | ||
| Safe Shallows | 175 -23 -253 | ||
| Safe Shallows | 310 -23 -119 | ||
| Safe Shallows | 527 -23 -43 | ||
| Grassy Plateaus | 165 -86 -520 | ||
| Grassy Plateaus | 315 -90 215 | ||
| Grassy Plateaus | 270 -85 70 | ||
| Grassy Plateaus | -370 -100 475 | ||
| Grassy Plateaus | -284 -93 606 | ||
| Grassy Plateaus | -520 -90 -215 |


Gallery
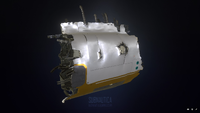
Large Explorable Wreck Model from Sketchfab
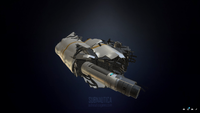
Another Large Explorable Wreck Model from Sketchfab

Small Explorable Wreck's Model from Sketchfab
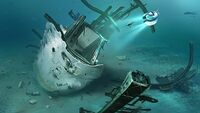
Large Explorable Wreck's Concept Art
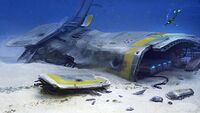
Small Explorable Wreck's Concept Art

Small wreckage, found in the Crash Zone


.jpg)
For a more complete gallery, see Wrecks/Gallery.