
Harvesting Nodes: Difference between revisions
No edit summary Tags: Visual edit apiedit |
MilotronZeta (talk | contribs) m (fixed spelling) |
||
| (58 intermediate revisions by 25 users not shown) | |||
| Line 1: | Line 1: | ||
'''Harvesting Nodes''' are mineral deposits that the player can break to reveal the materials inside. Each Harvesting Node drops a different set of [[Raw Materials]]. |
|||
{{ExperimentalMode}} |
|||
'''Harvesting Nodes''' are mineral deposits that can be broken up by the player to reveal the materials inside. Each '''Harvesting Node''' drops a different set of [[Raw Materials]]. |
|||
While |
While Harvesting Nodes can be broken by the player's hands, many tools have custom animations should the player break nodes while equipped with said tools. Despite their static nature, Harvesting Nodes can be picked up and launched by the [[Propulsion Cannon]] and will break on impact. They can even be picked up by [[Grav Trap|Grav Traps]]. |
||
''Below Zero'' added improvements to Harvesting Nodes. When they are [[Scanner (Below Zero)|scanned]], looking at nodes will tell the player what resource can drop from it. In addition, every ten nodes will always provide resources in exact ratios. For example, if ten [[Argentite Outcrop]]s are broken, the player will always receive six [[Silver Ore (Below Zero)|Silver Ore]]s and four [[Titanium (Below Zero)|Titanium]]. |
|||
==Harvesting Nodes== |
==Harvesting Nodes== |
||
===''Subnautica''=== |
|||
{| class="article-table sortable" style="width: 100%;" border="0" cellpadding="1" cellspacing="1" |
{| class="article-table sortable" style="width: 100%;" border="0" cellpadding="1" cellspacing="1" |
||
|- |
|- |
||
| Line 11: | Line 13: | ||
! class="unsortable" style="width: 30%; text-align: left;" |Biomes |
! class="unsortable" style="width: 30%; text-align: left;" |Biomes |
||
|- |
|- |
||
| style="text-align:center; font-size:12px;" |[[File:Barnacle.png|150px|center|link=Barnacle]][[Barnacle]] |
| style="text-align:center; font-size:12px;" |[[File:Barnacle Node.png|150px|center|link=Barnacle]][[Barnacle]] |
||
| style="text-align:left; font-size:12px;" | |
| style="text-align:left; font-size:12px;" | |
||
* [[Copper Ore]] |
* [[Copper Ore (Subnautica)|Copper Ore]] - 90% |
||
* [[Silver Ore]] |
* [[Silver Ore (Subnautica)|Silver Ore]] - 10% |
||
| style="text-align:left; font-size:12px;" | |
| style="text-align:left; font-size:12px;" | |
||
* [[Reefback]] |
* [[Reefback Leviathan]] |
||
|- |
|- |
||
| style="text-align:center; font-size:12px;" |[[File: |
| style="text-align:center; font-size:12px;" |[[File:Ic_LimestoneChunk_22743.png|128px|center|link=Limestone Outcrop]][[Limestone Outcrop]] |
||
| style="text-align:left; font-size:12px;" | |
| style="text-align:left; font-size:12px;" | |
||
* [[Copper Ore (Subnautica)|Copper Ore]] - 50% |
|||
* [[Diamond]] |
|||
* [[Titanium (Subnautica)|Titanium]] - 50% |
|||
* [[Gold]] |
|||
| style="text-align:left; font-size:12px;" | |
| style="text-align:left; font-size:12px;" | |
||
* [[Blood Kelp Caves]] |
|||
* [[Blood Kelp Zone]] |
|||
* [[Crag Field]] |
* [[Crag Field]] |
||
* [[ |
* [[Crash Zone]] |
||
* [[Crash Zone Mesas]] |
|||
* [[Dunes]] |
|||
* [[Dunes Caves]] |
|||
* [[Grand Reef]] |
* [[Grand Reef]] |
||
* [[ |
* [[Grassy Plateaus]] |
||
* [[ |
* [[Grassy Plateaus Caves]] |
||
* [[ |
* [[Kelp Forest]] |
||
* [[ |
* [[Kelp Forest Caves]] |
||
* [[ |
* [[Lost River]] |
||
* [[Mushroom Forest]] |
* [[Mushroom Forest]] |
||
* [[Safe Shallows]] |
|||
* [[Safe Shallows Caves]] |
|||
* [[Sea Treader's Path]] |
* [[Sea Treader's Path]] |
||
* [[Sea Treader's Tunnel Caves]] |
* [[Sea Treader's Tunnel Caves]] |
||
* [[Sparse Reef]] |
|||
* [[Underwater Islands]] |
* [[Underwater Islands]] |
||
|- |
|- |
||
| style="text-align:center; font-size:12px;" |[[File: |
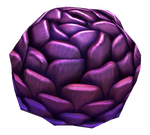
| style="text-align:center; font-size:12px;" |[[File:Purple Pinecone Flora.png|150px|center|link=Purple Pinecone]][[Purple Pinecone]] |
||
| style="text-align:left; font-size:12px;" | |
| style="text-align:left; font-size:12px;" | |
||
* [[Salt Deposit (Subnautica)|Salt Deposit]] |
|||
* [[Copper Ore]] |
|||
* [[Lead]] |
|||
* [[Titanium]] |
|||
| style="text-align:left; font-size:12px;" | |
| style="text-align:left; font-size:12px;" | |
||
* [[Crag Field]] |
|||
* [[Grand Reef Caves]] |
|||
* [[Grassy Plateaus]] |
|||
* [[Kelp Forest]] |
|||
* [[Kelp Forest Caves]] |
|||
* [[Mushroom Forest]] |
* [[Mushroom Forest]] |
||
* [[Lava Geyser]] |
|||
* [[Safe Shallows]] |
|||
* [[Safe Shallows Caves]] |
|||
* [[Underwater Islands]] |
|||
* [[Sparse Reef]] |
|||
|- |
|- |
||
| style="text-align:center; font-size:12px;" |[[File: |
| style="text-align:center; font-size:12px;" |[[File:Ic_SandstoneChunk_22997.png|128px|center|link=Sandstone Outcrop]][[Sandstone Outcrop]] |
||
| style="text-align:left; font-size:12px;" | |
| style="text-align:left; font-size:12px;" | |
||
* [[Gold]] |
* [[Gold (Subnautica)|Gold]] - 25% |
||
* [[Lead (Subnautica)|Lead]] - 37.5% |
|||
* [[Silver Ore]] |
|||
* [[Silver Ore (Subnautica)|Silver Ore]] - 37.5% |
|||
| style="text-align:left; font-size:12px;" | |
| style="text-align:left; font-size:12px;" | |
||
* [[ |
* [[Bulb Zone]] |
||
* [[Crag Field]] |
|||
* [[Crash Zone]] |
|||
* [[Crash Zone Mesas]] |
|||
* [[Deep Sparse Reef]] |
|||
* [[Dunes]] |
* [[Dunes]] |
||
* [[Dunes Caves]] |
|||
* [[Grand Reef]] |
|||
* [[Grassy Plateaus]] |
* [[Grassy Plateaus]] |
||
* [[Grassy Plateaus Caves]] |
|||
* [[Kelp Forest]] |
* [[Kelp Forest]] |
||
* [[Kelp Forest Caves]] |
* [[Kelp Forest Caves]] |
||
* [[ |
* [[Lost River]] |
||
* [[Mountains]] |
* [[Mountains]] |
||
* [[Mountain Island]] |
|||
* [[Mushroom Forest]] |
* [[Mushroom Forest]] |
||
* [[Safe Shallows]] |
* [[Safe Shallows]] |
||
* [[Safe Shallows Caves]] |
* [[Safe Shallows Caves]] |
||
* [[Sea Treader's Path]] |
|||
* [[Underwater Islands]] |
|||
|- |
|- |
||
| style="text-align:center; font-size:12px;" |[[File: |
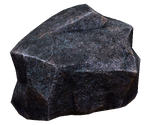
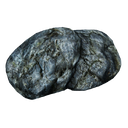
| style="text-align:center; font-size:12px;" |[[File:Ic_ShaleChunk_23297.png|128px|center|link=Shale Outcrop]][[Shale Outcrop]] |
||
| style="text-align:left; font-size:12px;" | |
| style="text-align:left; font-size:12px;" | |
||
* [[Diamond]] |
* [[Diamond]] - 38.5% |
||
* [[Gold]] |
* [[Gold (Subnautica)|Gold]] - 30% |
||
* [[Lithium]] |
* [[Lithium (Subnautica)|Lithium]] - 31.5% |
||
| style="text-align:left; font-size:12px;" | |
| style="text-align:left; font-size:12px;" | |
||
* [[ |
* [[Blood Kelp Caves]] |
||
* [[ |
* [[Blood Kelp Zone]] |
||
* [[ |
* [[Bulb Zone]] |
||
* [[ |
* [[Bulb Zone Caves]] |
||
* [[Crag Field]] |
|||
* [[Crash Zone Mesas]] |
|||
* [[Deep Sparse Reef]] |
|||
* [[Grand Reef]] |
|||
* [[Grand Reef Caves]] |
|||
* [[Inactive Lava Zone Corridor]] |
|||
* [[Inactive Lava Zone]] |
|||
* [[Jellyshroom Cave]] |
|||
* [[Lost River]] |
|||
* [[Mountain Island]] |
|||
* [[Mountains Caves]] |
|||
* [[Mountains]] |
|||
* [[Mushroom Forest]] |
* [[Mushroom Forest]] |
||
* [[Mushroom Forest Caves]] |
* [[Mushroom Forest Caves]] |
||
* [[Sea Treader's Path]] |
|||
* [[Sea Treader's Tunnel Caves]] |
|||
* [[Sparse Reef]] |
|||
* [[Underwater Islands]] |
|||
* [[Underwater Islands Caves]] |
|||
|} |
|||
===''Below Zero''=== |
|||
{| class="article-table sortable" style="width: 100%;" border="0" cellpadding="1" cellspacing="1" |
|||
|- |
|- |
||
! class="unsortable" style="width: 40%; text-align: center;" |Nodes |
|||
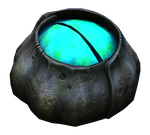
| style="text-align:center; font-size:12px;" |[[File:Obsidian Transaernt.png|150px|center|link=Obsidian Outcrop]][[Obsidian Outcrop]] |
|||
! class="unsortable" style="width: 30%; text-align: left;" |Content |
|||
! class="unsortable" style="width: 30%; text-align: left;" |Biomes |
|||
|- |
|||
| style="text-align:center; font-size:12px;" | |
|||
[[File:Ic ShaleChunk 23297.png|128px|center|link=Argentite Outcrop]][[Argentite Outcrop]] |
|||
| style="text-align:left; font-size:12px;" | |
| style="text-align:left; font-size:12px;" | |
||
* [[Silver Ore (Below Zero)|Silver Ore]] - 60% |
|||
* [[Diamond]] |
|||
* [[Titanium (Below Zero)|Titanium]] - 40% |
|||
| style="text-align:left; font-size:12px;" | |
| style="text-align:left; font-size:12px;" | |
||
* [[ |
* [[Arctic Kelp Caves]] |
||
* [[ |
* [[Arctic Kelp Forest]] |
||
* [[ |
* [[Crystal Caves]] |
||
** [[Crystal Caves|Main Crystal Caves]] |
|||
* [[Lava Castle]] |
|||
** [[Crystal Caves|Crystal Caves Fissure]] |
|||
* [[Deep Lilypads Cave]] |
|||
* [[Fabricator Caverns]] |
|||
* [[Lilypad Islands]] |
|||
** [[Lilypad Islands|Main Lilypad Islands]] |
|||
* [[Koppa Mining Site]] |
|||
* [[Thermal Spires]] |
|||
* [[Thermal Spires Caves]] |
|||
* [[Tree Spires]] |
|||
* [[Twisty Bridges]] |
|||
* [[Twisty Bridges Caves]] |
|||
|- |
|||
| style="text-align:center; font-size:12px;" | |
|||
[[File:Ic SandstoneChunk 22997.png|center|128px|link=Calaverite Outcrop]] [[Calaverite Outcrop]] |
|||
| style="text-align:left; font-size:12px;" | |
|||
* [[Gold (Below Zero)|Gold]] - 50% |
|||
* [[Titanium (Below Zero)|Titanium]] - 50% |
|||
| style="text-align:left; font-size:12px;" | |
|||
* [[Arctic Kelp Caves]] |
|||
* [[Crystal Caves]] |
|||
** [[Crystal Caves|Crystal Caves Fissure]] |
|||
* [[Deep Lilypads Cave]] |
|||
* [[Delta Island]] |
|||
* [[Fabricator Caverns]] |
|||
* [[Lilypad Islands]] |
|||
** [[Lilypad Islands|Lilypad Islands Caves]] |
|||
* [[Lilypads Crevice]] |
|||
* [[Thermal Spires]] |
|||
* [[Tree Spires]] |
|||
* [[Twisty Bridges]] |
|||
* [[Twisty Bridges Caves]] |
|||
|- |
|||
| style="text-align:center; font-size:12px;" | |
|||
[[File:Lead Outcrop.png|150px|center|link=Galena Outcrop]][[Galena Outcrop]] |
|||
| style="text-align:left; font-size:12px;" | |
|||
* [[Lead (Below Zero)|Lead]] - 50% |
|||
* [[Titanium (Below Zero)|Titanium]] - 50% |
|||
| style="text-align:left; font-size:12px;" | |
|||
* [[Arctic Kelp Forest]] |
|||
* [[Crystal Caves]] |
|||
** [[Crystal Caves|Main Crystal Caves]] |
|||
* [[Glacial Connection]] |
|||
* [[Lilypad Islands]] |
|||
** [[Lilypad Islands|Main Lilypad Islands]] |
|||
* [[Shallow Twisty Bridges]] |
|||
* [[Thermal Spires]] |
|||
* [[Thermal Spires Caves]] |
|||
* [[Twisty Bridges]] |
|||
|- |
|||
| style="text-align:center; font-size:12px;" | |
|||
[[File:Ic LimestoneChunk 22743.png|128px|center|link=Limestone Outcrop (Below Zero)]][[Limestone Outcrop (Below Zero)|Limestone Outcrop]] |
|||
| style="text-align:left; font-size:12px;" | |
|||
* [[Copper Ore (Below Zero)|Copper Ore]] - 40% |
|||
* [[Titanium (Below Zero)|Titanium]] - 60% |
|||
| style="text-align:left; font-size:12px;" | |
|||
* [[Arctic Kelp Caves]] |
|||
* [[Arctic Kelp Forest]] |
|||
* [[Arctic Spires]] |
|||
* [[Crystal Caves]] |
|||
** [[Crystal Caves|Main Crystal Caves]] |
|||
* [[Deep Lilypads Cave]] |
|||
* [[Delta Island]] |
|||
* [[Arctic|East Arctic]] |
|||
* [[Glacial Basin]] |
|||
** [[Glacial Basin|Basin]] |
|||
* [[Glacial Bay]] |
|||
* [[Glacial Connection]] |
|||
* [[Lilypad Islands]] |
|||
** [[Lilypad Islands|Main Lilypad Islands]] |
|||
* [[Lilypads Crevice]] |
|||
* [[Shallow Twisty Bridges]] |
|||
* [[Sparse Arctic]] |
|||
* [[Thermal Spires]] |
|||
* [[Thermal Spires Caves]] |
|||
* [[Twisty Bridges]] |
|||
* [[Arctic|West Arctic]] |
|||
|- |
|||
| style="text-align:center; font-size:12px;" | |
|||
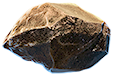
[[File:Rock.png|128px|center|link=Rock Puncher]][[Rock]] |
|||
| style="text-align:left; font-size:12px;" | |
|||
* [[Copper Ore (Below Zero)|Copper Ore]] - 50% |
|||
* [[Gold (Below Zero)|Gold]] - 25% |
|||
* [[Silver Ore (Below Zero)|Silver Ore]] - 20% |
|||
* [[Titanium (Below Zero)|Titanium]] - 5% |
|||
| style="text-align:left; font-size:12px;" | |
|||
* [[Crystal Caves]] |
|||
** [[Crystal Caves|Main Crystal Caves]] |
|||
* [[Koppa Mining Site]] |
|||
* [[Thermal Spires]] |
|||
|} |
|} |
||
== |
== Trivia == |
||
*''Subnautica'' originally had Basalt Outcrops and Obsidian Outcrops. These were [[Cut Content (Subnautica)|removed]] before the game's full release. |
|||
<gallery> |
|||
**The [[Galena Outcrop]] in ''Below Zero'' reuses the previously-unused model of the Basalt Outcrop. |
|||
SizeRefNodes.png|Size Difference between the '''Harvesting Nodes''' |
|||
*The [[Argentite Outcrop]] and [[Calaverite Outcrop]] in ''Below Zero'' use the same models as the Shale Outcrop and Sandstone Outcrop from ''Subnautica'', respectively. |
|||
</gallery> |
|||
[[fr:Gangues de minerai]] |
|||
[[es:Nodo de Captura]] |
|||
[[ru:Скальный выступ]] |
|||
[[Category:Raw Material]] |
[[Category:Raw Material]] |
||
[[Category:In Development]] |
|||
[[Category:Harvesting Node]] |
[[Category:Harvesting Node]] |
||
[[Category:Blood Kelp Zone]] |
|||
[[Category:Blood Kelp Caves]] |
|||
[[Category:Sparse Reef]] |
|||
[[Category:Deep Sparse Reef]] |
|||
[[Category:Deep Grand Reef]] |
|||
[[Category:Kelp Forest]] |
|||
[[Category:Kelp Forest Caves]] |
|||
[[Category:Safe Shallows]] |
|||
[[Category:Safe Shallows Caves]] |
|||
[[Category:Inactive Lava Zone]] |
|||
[[Category:Inactive Lava Zone Corridor]] |
|||
[[Category:Jellyshroom Cave]] |
|||
[[Category:Bulb Zone]] |
|||
[[Category:Bulb Zone Caves]] |
|||
[[Category:Crag Field]] |
|||
[[Category:Lost River]] |
|||
[[Category:Sea Treader's Tunnel Caves]] |
|||
[[Category:Sea Treader's Path]] |
|||
[[Category:Underwater Islands]] |
|||
[[Category:Underwater Islands Caves]] |
|||
[[Category:Mushroom Forest Caves]] |
|||
[[Category:Mountains Caves]] |
|||
[[Category:Mountains]] |
|||
[[Category:Mountain Island]] |
|||
[[Category:Grand Reef Caves]] |
|||
[[Category:Grassy Plateaus]] |
|||
[[Category:Grassy Plateaus Caves]] |
|||
[[Category:Grand Reef]] |
|||
[[Category:Crash Zone Mesas]] |
|||
[[Category:Crash Zone]] |
|||
[[Category:Dunes]] |
|||
[[Category:Dunes Caves]] |
|||
Latest revision as of 19:07, 3 February 2025
Harvesting Nodes are mineral deposits that the player can break to reveal the materials inside. Each Harvesting Node drops a different set of Raw Materials.
While Harvesting Nodes can be broken by the player's hands, many tools have custom animations should the player break nodes while equipped with said tools. Despite their static nature, Harvesting Nodes can be picked up and launched by the Propulsion Cannon and will break on impact. They can even be picked up by Grav Traps.
Below Zero added improvements to Harvesting Nodes. When they are scanned, looking at nodes will tell the player what resource can drop from it. In addition, every ten nodes will always provide resources in exact ratios. For example, if ten Argentite Outcrops are broken, the player will always receive six Silver Ores and four Titanium.
Harvesting Nodes
Subnautica
Below Zero
| Nodes | Content | Biomes |
|---|---|---|
 |
|
|
 |
||
 |
||
 |
|
|
 |
|
Trivia
- Subnautica originally had Basalt Outcrops and Obsidian Outcrops. These were removed before the game's full release.
- The Galena Outcrop in Below Zero reuses the previously-unused model of the Basalt Outcrop.
- The Argentite Outcrop and Calaverite Outcrop in Below Zero use the same models as the Shale Outcrop and Sandstone Outcrop from Subnautica, respectively.
- Raw Material
- Harvesting Node
- Blood Kelp Zone
- Blood Kelp Caves
- Sparse Reef
- Deep Sparse Reef
- Deep Grand Reef
- Kelp Forest
- Kelp Forest Caves
- Safe Shallows
- Safe Shallows Caves
- Inactive Lava Zone
- Inactive Lava Zone Corridor
- Jellyshroom Cave
- Bulb Zone
- Bulb Zone Caves
- Crag Field
- Lost River
- Sea Treader's Tunnel Caves
- Sea Treader's Path
- Underwater Islands
- Underwater Islands Caves
- Mushroom Forest Caves
- Mountains Caves
- Mountains
- Mountain Island
- Grand Reef Caves
- Grassy Plateaus
- Grassy Plateaus Caves
- Grand Reef
- Crash Zone Mesas
- Crash Zone
- Dunes
- Dunes Caves