
Neptune Escape Rocket: Difference between revisions
JoelBesada (talk | contribs) mNo edit summary |
m (How is "big gun" better than just the name) |
||
| (12 intermediate revisions by 11 users not shown) | |||
| Line 5: | Line 5: | ||
|category = Mobile Vehicle Bay |
|category = Mobile Vehicle Bay |
||
|tab = [[Vehicles]] |
|tab = [[Vehicles]] |
||
|description = '''Neptune Launch Platform:'''<br |
|description = '''Neptune Launch Platform:'''<br/>Provides a stable surface from which to launch the Neptune. |
||
---- |
---- |
||
'''Neptune Gantry:'''<br |
'''Neptune Gantry:'''<br/>Supports the rocket during construction. |
||
---- |
---- |
||
'''Neptune Boosters:'''<br |
'''Neptune Boosters:'''<br/>Experimental boosters. |
||
---- |
---- |
||
'''Neptune Fuel Reserve:'''<br |
'''Neptune Fuel Reserve:'''<br/>Primary fuel tanks. |
||
---- |
---- |
||
'''Neptune Cockpit:'''<br |
'''Neptune Cockpit:'''<br/>A hermetically sealed environment with life support and launch controls. |
||
|hull_integrity = N/A |
|hull_integrity = N/A |
||
|health = Indestructible |
|health = Indestructible |
||
|acqired_from = [[Mobile Vehicle Bay]] |
|acqired_from = [[Mobile Vehicle Bay]] |
||
|fragments = [[Fragments|1 Fragment]] |
|fragments = [[Fragments (Subnautica)|1 Fragment]] |
||
|debugspawn = ''rocketbase'' |
|debugspawn = ''rocketbase'' |
||
}}<nowiki> |
}}<nowiki> |
||
| Line 23: | Line 23: | ||
{{Quote2|Neptune 1 rocket online.|PDA|Dialogue[[File:NeptuneVO.ogg]]}}<nowiki> |
{{Quote2|Neptune 1 rocket online.|PDA|Dialogue[[File:NeptuneVO.ogg]]}}<nowiki> |
||
</nowiki> |
</nowiki> |
||
The '''Neptune Escape Rocket''' is a [[Vehicles|vehicle]] that is used to leave [[Planet 4546B]]. It consists of five constructable parts: the ''Neptune Launch Platform'', the ''Neptune Gantry'', ''Neptune Ion Boosters'', ''Neptune Fuel Reserve'', and ''Neptune Cockpit''. The Neptune Launch Platform can be built using the [[Mobile Vehicle Bay]], while the other four components are built on the launch platform. The player can enter it after the Gantry, Boosters, and Fuel reserve is built. |
The '''Neptune Escape Rocket''' is a [[Vehicles|vehicle]] that is used to leave [[Planet 4546B]] and beat the game. It consists of five constructable parts: the ''Neptune Launch Platform'', the ''Neptune Gantry'', ''Neptune Ion Boosters'', ''Neptune Fuel Reserve'', and ''Neptune Cockpit''. The Neptune Launch Platform can be built using the [[Mobile Vehicle Bay]], while the other four components are built on the launch platform. The player can enter it after the Gantry, Boosters, and Fuel reserve is built. |
||
The Neptune Escape Rocket '''''cannot''''' be launched unless the [[Quarantine Enforcement Platform]] is disabled. Attempting to do so will result in the PDA informing the player that the base needs to be disabled. |
The Neptune Escape Rocket '''''cannot''''' be launched unless the [[Quarantine Enforcement Platform]] is disabled. Attempting to do so will result in the PDA informing the player that the base needs to be disabled. |
||
== Description == |
== Description == |
||
The Neptune is a ion powered rocket used to leave [[Planet 4546B]] |
The Neptune is a massive ion powered rocket used to leave [[Planet 4546B]] after the Quarantine Enforcement Platform is disabled. Once the launch procedure is completed, the final cut-scene begins and the game comes to an end. |
||
=== Blueprints === |
=== Blueprints === |
||
The [[ |
The [[Ryley Robinson|player]] can find the blueprints for the Neptune Launch Platform inside the Captain's Quarters of the [[Aurora]]. The door will be locked, but can be accessed using the entry code, which is '''2679'''. Accessing the data entry will unlock the Blueprints. |
||
The ingredients for all Neptune systems are not accessible right after acquiring it, instead the ingredients of each system are revealed after the previous system is constructed. |
The ingredients for all Neptune systems are not accessible right after acquiring it, instead the ingredients of each system are revealed after the previous system is constructed. |
||
<div style="border: |
<div style="border:1px solid LightSlateGrey; border-padding:5px 100px; padding:10px"> |
||
<tabber> |
<tabber> |
||
Neptune Launch Platform= |
Neptune Launch Platform= |
||
| Line 57: | Line 57: | ||
</div> |
</div> |
||
==Lift off== |
== Lift off == |
||
Once the Neptune Escape Rocket has been completed, the player can "say farewell" to their [[Cuddlefish]].<ref>https://trello.com/c/FvPSwury/6700-hook-up-cuddle-fish-goodbye</ref> |
Once the Neptune Escape Rocket has been completed, the player can "say farewell" to their [[Cuddlefish]].<ref>https://trello.com/c/FvPSwury/6700-hook-up-cuddle-fish-goodbye</ref> |
||
In order for the Neptune Escape Rocket to be able to launch off world there are certain, smaller requirements that have to be met. |
In order for the Neptune Escape Rocket to be able to launch off world there are certain, smaller requirements that have to be met. |
||
First, the player must activate five out of the Neptune's six, various subsystems - three on the lower deck, right after entering the rocket and two out of three on the upper deck, in the cockpit after climbing a ladder. When the required subsystems are all activated, Neptune's AI will inform the player that they are ready for liftoff; the order doesn't matter. Before the player is able to initiate the launch sequence, they must first disable the [[Quarantine Enforcement Platform]] by curing themselves of [[Kharaa Bacterium|Kharaa]] and interacting with the control terminal at the [[Mountain Island]] to turn it off. |
|||
---- |
---- |
||
===Pre-Flight Check=== |
=== Pre-Flight Check === |
||
{| class="article-table |
{| class="article-table" style="width:100%; border:0; border-spacing:0" |
||
|- |
|- |
||
! |
! style="width:20%; text-align:center" | |
||
! |
! style="width:80%; text-align:center" | |
||
|- style="font-size:12px" |
|||
|- |
|||
| style="text-align:center |
| style="text-align:center" | [[File:Log-128.png]] |
||
| style="text-align:left |
| style="text-align:left" | ''"NEPTUNE: Life support systems online."'' |
||
[[File:Lifesupport on.ogg]] |
[[File:Lifesupport on.ogg]] |
||
|- style="font-size:12px" |
|||
|- |
|||
| style="text-align:center |
| style="text-align:center" | [[File:Log-128.png]] |
||
| style="text-align:left |
| style="text-align:left" | ''"NEPTUNE: Pressurizing hydraulics."'' |
||
[[File:Hydrolics on.ogg]] |
[[File:Hydrolics on.ogg]] |
||
|- style="font-size:12px" |
|||
|- |
|||
| style="text-align:center |
| style="text-align:center" | [[File:Log-128.png]] |
||
| style="text-align:left |
| style="text-align:left" | ''"NEPTUNE: Auxiliary power unit online."'' |
||
[[File:Auxilery on.ogg]] |
[[File:Auxilery on.ogg]] |
||
|- style="font-size:12px" |
|||
|- |
|||
| style="text-align:center |
| style="text-align:center" | [[File:Log-128.png]] |
||
| style="text-align:left |
| style="text-align:left" | ''"NEPTUNE: Time Capsule ready."'' |
||
[[File:Time Capsule.ogg]] |
[[File:Time Capsule.ogg]] |
||
|- style="font-size:12px" |
|||
|- |
|||
| style="text-align:center |
| style="text-align:center" | [[File:Log-128.png]] |
||
| style="text-align:left |
| style="text-align:left" | ''"NEPTUNE: Communications systems array active."'' |
||
[[File:Comms on.ogg]] |
[[File:Comms on.ogg]] |
||
|- style="font-size:12px" |
|||
|- |
|||
| style="text-align:center |
| style="text-align:center" | [[File:Log-128.png]] |
||
| style="text-align:left |
| style="text-align:left" | ''"NEPTUNE: Primary computer systems active."'' |
||
[[File:Computer on.ogg]] |
[[File:Computer on.ogg]] |
||
|- style="font-size:12px" |
|||
|- |
|||
| style="text-align:center |
| style="text-align:center" | [[File:Log-128.png]] |
||
| style="text-align:left |
| style="text-align:left" | ''"All systems GO."'' |
||
[[File:AllSystemsGo.ogg]] |
[[File:AllSystemsGo.ogg]] |
||
|} |
|} |
||
===Launch Sequence=== |
=== Launch Sequence === |
||
{| class="article-table |
{| class="article-table" style="width: 100%; border:0; border-spacing:0" |
||
|- |
|- |
||
! |
! style="width:20%; text-align:center" | |
||
! |
! style="width:80%; text-align:center" | |
||
|- style="font-size:12px" |
|||
|- |
|||
| style="text-align:center |
| style="text-align:center" | [[File:Log-128.png]] |
||
| style="text-align:left |
| style="text-align:left" | ''"Ready to launch on your command captain.<br/>Launch in 10...9...8...7...6...5...4...3...2...1...<br/>Time capsule jettisoned.<br/>Caution: approaching orbital debris field.<br/>Orbital debris field clear. Performing gravity turn maneuver.<br/>Confirm destination coordinates: nearest interstellar phasegate.<br/>Engaging ion thrusters in 3...2...1..."'' |
||
[[File:EndCinematicSFX.ogg]] |
[[File:EndCinematicSFX.ogg]] |
||
|- style="font-size:12px" |
|||
|- |
|||
| style="text-align:center |
| style="text-align:center" | [[File:Log-128.png]] |
||
| style="text-align:left |
| style="text-align:left" | ''"Welcome home to Alterra. Permission to land will be granted once you have settled your outstanding balance of: 1,000,000,000,000 credits."'' |
||
[[File:1 trillion credits.ogg]] |
[[File:1 trillion credits.ogg]] |
||
|- style="font-size:12px" |
|||
|- |
|||
| style="text-align:center |
| style="text-align:center" | [[File:Log-128.png]] |
||
| style="text-align:left |
| style="text-align:left" | ''"What is a wave without the ocean?<br/>A beginning without an end?<br/>They are different, but they go together.<br/>Now you go among the stars, and I fall among the sand.<br/>We are different.<br/>But we go... together."'' |
||
[[File:Rocket Emperor.ogg]] |
[[File:Rocket Emperor.ogg]] |
||
|} |
|} |
||
| Line 128: | Line 128: | ||
<!--To be continued here--> |
<!--To be continued here--> |
||
<nowiki></nowiki><!--nowiki removes needless <p> before the following section!--> |
<nowiki></nowiki><!--nowiki removes needless <p> before the following section!--> |
||
==Original Launch Sequence== |
== Original Launch Sequence == |
||
[[File:End_cin_sfx.ogg]] |
[[File:End_cin_sfx.ogg]] |
||
| Line 134: | Line 134: | ||
Neptune Launch Platform |
Neptune Launch Platform |
||
{{Recipe2|page |
{{Recipe2|page=Neptune Launch Platform}} |
||
Neptune Gantry |
Neptune Gantry |
||
{{Recipe2|page |
{{Recipe2|page=Neptune Gantry}} |
||
Neptune Boosters |
Neptune Boosters |
||
{{Recipe2|page |
{{Recipe2|page=Neptune Boosters}} |
||
Neptune Fuel Reserve |
Neptune Fuel Reserve |
||
{{Recipe2|page |
{{Recipe2|page=Neptune Fuel Reserve}} |
||
Neptune Cockpit |
Neptune Cockpit |
||
{{Recipe2|page |
{{Recipe2|page=Neptune Cockpit}} |
||
{| class="article-table" style="width: 100%; |
{| class="article-table" style="width: 100%; border:0; border-spacing:0" |
||
|- |
|- |
||
! Total Raw Materials List (alphabetical) |
! Total Raw Materials List (alphabetical) |
||
! |
! |
||
|- |
|- |
||
| [[Image:Acid Mushroom.png|52px|link=Acid Mushroom]]<span class="times" style="font-size:150%;vertical-align:middle;margin: |
| [[Image:Acid Mushroom.png|52px|link=Acid Mushroom]]<span class="times" style="font-size:150%; vertical-align:middle; margin:3px"> ×'''4'''</span> |
||
| [[Image:Lithium.png|52px|link=Lithium]]<span class="times" style="font-size:150%;vertical-align:middle;margin: |
| [[Image:Lithium.png|52px|link=Lithium]]<span class="times" style="font-size:150%; vertical-align:middle; margin:3px"> ×'''8'''</span> |
||
|- |
|- |
||
| [[Image:Copper Ore.png|52px|link=Copper Ore]]<span class="times" style="font-size:150%;vertical-align:middle;margin: |
| [[Image:Copper Ore.png|52px|link=Copper Ore]]<span class="times" style="font-size:150%; vertical-align:middle; margin:3px"> ×'''10'''</span> |
||
| [[Image:Nickel Ore.png|52px|link=Nickel Ore]]<span class="times" style="font-size:150%;vertical-align:middle;margin: |
| [[Image:Nickel Ore.png|52px|link=Nickel Ore]]<span class="times" style="font-size:150%; vertical-align:middle; margin:3px"> ×'''3'''</span> |
||
|- |
|- |
||
| [[Image:Creepvine Seed Cluster.png|52px|link=Creepvine Seed Cluster]]<span class="times" style="font-size:150%;vertical-align:middle;margin: |
| [[Image:Creepvine Seed Cluster.png|52px|link=Creepvine Seed Cluster]]<span class="times" style="font-size:150%; vertical-align:middle; margin:3px"> ×'''3'''</span> |
||
| [[Image:Quartz.png|52px|link=Quartz]]<span class="times" style="font-size:150%;vertical-align:middle;margin: |
| [[Image:Quartz.png|52px|link=Quartz]]<span class="times" style="font-size:150%; vertical-align:middle; margin:3px"> ×'''2'''</span> |
||
|- |
|- |
||
| [[Image:Crystalline Sulfur.png|52px|link=Crystalline Sulfur]]<span class="times" style="font-size:150%;vertical-align:middle;margin: |
| [[Image:Crystalline Sulfur.png|52px|link=Crystalline Sulfur]]<span class="times" style="font-size:150%; vertical-align:middle; margin:3px"> ×'''4'''</span> |
||
| [[Image:Ruby.png|52px|link=Ruby]]<span class="times" style="font-size:150%;vertical-align:middle;margin: |
| [[Image:Ruby.png|52px|link=Ruby]]<span class="times" style="font-size:150%; vertical-align:middle; margin:3px"> ×'''2'''</span> |
||
|- |
|- |
||
| [[Image:Deep Shroom.png|52px|link=Deep Shroom]]<span class="times" style="font-size:150%;vertical-align:middle;margin: |
| [[Image:Deep Shroom.png|52px|link=Deep Shroom]]<span class="times" style="font-size:150%; vertical-align:middle; margin:3px"> ×'''3'''</span> |
||
| [[Image:Salt Deposit.png|52px|link=Salt Deposit]]<span class="times" style="font-size:150%;vertical-align:middle;margin: |
| [[Image:Salt Deposit.png|52px|link=Salt Deposit]]<span class="times" style="font-size:150%; vertical-align:middle; margin:3px"> ×'''1'''</span> |
||
|- |
|- |
||
| [[Image:Gel Sack.png|52px|link=Gel Sack]]<span class="times" style="font-size:150%;vertical-align:middle;margin: |
| [[Image:Gel Sack.png|52px|link=Gel Sack]]<span class="times" style="font-size:150%; vertical-align:middle; margin:3px"> ×'''2'''</span> |
||
| [[Image:Titanium.png|52px|link=Titanium]]<span class="times" style="font-size:150%;vertical-align:middle;margin: |
| [[Image:Titanium.png|52px|link=Titanium]]<span class="times" style="font-size:150%; vertical-align:middle; margin:3px"> ×'''60'''</span> ''or'' [[Image:Metal Salvage.png|52px|link=Metal Salvage]]<span class="times" style="font-size:150%; vertical-align:middle; margin:3px"> ×'''15'''</span> |
||
|- |
|- |
||
| [[Image:Gold.png|52px|link=Gold]]<span class="times" style="font-size:150%;vertical-align:middle;margin: |
| [[Image:Gold.png|52px|link=Gold]]<span class="times" style="font-size:150%; vertical-align:middle; margin:3px"> ×'''10'''</span> |
||
| [[Image:Silver Ore.png|52px|link=Silver Ore]]<span class="times" style="font-size:150%;vertical-align:middle;margin: |
| [[Image:Silver Ore.png|52px|link=Silver Ore]]<span class="times" style="font-size:150%; vertical-align:middle; margin:3px"> ×'''8'''</span> |
||
|- |
|- |
||
| [[Image:Ion Cube.png|52px|link=Ion Cube]]<span class="times" style="font-size:150%;vertical-align:middle;margin: |
| [[Image:Ion Cube.png|52px|link=Ion Cube]]<span class="times" style="font-size:150%; vertical-align:middle; margin:3px"> ×'''4'''</span> |
||
| [[Image:Stalker Tooth.png|52px|link=Stalker Tooth]]<span class="times" style="font-size:150%;vertical-align:middle;margin: |
| [[Image:Stalker Tooth.png|52px|link=Stalker Tooth]]<span class="times" style="font-size:150%; vertical-align:middle; margin:3px"> ×'''1'''</span> |
||
|- |
|- |
||
| [[Image:Kyanite.png|52px|link=Kyanite]]<span class="times" style="font-size:150%;vertical-align:middle;margin: |
| [[Image:Kyanite.png|52px|link=Kyanite]]<span class="times" style="font-size:150%; vertical-align:middle; margin:3px"> ×'''4'''</span> |
||
| [[Image:Table Coral Sample.png|52px|link=Table Coral Sample]]<span class="times" style="font-size:150%;vertical-align:middle;margin: |
| [[Image:Table Coral Sample.png|52px|link=Table Coral Sample]]<span class="times" style="font-size:150%; vertical-align:middle; margin:3px"> ×'''6'''</span> |
||
|- |
|- |
||
| [[Image:Lead.png|52px|link=Lead]]<span class="times" style="font-size:150%;vertical-align:middle;margin: |
| [[Image:Lead.png|52px|link=Lead]]<span class="times" style="font-size:150%; vertical-align:middle; margin:3px"> ×'''4'''</span> |
||
| |
| |
||
|} |
|} |
||
== Data Bank Entry == |
== Data Bank Entry == |
||
{| class="article-table |
{| class="article-table" style="width:100%; border:0; border-spacing:0" |
||
|- |
|- |
||
! |
! style="width:100%; text-align:center" |[[File:RocketEncy.png|centre|660px]] |
||
|- |
|- |
||
| style="text-align:left; font-size:12px;" | |
| style="text-align:left; font-size:12px;" | |
||
| Line 198: | Line 198: | ||
It consists of five independently constructible elements: |
It consists of five independently constructible elements: |
||
- Launch Platform: Floating platform provides a solid base from which to launch the rocket<br |
- Launch Platform: Floating platform provides a solid base from which to launch the rocket<br/> |
||
- Gantry: Provides structural support<br |
- Gantry: Provides structural support<br/> |
||
- Stage 1: Primary thrusters for reaching atmosphere escape velocity<br |
- Stage 1: Primary thrusters for reaching atmosphere escape velocity<br/> |
||
- Stage 2: Fuel reserve<br |
- Stage 2: Fuel reserve<br/> |
||
- Stage 3: Cockpit |
- Stage 3: Cockpit |
||
Features:<br |
Features:<br/> |
||
- One-person life support<br |
- One-person life support<br/> |
||
- Short-range communications<br |
- Short-range communications<br/> |
||
- Adaptable power supply<br |
- Adaptable power supply<br/> |
||
- Orbital shielding<br |
- Orbital shielding<br/> |
||
- Onboard time capsule |
- Onboard time capsule |
||
| Line 216: | Line 216: | ||
|} |
|} |
||
{{Clear}} |
{{Clear}} |
||
==Achievements== |
|||
== Achievements == |
|||
{{Main|Achievements}} |
{{Main|Achievements}} |
||
{{:Achievements/Leave Only Time Capsules|}} |
{{:Achievements/Leave Only Time Capsules|}} |
||
| Line 224: | Line 225: | ||
== Gallery == |
== Gallery == |
||
<tabber> |
<tabber> |
||
Platform= |
|||
Concept Art= |
|||
{{#tag:tabber| |
|||
Launch Platform= |
|||
<gallery widths="200" spacing="small"> |
<gallery widths="200" spacing="small"> |
||
Neptune_Platform_side.jpg|Overhead view of the Launch Platform |
|||
Rocket Stages Concept.png|Concept art of the different Neptune stages |
|||
Neptune Platform Ladder.jpg|A side ladder used to board the platform |
|||
Neptune_Platform_Bottom.jpg|Underside view of the launch platform |
|||
NeptuneModificationStation.jpg|Neptune Escape Rocket fabrication/customization terminal |
|||
Neptune_FabricationDrones.jpg|Platform Fabrication Drones |
|||
</gallery> |
|||
{{!}}-{{!}} |
|||
Gantry= |
|||
<gallery widths="200" spacing="small"> |
|||
Gantry_Side1.jpg|Side perspecive of the Gantry pillar |
|||
Gantry_Side2.jpg|View of the pillar from the platform |
|||
Gantry_Elevator_Controls.jpg|Gantry elevator lift |
|||
Gantry_Top_Proper.jpg|Top bridge of the gantry leading to Neptune Escape Rocket access |
|||
</gallery> |
|||
}} |
|||
|-|Ion Boosters= |
|||
<gallery widths="200" spacing="small"> |
|||
Ion_Booster_FloorView.jpg|Ion booster platform perspective |
|||
Ion_Booster_Bottom.jpg|Neptune Escape Rocket propulsion thrusters under the Booster |
|||
Ion_Booster_Side.jpg|Side perspective of the boosters |
|||
Ion_Booster_Top.jpg|Top view of the boosters |
|||
Ion_Booster_Details.jpg|Ion booster framework |
|||
</gallery> |
</gallery> |
||
|-| |
|-| |
||
Fuel Reserve= |
|||
Models= |
|||
{{#tag:tabber| |
|||
<gallery> |
|||
Exterior= |
|||
TimeCapsuleTerminalModel.jpeg|Model of Time Capsule Terminal from [https://sketchfab.com/3d-models/time-capsule-terminal-4c729c84062c4a2b81bc2689e8468edd Sketchfab] |
|||
<gallery widths="200" spacing="small"> |
|||
Reserve_Exterior_Side.jpg|Side perspective of the Fuel Reserve |
|||
Reserve_Exterior_Top.jpg|The top of the reserve without the Cockpit. The hallway and central column engine exposed |
|||
Reserve_Exterior_Door.jpg|Neptune Escape Rocket Entrance |
|||
</gallery> |
</gallery> |
||
{{!}}-{{!}} |
|||
Interior= |
|||
<gallery widths="200" spacing="small"> |
|||
Reserve_Interior_Door.jpg|Neptune Escape Rocket door internal side |
|||
Reserve_Interior_NoLadder.jpg|The unroofed reserve hallway without the cockpit |
|||
NeptuneHallway.png|Fuel Reserve hallway |
|||
Reserve Interior Locker.jpg|Central column locker(s) |
|||
Reserve_Interior_Ladder.jpg|Ladder leading to the bridge |
|||
NeptuneCommsDisabled.png|Reserve Systems: Communications Array - Offline |
|||
NeptuneHydraulicEnabled.png|Reserve Systems: Hydraulic Systems - Online |
|||
NeptuneAuxPower.gif|Reserve System(s) lever activation animation. |
|||
</gallery> |
|||
}} |
|||
|-| |
|-| |
||
Cockpit= |
|||
Other= |
|||
{{#tag:tabber| |
|||
<gallery widths="200" spacing="small"> |
|||
Exterior= |
|||
Fox3d-entertainment-rocketship.jpg|Another, different file for PDA entry. |
|||
<gallery widths="200" spacing="small"> |
|||
NeptuneCockpitSide.png|Finished Cockpit |
|||
NeptuneCockpitTopDown.png|Bridge seen through bow windshield |
|||
NeptuneExteriorNightSkylight.jpg|Bridge internal lighting |
|||
NeptuneRocketConstructionFinish.gif|Cockpit fabrication |
|||
</gallery> |
|||
{{!}}-{{!}} |
|||
Interior= |
|||
=== Overview === |
|||
<gallery widths="200" spacing="small"> |
|||
CommandChairSide.jpg|Bridge overview |
|||
CommandChairBackProper.jpg|Bridge system consoles and display HUDs |
|||
CommandChairFront.jpg|Close-up of the command chair with both holographic system displays |
|||
NeptuneCockpitCeiling.jpg|Bow cockpit windshield |
|||
NeptunePowerCore.gif|Operational Neptune Rocket engine core; connecting the Fuel Reserve and Cockpit. |
|||
</gallery> |
|||
=== Cockpit Systems === |
|||
<gallery widths="200" spacing="small"> |
|||
NeptuneLifeSupport_Static.jpg|Life Support - Offline |
|||
NeptuneTimeCapsule_Static.jpg|Time Capsule - Offline |
|||
NeptuneCPU_Static.jpg|Neptune CPU - Offline |
|||
NeptuneCockpitSystems.jpg|Cockpit Systems holographic display HUD |
|||
NeptuneReserveSystems.jpg|Reserve Systems holographic display HUD |
|||
NeptuneLifeSupport.gif|Life Support initialization animation. |
|||
NeptuneTimeCapsule.gif|Time Capsule access animation. |
|||
Time capsule hud.jpg|[[Time Capsule]] Inventory HUD |
|||
NeptuneCPU.gif|Central Processing Unit configuration animation. |
|||
</gallery> |
|||
}} |
|||
|-| |
|||
Neptune Escape Rocket= |
|||
<gallery widths="200" spacing="small"> |
|||
Gantry_Complete_Rocket.jpg|The Rocket complete alongside the Gantry |
|||
Neptune_Name.jpg|Rocket Name |
|||
Neptune_Ground_view.jpg|Platform perspective of the Neptune Escape Rocket |
|||
Neptune_Name_Customized.jpg|Neptune Escape Rocket exterior customization example |
|||
Neptune_Ground_view_Customized.jpg|Ground view of a customized Neptune Escape Rocket |
|||
</gallery> |
|||
|-|Other= |
|||
<gallery widths="200" spacing="small"> |
|||
Rocket Stages Concept.png|Concept art of the different Neptune stages |
|||
TimeCapsuleTerminalModel.jpeg|Model of Time Capsule Terminal from [https://sketchfab.com/3d-models/time-capsule-terminal-4c729c84062c4a2b81bc2689e8468edd Sketchfab] |
|||
Fox3d-entertainment-rocketship.jpg|Another, different file for PDA entry |
|||
</gallery> |
</gallery> |
||
</tabber> |
</tabber> |
||
== Trivia == |
== Trivia == |
||
*The Neptune Launch Platform would originally require an [[Cut Content#Ion Cube Matrix|Ion Cube Matrix]] in order to craft the Neptune Fuel Reserve. Version 1.0 removed the Ion Cube Matrix (which was not used in any other crafting recipe) with its place being taken by two [[Ion Power Cell]]s. |
* The Neptune Launch Platform would originally require an [[Cut Content#Ion Cube Matrix|Ion Cube Matrix]] in order to craft the Neptune Fuel Reserve. Version 1.0 removed the Ion Cube Matrix (which was not used in any other crafting recipe) with its place being taken by two [[Ion Power Cell]]s. |
||
*The Neptune Escape Rocket was |
* The Neptune Escape Rocket was originally supposed to fly to Earth instead of a phasegate and use "dark matter thrusters" instead of "ion boosters", as evidenced by the original launch sequence dialogue found in the game's files. |
||
*The Neptune Launch Platform, Neptune Ion Booster's clamps, and Neptune Escape Rocket interior color scheme are not editable; despite any color changes to the Neptune Escape Rocket's exterior. |
* The Neptune Launch Platform, Neptune Ion Booster's clamps, and Neptune Escape Rocket interior color scheme are not editable; despite any color changes to the Neptune Escape Rocket's exterior. |
||
*When the player launches the Neptune Escape Rocket, the player can use commands (Freecam) to witness the fact that the Neptune didn't really take off. |
* When the player launches the Neptune Escape Rocket, the player can use commands (Freecam) to witness the fact that the Neptune didn't really take off. |
||
== Bugs == |
== Bugs == |
||
{{Bugs}} |
{{Bugs}} |
||
{{XBOX}} if you place [[Cut_Content#White_Tablet|White Tablets]] with Console Commands on it, it will start to tilt until it turns upside down. |
{{XBOX}} if you place [[Cut_Content#White_Tablet|White Tablets]] with Console Commands on it, it will start to tilt until it turns upside down. |
||
{{PC}} Standing on the edge of the boarding platform at the top of the Gantry, the interior soundscape can be heard before the Cockpit has been constructed. |
|||
== References == |
== References == |
||
<references /> |
<references /> |
||
[[pl:Rakieta ewakuacyjna Neptun]] |
|||
[[ru:Нептун]] |
[[ru:Нептун]] |
||
[[fr:Fusée d'évacuation Neptune]] |
[[fr:Fusée d'évacuation Neptune]] |
||
[[Category:Story]] |
[[Category:Story]] |
||
[[Category:Uses Energy]] |
[[Category:Uses Energy]] |
||
Latest revision as of 03:02, 1 March 2024
.png)
|
Read at own risk This article contains unmarked spoilers. Players new to the game would want to avoid or be cautious toward this article. |
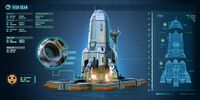
<infobox> <title source="title1"><default>Neptune Escape Rocket</default></title>
<image source="image4"></image> <label>Category</label> <label>Category</label> <label>Description</label> <label>Hull Integrity</label> <label>Health</label> <label>Blueprint Source</label> <label>Acquired From</label> <label>Fragments</label> <label>Build Time</label> <label>Size</label> <label>Damage</label> <label>Drill Yield</label> <label>Biome</label> <label>Location</label> <label>Coordinates</label> <label>Perks</label> <label>Penalties</label> <label>Attribute</label> <label>Drops</label>
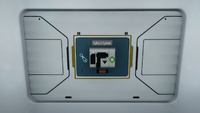
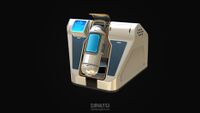
<label>Debug Spawn</label> <format> * {{#explode:rocketbase||1}} </format> <label>Debug Spawn</label> <format> * {{#explode:{{{item_id}}}||1}} </format><label>Music</label> <group layout="horizontal"> <label>Food</label> <label>H2O</label> </group> <label>Bioreactor</label> <label>Byproduct</label> <group collapse="open" class="tab-fragment"> <header>Fragments</header> <image source="image2"></image> <label>Item</label> <label>Description</label> <label>Location</label> <label>Fragments</label> <label>Attribute</label> <label>Debug Spawn</label> <format>{{{debugspawn2}}}</format> <image source="image3"></image> <label>Item</label> <label>Description</label> <label>Location</label> <label>Fragments</label> <label>Attribute</label> <label>Debug Spawn</label> <format>{{{debugspawn3}}}</format> <image source="image5"></image> <label>Item</label> <label>Description</label> <label>Location</label> <label>Fragments</label> <label>Attribute</label> <label>Debug Spawn</label> <format>{{{debugspawn4}}}</format> </group> <group collapse="open" class="tab-fragment"> <header>Data Boxes</header> <image source="image6"></image> <label>Location</label> </group> </infobox>
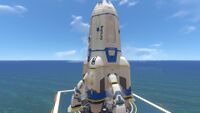
The Neptune Escape Rocket is a vehicle that is used to leave Planet 4546B and beat the game. It consists of five constructable parts: the Neptune Launch Platform, the Neptune Gantry, Neptune Ion Boosters, Neptune Fuel Reserve, and Neptune Cockpit. The Neptune Launch Platform can be built using the Mobile Vehicle Bay, while the other four components are built on the launch platform. The player can enter it after the Gantry, Boosters, and Fuel reserve is built.
The Neptune Escape Rocket cannot be launched unless the Quarantine Enforcement Platform is disabled. Attempting to do so will result in the PDA informing the player that the base needs to be disabled.
Description
The Neptune is a massive ion powered rocket used to leave Planet 4546B after the Quarantine Enforcement Platform is disabled. Once the launch procedure is completed, the final cut-scene begins and the game comes to an end.
Blueprints
The player can find the blueprints for the Neptune Launch Platform inside the Captain's Quarters of the Aurora. The door will be locked, but can be accessed using the entry code, which is 2679. Accessing the data entry will unlock the Blueprints. The ingredients for all Neptune systems are not accessible right after acquiring it, instead the ingredients of each system are revealed after the previous system is constructed.
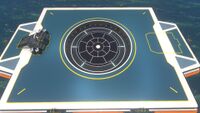
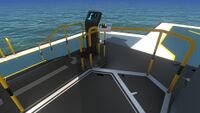
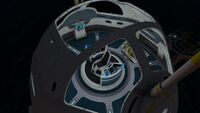
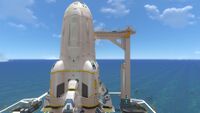
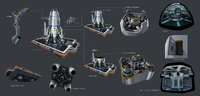
<tabber> Neptune Launch Platform= The Neptune Launch Platform is a very large floating barge with ladders on each side. In the middle is a circular indentation where the rocket will sit. On one side is a terminal used to construct the individual rocket segments, and can be used to rename and recolor the rocket once it has been fully completed. The terminal possesses fabrication drones similar to the Mobile Vehicle Bay. |-| Neptune Gantry=

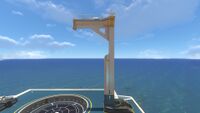
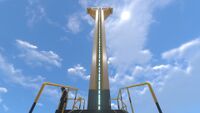
The Neptune Gantry is the second component of the Neptune Rocket. It consists of a small metal pillar with a bridge (which eventually leads into the Neptune Rocket) and an elevator which can lift the player to the top of the gantry to access the cockpit. |-| Neptune Ion Boosters=

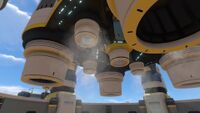
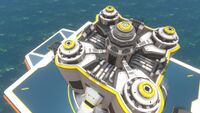
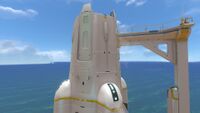
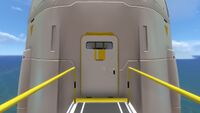
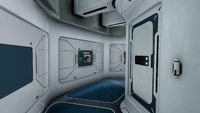
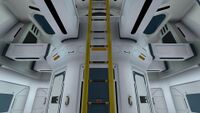
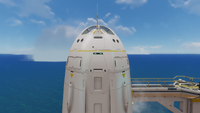
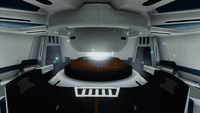
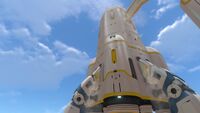
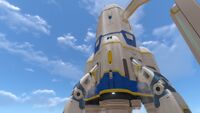
The first stage of the Neptune Rocket consists of a cylindrical shape with launching clamps connected to it. This portion consists of the thrusters which will provide enough velocity to leave the orbit, and serves no personal function other than to progress to the other stage. |-| Neptune Fuel Reserve=

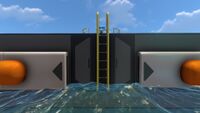
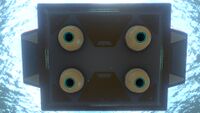
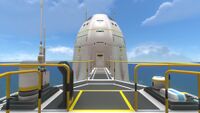
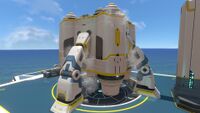
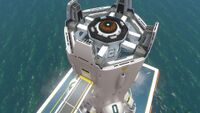
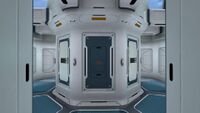
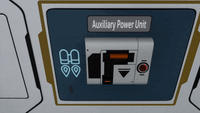
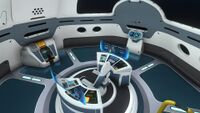
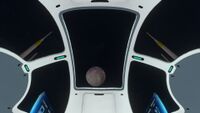
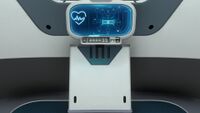
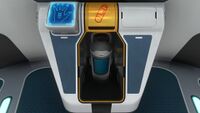
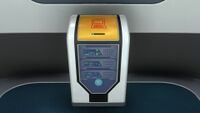
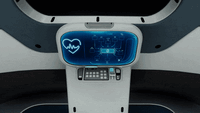
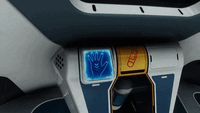
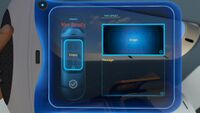
The second stage adds more to the body of the rocket, including the hatch that leads inside, where the player can find a ladder leading up to the cockpit, as well as lockers surrounding the central column. Three levers can be found in this section as well, and it is required to pull them in order to launch. The engine is housed here as well. |-| Neptune Cockpit=

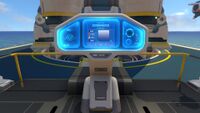
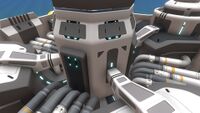
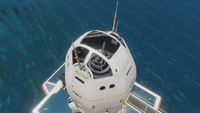
The third and final stage represents the main cockpit of the Neptune Rocket. Here the player can access the Time Capsule launcher, main CPU, life support systems, and the command chair which will initiate the launch to escape Planet 4546B. </tabber>
Lift off
Once the Neptune Escape Rocket has been completed, the player can "say farewell" to their Cuddlefish.[1]
In order for the Neptune Escape Rocket to be able to launch off world there are certain, smaller requirements that have to be met.
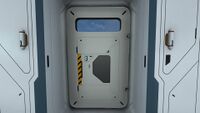
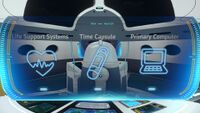
First, the player must activate five out of the Neptune's six, various subsystems - three on the lower deck, right after entering the rocket and two out of three on the upper deck, in the cockpit after climbing a ladder. When the required subsystems are all activated, Neptune's AI will inform the player that they are ready for liftoff; the order doesn't matter. Before the player is able to initiate the launch sequence, they must first disable the Quarantine Enforcement Platform by curing themselves of Kharaa and interacting with the control terminal at the Mountain Island to turn it off.
Pre-Flight Check
| "NEPTUNE: Life support systems online." | |
| "NEPTUNE: Pressurizing hydraulics." | |
| "NEPTUNE: Auxiliary power unit online." | |
| "NEPTUNE: Time Capsule ready." | |
| "NEPTUNE: Communications systems array active." | |
| "NEPTUNE: Primary computer systems active." | |
| "All systems GO." |
Launch Sequence
| "Ready to launch on your command captain. Launch in 10...9...8...7...6...5...4...3...2...1... Time capsule jettisoned. Caution: approaching orbital debris field. Orbital debris field clear. Performing gravity turn maneuver. Confirm destination coordinates: nearest interstellar phasegate. Engaging ion thrusters in 3...2...1..." | |
| "Welcome home to Alterra. Permission to land will be granted once you have settled your outstanding balance of: 1,000,000,000,000 credits." | |
| "What is a wave without the ocean? A beginning without an end? They are different, but they go together. Now you go among the stars, and I fall among the sand. We are different. But we go... together." |
Original Launch Sequence
Crafting
Neptune Launch Platform
 ×4
×4


Neptune Gantry


Neptune Boosters


Neptune Fuel Reserve
 ×4
×4 ×4
×4

Neptune Cockpit


| Total Raw Materials List (alphabetical) | |
|---|---|
 ×4 ×4
|
 ×8 ×8
|
 ×10 ×10
|
 ×3 ×3
|
 ×3 ×3
|
 ×2 ×2
|
 ×4 ×4
|
 ×2 ×2
|
 ×3 ×3
|
 ×1 ×1
|
 ×2 ×2
|
 ×60 or ×60 or  ×15 ×15
|
 ×10 ×10
|
 ×8 ×8
|
 ×4 ×4
|
 ×1 ×1
|
 ×4 ×4
|
 ×6 ×6
|
 ×4 ×4
|
Data Bank Entry
 |
|---|
|
This blueprint set was developed at Alterra headquarters specifically to get you off 4546B and back to the nearest phasegate. It takes into account local gravity, astronomical data and available resources, and is piloted by AI. It may be adapted to employ whatever power source is available - but it will require a lot of it. It consists of five independently constructible elements: - Launch Platform: Floating platform provides a solid base from which to launch the rocket Features: Warning: Onboard AI will not launch if local threats are detected. Warning: The use of alien materials to power the craft may increase its range in unpredictable ways. |
Achievements
| Spoiler alert: The following section contains story related material.
| |

|
Leave Only Time Capsules Create and deploy a time capsule
|
| Spoiler alert: The following section contains story related material.
| |

|
Go Among the Stars Launch the neptune rocket
|
Gallery
<tabber> Platform= <tabber> Launch Platform=
Overhead view of the Launch Platform
A side ladder used to board the platform
Underside view of the launch platform
Neptune Escape Rocket fabrication/customization terminal

Platform Fabrication Drones


|-| Gantry=
Side perspecive of the Gantry pillar
View of the pillar from the platform
Gantry elevator lift
Top bridge of the gantry leading to Neptune Escape Rocket access


</tabber> |-|Ion Boosters=

Ion booster platform perspective
Neptune Escape Rocket propulsion thrusters under the Booster
Side perspective of the boosters
Top view of the boosters
Ion booster framework


|-| Fuel Reserve= <tabber> Exterior=
Side perspective of the Fuel Reserve
The top of the reserve without the Cockpit. The hallway and central column engine exposed
Neptune Escape Rocket Entrance


|-| Interior=
Neptune Escape Rocket door internal side
The unroofed reserve hallway without the cockpit
Fuel Reserve hallway

Central column locker(s)
Ladder leading to the bridge
Reserve Systems: Communications Array - Offline
Reserve Systems: Hydraulic Systems - Online
Reserve System(s) lever activation animation.


</tabber>
|-| Cockpit= <tabber> Exterior=
Finished Cockpit
Bridge seen through bow windshield
Bridge internal lighting

Cockpit fabrication


|-| Interior=
Overview

Bridge overview
Bridge system consoles and display HUDs

Close-up of the command chair with both holographic system displays
Bow cockpit windshield
Operational Neptune Rocket engine core; connecting the Fuel Reserve and Cockpit.


Cockpit Systems
Life Support - Offline
Time Capsule - Offline
Neptune CPU - Offline
Cockpit Systems holographic display HUD

Reserve Systems holographic display HUD
Life Support initialization animation.
Time Capsule access animation.
Time Capsule Inventory HUD

Central Processing Unit configuration animation.


</tabber> |-| Neptune Escape Rocket=
The Rocket complete alongside the Gantry

Rocket Name
Platform perspective of the Neptune Escape Rocket
Neptune Escape Rocket exterior customization example
Ground view of a customized Neptune Escape Rocket


|-|Other=
Concept art of the different Neptune stages
Model of Time Capsule Terminal from Sketchfab
Another, different file for PDA entry


</tabber>
Trivia
- The Neptune Launch Platform would originally require an Ion Cube Matrix in order to craft the Neptune Fuel Reserve. Version 1.0 removed the Ion Cube Matrix (which was not used in any other crafting recipe) with its place being taken by two Ion Power Cells.
- The Neptune Escape Rocket was originally supposed to fly to Earth instead of a phasegate and use "dark matter thrusters" instead of "ion boosters", as evidenced by the original launch sequence dialogue found in the game's files.
- The Neptune Launch Platform, Neptune Ion Booster's clamps, and Neptune Escape Rocket interior color scheme are not editable; despite any color changes to the Neptune Escape Rocket's exterior.
- When the player launches the Neptune Escape Rocket, the player can use commands (Freecam) to witness the fact that the Neptune didn't really take off.
Bugs
|
This section contains bugs related to Neptune Escape Rocket. Make sure to only post reproducible bugs, and use appropriate system template ( |
![]() if you place White Tablets with Console Commands on it, it will start to tilt until it turns upside down.
if you place White Tablets with Console Commands on it, it will start to tilt until it turns upside down.
![]() Standing on the edge of the boarding platform at the top of the Gantry, the interior soundscape can be heard before the Cockpit has been constructed.
Standing on the edge of the boarding platform at the top of the Gantry, the interior soundscape can be heard before the Cockpit has been constructed.