
User:ChrisFo/Testing: Difference between revisions
(Removing all content from page) Tag: sourceedit |
No edit summary Tag: sourceedit |
||
| Line 1: | Line 1: | ||
=Twitter scm test= |
|||
==Real time development tracker== |
|||
<center> |
|||
<twitter screen-name="Subnauticascm" chrome="transparent nofooter" tweet-limit="2" height="500" width="300" theme="dark"> |
|||
</twitter> |
|||
</center> |
|||
=TOC Test= |
|||
{| id="toc" class="toc" summary="Contents" width="auto" |
|||
! Contents |
|||
| [[#0–9|0–9]] <br /> [[#A|A]] <br /> [[#B|B]] <br /> [[#C|C]] <br /> [[#D|D]] <br /> [[#E|E]] <br /> [[#F|F]] <br /> [[#G|G]] <br /> [[#H|H]] <br /> [[#I|I]] <br /> [[#J|J]] <br /> [[#K|K]] <br /> [[#L|L]] <br /> [[#M|M]] <br /> [[#N|N]] <br /> [[#O|O]] <br /> [[#P|P]] <br /> [[#Q|Q]] <br /> [[#R|R]] <br /> [[#S|S]] <br /> [[#T|T]] <br /> [[#U|U]] <br /> [[#V|V]] <br /> [[#W|W]] <br /> [[#X|X]] <br /> [[#Y|Y]] <br /> [[#Z|Z]] |
|||
|} |
|||
{| id="toc" class="toc" summary="Contents" |
|||
! Contents: |
|||
| [[#0–9|0–9]] · [[#A|A]] · [[#B|B]] · [[#C|C]] · [[#D|D]] · [[#E|E]] · [[#F|F]] · [[#G|G]] · [[#H|H]] · [[#I|I]] · [[#J|J]] · [[#K|K]] · [[#L|L]] · [[#M|M]] · [[#N|N]] · [[#O|O]] · [[#P|P]] · [[#Q|Q]] · [[#R|R]] · [[#S|S]] · [[#T|T]] · [[#U|U]] · [[#V|V]] · [[#W|W]] · [[#X|X]] · [[#Y|Y]] · [[#Z|Z]] |
|||
|} |
|||
---- |
|||
=Add tabbers into a box= |
|||
== Description == |
|||
The '''Lost River''' is generally gloomy and foggy, possessing a distinct greenish water tint that is mostly illuminated by acidic brine pools. These pools cover almost all of the lower portions of the caverns. The green brine found throughout most of the cave system will harm the player, but the blue brine found within the Tree Cove is harmless. |
|||
The [[Disease Research Facility]] is located in the '''Lost River''', inside a cavern. |
|||
The '''Lost River''' is composed of five distinct areas: |
|||
<div class="MainPageBox"> |
|||
<div class="lostRiverTabber"> |
|||
<tabber> |
|||
Bones Field= |
|||
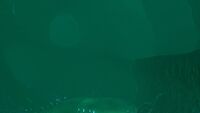
[[File:LostRiver BonesField V02b lorez.jpg|thumb|"Bones Field"|300px]] |
|||
The '''Bones Field''' is a vast cavern within the '''Lost River''', where a massive skeleton of an unknown [[fauna]] can be seen laying. It connects to the first [[Blood Kelp Zone]], through passages, each of them having its own [[flora]] and particular landscape, as well as the '''Ghost Canyon'''. {{Clear}} |
|||
<div class="MainPageBox"> |
|||
{{#tag:tabber| |
|||
Fauna= |
|||
* [[Bleeder]] |
|||
* [[Crabsquid]] |
|||
* [[Ghostray]] |
|||
* [[Mesmer]] |
|||
* [[River Prowler]] |
|||
* [[Shoal of Fish]] |
|||
* [[Spinefish]] |
|||
{{!}}-{{!}} |
|||
Flora= |
|||
* [[Ghost Weed]] |
|||
{{!}}-{{!}} |
|||
Resources= |
|||
* [[Aluminum Oxide Crystal]] |
|||
* [[Ghost Weed Seed]] |
|||
* [[Large Resource Deposits|Large Titanium Deposits]] |
|||
* [[Large Resource Deposits|Large Nickel Deposits]] |
|||
* [[Nickel Ore]] |
|||
* [[Quartz]] |
|||
}}</div> |
|||
=== Gallery === |
|||
<gallery widths="200" spacing="small"> |
|||
BonesField.jpg|A view of the gigantic skeleton |
|||
SkullSizeref.jpg|A size comparison between the larger of the two skulls, and the player |
|||
Mesmer GhostWeed.jpg|Some [[Ghost Weed]]s and a [[Mesmer]] inside the '''Bones Field''' |
|||
</gallery> |
|||
|-| |
|||
Ghost Canyon= |
|||
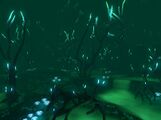
[[File:Pat-presley-lostriver-ghostcanyon.jpg|thumb|"Ghost Canyon"|250px]] |
|||
The '''Ghost Canyon''' is a huge passage featuring multiple caves and tunnels branching out from one main canyon. It connects to the '''Bones Field''' from the south. Numerous roots and luminescent-tipped branches litter the sides and bottom of the brine-filled trenches.{{clear}} |
|||
=== Gallery === |
|||
<gallery widths="200" spacing="small"> |
|||
GhostCanyon-Overview.jpg|Overview of the '''Ghost Canyon''' |
|||
GhostCanyon-BF-entrance.jpg|The '''Ghost Canyon''' entrance from the '''Bone Field''' |
|||
20161116165315_1.jpg|View of the entrance from the '''Ghost Canyon''' to the [[Deep Grand Reef]] |
|||
</gallery> |
|||
|-| |
|||
Ghost Forest= |
|||
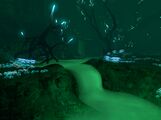
[[File:LostriverConcept1.png|thumb|"Ghost Forest"|300px]] |
|||
A large chamber that leads from the main entrance of the '''Lost River''' (located in the [[Blood Kelp Zone#Second Blood Kelp Zone|second Blood Kelp Zone]]). This area is filled with whitish glowing blobs and dark brown, [[Bioluminescence|bioluminescent]] giant Ghost Trees, and is also the starting point of the brine river. From there, the player can either go straight forward into the '''Bones Field''', or turn right to enter the '''Tree Cove'''. Brinefalls of various sizes are present, and a smaller version of the skull found in the '''Bones Field''' can be found here. {{Clear}}<div class="MainPageBox"> |
|||
{{#tag:tabber| |
|||
Fauna= |
|||
* [[Blood Crawler]] |
|||
* [[Ghostray]] |
|||
* [[River Prowler]] |
|||
* [[Shoal of Fish]] |
|||
* [[Spinefish]] |
|||
* [[Reginald]] |
|||
{{!}}-{{!}} |
|||
Resources= |
|||
* [[Aluminium Oxide Crystal]] |
|||
* [[Large Resource Deposits|Large Titanium Deposits]] |
|||
* [[Large Resource Deposits|Large Nickel Deposits]] |
|||
* [[Nickel Ore]] |
|||
* [[Quartz]] |
|||
}}</div> |
|||
=== Gallery === |
|||
<gallery widths="200" spacing="small"> |
|||
GTCOverview1.jpg|Overview |
|||
GTCWaterfalls.jpg|Brinefalls in the '''Ghost Forest''' |
|||
GTCSkull.jpg|A smaller skull found within the area |
|||
GTCCave.jpg|A small cave found in the '''Forest''' |
|||
GTCBrinePool.jpg|A small brine pool, notice the [[River Prowler]] |
|||
</gallery> |
|||
|-| |
|||
Tree Cove= |
|||
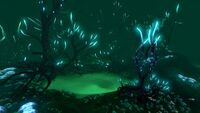
[[File:Lost River Concept Art 4.jpg|thumb|"Tree Cove"|300px]] |
|||
The '''Tree Cove''' is a large cavern within the '''Lost River'''. The brine river forms a large lake there, with the luminous [[Giant Cove Tree]] in its center. However, the color of the brine is a bright blue, compared to the green brine of the other sections of the '''Lost River''' One end opens to the north tunnel leading to the '''Bones Field''', and the other, a corridor, to the [[Inactive Lava Zone]]. Roots and branches grow scattered on the brine-lake and numerous [[Ghostray]]s inhabit the chamber. {{Clear}}<div class="MainPageBox"> |
|||
{{#tag:tabber| |
|||
Fauna= |
|||
* [[Ghostray]] |
|||
{{!}}-{{!}} |
|||
Flora= |
|||
* [[Giant Cove Tree]] |
|||
* [[Deep Shroom]] |
|||
{{!}}-{{!}} |
|||
Resources= |
|||
* [[Deep Shroom Spore]] |
|||
* [[Large Resource Deposits|Large Nickel Deposits]] |
|||
* [[Large Resource Deposits|Large Uraninite Deposits]] |
|||
* [[Sulphur]] |
|||
* [[Uraninite Crystal]] |
|||
}}</div> |
|||
=== Gallery === |
|||
<gallery widths="200" spacing="small"> |
|||
TreeCove-Overview.jpg| Overview of the '''Tree Cove''' |
|||
GhostRay-under-Brine.jpg|A [[Ghostray]] under the blue brine |
|||
TreeCove-Thermal Plants.jpg| A smoker within the '''Tree Cove''' |
|||
</gallery> |
|||
|-| |
|||
Junction= |
|||
[[File:LRJunction.png|thumb|"Junction"|300px]] |
|||
The '''Junction''' is characterised by a large plateau surrounded by a ring of brine. At the top of the plateau are several smokers, and a few glowing blobs. A naturally formed bridge connects the plateau to the northern side of the cavern, towards the '''Ghost Forest'''. Brinefalls from the north and south flow into the brine here, which contains some ghost trees and roots. The '''Junction''' connects to the '''Bones Field''' to the south, the '''Ghost Forest''' to the north, the [[Disease Research Facility|Disease Research Facility's]] cavern to the east, and the '''Tree Cove''' to the west. {{Clear}}<div class="MainPageBox"> |
|||
{{#tag:tabber| |
|||
Fauna= |
|||
* [[Ghostray]] |
|||
* [[Spinefish]] |
|||
* [[Shoal of Fish]] |
|||
* [[Warper]] |
|||
{{!}}-{{!}} |
|||
Resources= |
|||
* [[Sulphur]] |
|||
* [[Large Resource Deposits|Large Nickel Deposits]] |
|||
}}</div> |
|||
=== Gallery === |
|||
<gallery widths="200" spacing="small"> |
|||
Junction-Overview.jpg|Overview |
|||
Junction-Bridge.jpg|A naturally formed bridge, connecting the plateau to another side of the '''Junction''' |
|||
Junction-Smoker.jpg|Some smokers nearby the [[Disease Research Facility]] cave entrance |
|||
</tabber> |
|||
</div> |
|||
</div> |
|||
---- |
|||
=Finalize all Navboxes= |
|||
To Do: |
|||
# Add Navboxes to the sites |
|||
# Navbox items upgrade modules, in development, seabase modules is missing |
|||
# Alphabetical order |
|||
**in all lists, too |
|||
# Check with [[Blueprints]] |
|||
# Check all Navboxes before adding new Navboxes |
|||
---- |
|||
# what about floodlight and light stick and other light in seabase modules |
|||
# add interior, exterior modules, ... |
|||
# add categorys for flora, biomes |
|||
---- |
|||
==Fauna ✓ == |
|||
{{Navbox2 |
|||
|name = Navbox Fauna |
|||
|state = mw-collapsible mw-collapsed |
|||
|title = [[Fauna]] in the world of ''[[Subnautica (game)|Subnautica]] |
|||
|style = width:100%; margin-top:1em; border-radius:0.5em; border:1px solid #999; font-size:90%; text-align:center; |
|||
|titlestyle= background-color:#3366CC; border-radius:0.5em; color:#FFFFFF; padding:0.2em 0.5em; text-align:center; |
|||
|groupstyle= background-color:#3366CC; border-radius:0.5em 0 0 0.5em; color:#FFFFFF; padding:0.2em 0.5em; text-align:center; width:10%; |
|||
|liststyle = background:transparent; color:#FFF; text-align:left; |
|||
|group1 = Carnivores |
|||
|list1 = [[Ampeel]] • [[Biter]] • [[Blighter]] • [[Boneshark]] • [[Crabsnake]] • [[Crabsquid]] • [[Crashfish]] • [[Lava Lizard]] • [[Mesmer]] • [[Reaper Leviathan]] • [[River Prowler]] • [[Sea Dragon Leviathan]] • [[Sand Shark]] • [[Stalker]] • [[Warper]] |
|||
|group2 = Herbivores |
|||
|list2 = [[Bladderfish]] • [[Boomerang]] • [[Crimson Ray]] • [[Cutefish]] • [[Eyeye]] • [[Garryfish]] • [[Gasopod]] • [[Ghostray]] • [[Holefish]] • [[Hoopfish]] • [[Hoverfish]] • [[Jellyray]] • [[Lava Boomerang]] • [[Lava Eyeye]] • [[Oculus]] • [[Peeper]] • [[Rabbit Ray]] • [[Reefback]] • [[Reginald]] • [[Sea Treader]] • [[Spadefish]] • [[Spinefish]] |
|||
|group3 = Scavengers & Parasite |
|||
|list3 = [[Bleeder]] • [[Blood Crawler]] • [[Cave Crawler]] • [[Floater]] • [[Lava Larva]] • [[Rockgrub]] • [[Shuttlebug]] |
|||
|group4 = Other Entities |
|||
|list4 = [[Bloom Plankton]] • [[Shoal of Fish]] • [[Skyray]] • [[Starfish]] |
|||
|group5 = In Development |
|||
|list5 = [[Blue Barnacle Cluster]] • [[Sea Emperor]] • [[Sea Emperor Juvenile]] |
|||
|group6 = Unconfirmed |
|||
|list6 = [[Rock Puncher]]}} |
|||
==Biomes ✓ == |
|||
{{Navbox2 |
|||
|name = Navbox Biomes |
|||
|state = mw-collapsible mw-collapsed |
|||
|title = [[Biomes]] in the world of ''[[Subnautica (game)|Subnautica]]'' |
|||
|style = width:100%; margin-top:1em; border-radius:0.5em; border:1px solid #999; font-size:90%; text-align:center; |
|||
|titlestyle= background-color:#3366CC; border-radius:0.5em; color:#FFFFFF; padding:0.2em 0.5em; text-align:center; |
|||
|groupstyle= background-color:#3366CC; border-radius:0.5em 0 0 0.5em; color:#FFFFFF; padding:0.2em 0.5em; text-align:center; width:10%; |
|||
|liststyle = background:transparent; color:#FFF; text-align:left; |
|||
|group1 = Surface |
|||
|list1 = [[Blood Kelp Zone]] • [[Crash Zone]] • [[Dunes]] • [[Floating Island]] • [[Grand Reef]] • [[Grassy Plateaus]] • [[Kelp Forest]] • [[Koosh Zone]] • [[Mountain Island]] • [[Mountains]] • [[Mushroom Forest]] • [[Safe Shallows]] • [[Sea Treader's Path]] • [[Sparse Reef]] • [[Underwater Islands]] |
|||
|group2 = Caves |
|||
|list2 = [[Blood Kelp Caves]] • [[Deep Grand Reef]] • [[Grassy Plateaus Caves]] • [[Jelly Shroom Caves]] • [[Kelp Forest Caves]] • [[Koosh Zone Caves]] • [[Mountain Range Caves]] • [[Mushroom Forest Caves]] • [[Safe Shallows Caves]] • [[Sea Treader's Tunnel Caves]] |
|||
|group3 = Mini-Biomes |
|||
|list3 = [[Lava Geyser]] |
|||
|group4 = In Development |
|||
|list4 = [[Active Lava Zone]] • [[Inactive Lava Zone]] • [[Lava Castle]] • [[Lilypad Islands]] • [[Lost River]] • [[Twisty Bridges]] |
|||
|group5 = Possible |
|||
|list5 = Arctic}} |
|||
==Items== |
|||
{{Navbox2 |
|||
|name = Navbox Items |
|||
|state = mw-collapsible mw-collapsed |
|||
|title = [[Items]] in the world of ''[[Subnautica (game)|Subnautica]]'' |
|||
|style = width:100%; margin-top:1em; border-radius:0.5em; border:1px solid #999; font-size:90%; text-align:center; |
|||
|titlestyle= background-color:#3366CC; border-radius:0.5em; color:#FFFFFF; padding:0.2em 0.5em; text-align:center; |
|||
|groupstyle= background-color:#3366CC; border-radius:0.5em 0 0 0.5em; color:#FFFFFF; padding:0.2em 0.5em; text-align:center; width:10%; |
|||
|liststyle = background:transparent; color:#FFF; text-align:left; |
|||
|group1 = [[Raw Materials]] |
|||
|list1 = {{Navbox2|child|groupstyle= background-color:#3366CC; color:#FFFFFF; padding:0.2em 0.5em; width:15%; text-align:center; |
|||
|group1 = Minerals |
|||
|list1 = [[Aluminum Oxide Crystal]] • [[Amino Acid]] • [[Baby Leviathan Enzymes]] • [[Copper Ore]] • [[Crashfish Powder]] • [[Diamond]] • [[Gold]] • [[Gas Pod]] • [[Kyanite]] • [[Lead]]• [[Lithium]] • [[Magnetite]] • [[Metal Salvage]] • [[Mercury Ore]] • [[Quartz]] • [[Salt Deposit]] • [[Sea Treader Manure]] • [[Silver Ore]] • [[Stalker Tooth]] • [[Sulphur]] • [[Uraninite Crystal]] |
|||
|group2 = Corals |
|||
|list2 = [[Coral Sample]] • [[Fungal Sample]] • [[Purple Brain Coral Sample]] • [[Table Coral Sample]] |
|||
|group3 = Flora |
|||
|list3 = [[Acid Mushroom]] • [[Deep Shroom]] • [[Marblemelon]] • [[Small Marblemelon]] • [[Pink Cap]] • [[Speckled Rattler]] • [[Spore Sack]] |
|||
|group4 = Seeds and Spores |
|||
|list4 = {{Navbox2|child|groupstyle= background-color:#3366CC; color:#FFFFFF; padding:0.2em 0.5em; width:15%; text-align:center; |
|||
|group1 = Marine Flora |
|||
|list1 = [[Acid Mushroom Spore]] • [[Blood Oil]] • [[Blue Palm Seed]] • [[Cave Bush Seed]] • [[Creepvine Sample]] • [[Creepvine Seed Cluster]] • [[Deep Shroom Spore]] • [[Eye Stalk Seed]] • [[Furled Papyrus Seed]] • [[Gabe's Feather Seed]] • [[Ghost Weed Seed]] • [[Jellyshroom Spore]] • [[Koosh Sample]] • [[Membrain Tree Seed]] • [[Purple Brain Coral Sample]] • [[Pygmy Fan Seed]] • [[Redwort Seed]] • [[Regress Shell Seed]] • [[Rouge Cradle Seed]] • [[Sea Crown Seed]] • [[Spiked Horn Grass Seed]] • [[Spore Sack Seed]] • [[Spotted Dockleaf Seed]] • [[Tiger Plant Seed]] • [[Veined Nettle Seed]] • [[Violet Beau Seed]] • [[Writhing Weed Seed]] |
|||
|group2 = Land-based Flora |
|||
|list2 = [[Bulbo Tree Sample]] • [[Chinese Potato Plant]] • [[Fern Palm Seed]] • [[Grub Basket Seed]] • [[Jaffa Cup Seed]] • [[Lantern Fruit]] • [[Marblemelon Seeds]] • [[Ming Plant Seed]] • [[Pink Cap Spore]] • [[Speckled Rattler]] • [[Voxel Shrub Seed]]}}}} |
|||
|group2 = [[Placeable Items]] |
|||
|list2 = [[Arcade Gorge Toy]] • [[Cap]] • [[Coffee Vending Machine]] • [[Lab Container]] • [[Lab Equipment]] • [[Luggage Bag]] • [[Posters]] • [[Starship Souvenir]] |
|||
|group3 = Crafted Items |
|||
|list3 = {{Navbox2|child|groupstyle= background-color:#3366CC; color:#FFFFFF; padding:0.2em 0.5em; width:15%; text-align:center; |
|||
|group1 = Resources |
|||
|list1 = {{Navbox2|child|groupstyle= background-color:#3366CC; color:#FFFFFF; padding:0.2em 0.5em; width:15%; text-align:center; |
|||
|group1 = [[Basic Materials]] |
|||
|list1 = [[Bleach]] • [[Enameled Glass]] • [[Fiber Mesh]] • [[Glass]] • [[Lubricant]] • [[Magnesium]] • [[Plasteel Ingot]] • [[Silicone Rubber]] • [[Titanium]] • [[Titanium Ingot]] |
|||
|group2 = [[Advanced Materials]] |
|||
|list2 = [[Aerogel]] • [[Benzene]] • [[Hydrochloric Acid]] • [[Polyaniline]] • [[Synthetic Fibers]] • [[Uranium]] |
|||
|group3 = [[Electronics]] |
|||
|list3 = [[Advanced Wiring Kit]] • [[Battery]] • [[Computer Chip]] • [[Copper Wire]] • [[Power Cell]] • [[Reactor Rod]] • [[Wiring Kit]]}} |
|||
|group2 = Sustenance |
|||
|list2 = {{Navbox2|child|groupstyle= background-color:#3366CC; color:#FFFFFF; padding:0.2em 0.5em; width:15%; text-align:center; |
|||
|group1 = [[Water]] |
|||
|list1 = [[Big Filtered Water]] [[Disinfected Water]] • [[Filtered Water]] • [[Reclaimed Water]] |
|||
|group2 = Uncooked, cooked and cured |
|||
|list2 = [[Bladderfish]] • [[Boomerang]] • [[Eyeye]] • [[Garryfish]] • [[Holefish]] • [[Hoopfish]] • [[Hoverfish]] • [[Lava Boomerang]] • [[Lava Eyeye]] • [[Oculus]] • [[Peeper]] • [[Reginald]] • [[Spadefish]] • [[Spinefish]]}} |
|||
|group3 = Personal |
|||
|list3 = {{Navbox2|child|groupstyle= background-color:#3366CC; color:#FFFFFF; padding:0.2em 0.5em; width:15%; text-align:center; |
|||
|group1 = [[Equipment]] |
|||
|list1 = [[Compass]] • [[Fins]] • [[Fire Extinguisher]] • [[First Aid Kit]] • [[High Capacity Tank]] • [[O₂ Tank]] • [[Pipe]] • [[Plasteel Tank]] • [[Radiation Suit]] • [[Rebreather]] • [[Reinforced Dive Suit]] • [[Stillsuit]] • [[Swim Charge Fins]] • [[Thermometer]] • [[Ultra Glide Fins]] |
|||
|group2 = [[Tools]] |
|||
|list2 = [[Air Bladder]] • [[Dive Reel]] • [[Flare]] • [[Flashlight]] • [[Habitat Builder]] • [[Hardened Blade]] • [[Laser Cutter]] • [[Light Stick]] • [[Propulsion Cannon]] • [[Repair Tool]] • [[Repulsion Cannon]] • [[Scanner]] • [[Stasis Rifle]] • [[Survival Knife]] • [[Terraformer]] • [[Thermoblade]] • [[Transfuser]]}} |
|||
|group4 = [[Deployables]] |
|||
|list4 = [[Beacon]] • [[Current Generator]] • [[Gravsphere]] • [[Mobile Vehicle Bay]] • [[Seaglide]] • [[Waterproof Locker]]}} |
|||
|group4 = [[Vehicles]] |
|||
|list4 = {{Navbox2|child|groupstyle= background-color:#3366CC; color:#FFFFFF; padding:0.2em 0.5em; width:15%; text-align:center; |
|||
|group1 = Craftable Vehicles |
|||
|list1 = [[Cyclops]] • [[Seamoth]] • [[PRAWN Suit]] |
|||
|group2 = Unique Vehicles |
|||
|list2 = [[Lifepod 5]] • [[Aurora]]}} |
|||
|group5 = [[Upgrade Modules]] |
|||
|list5 = [[Chelonian Hull Reinforcement Module]] • [[Cyclops Pressure Compensator]] • [[Gas Torpedo]] • [[Hull Reinforcement]] • [[Power Efficiency Upgrade]] • [[Power Efficiency Upgrade Module]] • [[Prawn Suit Drill Arm]] • [[Prawn Suit Grappling Arm]] • [[Prawn Suit Jump Jet Upgrade]] • [[Prawn Suit Propulsion Cannon]] • [[Prawn Suit Thermal Reactor]] • [[Prawn Suit Torpedo Arm]] • [[Pressure Compensator MK 1]] • [[Pressure Compensator MK2]] • [[Pressure Compensator MK3]] • [[Scanner Room Range Upgrade]] • [[Seamoth Solar Charger]] • [[Scanner Room Speed Upgrade]] • [[Seamoth Perimeter Defense System]] • [[Seamoth Sonar]] • [[Shell Hull Reinforcement Module]] • [[Storage Module]] • [[Torpedo System]] • [[Ultra Cyclops Reinforcement Module]] • [[Vortex Torpedo]] |
|||
|group6 = In Development |
|||
|list6 = [[Aerogel]] • [[Aluminum Oxide Crystal]] • [[Baby Leviathan Enzymes]] • [[Bulbo Tree Sample]] • [[Enzyme 42]] • [[Gabe's Feather Seed]] • [[Ion Crystal]] • [[Ion Crystal Matrix]] • [[Precursor Keys]] • [[Sulphur]] • [[Transfuser]]}} |
|||
==Corals ✓ == |
|||
{{Navbox2 |
|||
|name = Navbox Corals |
|||
|state = mw-collapsible mw-collapsed |
|||
|title = [[Coral|Corals]] in the world of ''[[Subnautica (game)|Subnautica]]'' |
|||
|style = width:100%; margin-top:1em; border-radius:0.5em; border:1px solid #999; font-size:90%; text-align:center; |
|||
|titlestyle= background-color:#3366CC; border-radius:0.5em; color:#FFFFFF; padding:0.2em 0.5em; text-align:center; |
|||
|groupstyle= background-color:#3366CC; border-radius:0.5em 0 0 0.5em; color:#FFFFFF; padding:0.2em 0.5em; text-align:center; width:10%; |
|||
|liststyle = background:transparent; color:#FFF; text-align:left; |
|||
|group1 = Harvestable |
|||
|list1 = [[Coral Tube]] • [[Purple Brain Coral]] • [[Slanted Shell Plate]] • [[Table Coral]] • [[Tree Mushroom]] |
|||
|group2 = Decorative |
|||
|list2 = [[Blue Coral Tubes]] • [[Brain Coral]] • [[Brown Coral Tubes]] • [[Shell Plate]]}} |
|||
==Seabase Modules ✓ == |
|||
{{Navbox2 |
|||
|name = Navbox Seabase Modules |
|||
|state = mw-collapsible mw-collapsed |
|||
|title = Buildable [[Seabases|Seabase Modules]] in ''[[Subnautica (game)|Subnautica]]'' |
|||
|style = width:100%; margin-top:1em; border-radius:0.5em; border:1px solid #999; font-size:90%; text-align:center; |
|||
|titlestyle= background-color:#3366CC; border-radius:0.5em; color:#FFFFFF; padding:0.2em 0.5em; text-align:center; |
|||
|groupstyle= background-color:#3366CC; border-radius:0.5em 0 0 0.5em; color:#FFFFFF; padding:0.2em 0.5em; text-align:center; width:10%; |
|||
|liststyle = background:transparent; color:#FFF; text-align:left; |
|||
|group1 = [[Seabases|Habitat Compartments]] |
|||
|list1 = [[Alien Containment]] • [[Bulkhead]] • [[Basic Compartment]] • [[Glass compartment]] • [[L Compartment]] • [[L Glass compartment]] • [[T Compartment]] • [[X Compartment]] • [[Foundation]] • [[Hatch]] • [[Ladder]] • [[Living Wall]] • [[Moonpool]] • [[Multipurpose Room]] • [[Observatory]] • [[Reinforcement]] • [[Scanner Room]] • [[Spotlight]] • [[Vehicle Modification Station]] • [[Vertical Connector]] • [[Water Filtration Machine]] • [[Window]] |
|||
|group2 = [[Energy|Power]] |
|||
|list2 = [[Bioreactor]] • [[Nuclear Reactor]] • [[Power Transmitter]] • [[Solar Panel]] • [[Thermal Plant]] |
|||
|group3 = [[Interior Modules|Appliances]] |
|||
|list3 = [[Aquarium]] • [[Battery Charger]] • [[Bed]] • [[Bench]] • [[Coffee Vending Machine]] • [[Communications Relay]] • [[Fabricator]] • [[Exterior Growbed]] • [[Interior Growbed]] • [[Locker]] • [[Medical Kit Fabricator]] • [[Modification Station]] • [[Plant Pot]] • [[Plant Shelf]] • [[Picture Frame]] • [[Power Cell Charger]] • [[Sign]] • [[Vending Machine]] • [[Wall Locker]] |
|||
|group4 = [[Miscellaneous Items|Miscellaneous]] |
|||
|list4 = [[Arcade Gorge Toy]] • [[Bar Table]] • [[Biohazard Trash Can]] • [[Bed]] • [[Bench]] • [[Cap]] • [[Chair]] • [[Desk]] • [[Giveaway Items]] • [[Lab Counter]] • [[Lab Equipment]] • [[Living Wall]] • [[Luggage Bag]] • [[Narrow Bed]] • [[Posters]] • [[Single Wall Shelf]] • [[Starship Souvenir]] • [[Trash Can]] • [[Wall Shelves]] |
|||
|group5 = Possible V1.0 Additions |
|||
|list5 = [[Centrifuge]]}} |
|||
==Flora ✓ == |
|||
{{Navbox2 |
|||
|name = Navbox Flora |
|||
|state = mw-collapsible mw-collapsed |
|||
|title = [[Flora]] in the world of ''[[Subnautica (game)|Subnautica]]'' |
|||
|style = width:100%; margin-top:1em; border-radius:0.5em; border:1px solid #999; font-size:90%; text-align:center; |
|||
|titlestyle= background-color:#3366CC; border-radius:0.5em; color:#FFFFFF; padding:0.2em 0.5em; text-align:center; |
|||
|groupstyle= background-color:#3366CC; border-radius:0.5em 0 0 0.5em; color:#FFFFFF; padding:0.2em 0.5em; text-align:center; width:10%; |
|||
|liststyle = background:transparent; color:#FFF; text-align:left; |
|||
|group1 = Harvestable |
|||
|list1 = [[Blood Cave Root]] • [[Bloodvine]] • [[Blue Palm]] • [[Bulbo Tree]] • [[Cave Bush]] • [[Chinese Potato Plant]] • [[Crashfish Plant]] • [[Creepvine]] • [[Eye Stalk]] • [[Fern Palm]] • [[Furled Papyrus]] • [[Gabe's Feather]] • [[Ghost Weed]] • [[Grub Basket]] • [[Jaffa Cup]] • [[Jellyshroom]] • [[Koosh Bush]] • [[Lantern Tree]] • [[Marblemelon Plant]] • [[Membrain Tree]] • [[Ming Plant]] • [[Pink Cap]] • [[Purple Pinecone]] • [[Pygmy Fan]] • [[Redwort]] • [[Regress Shell]] • [[Rouge Cradle]] • [[Sea Crown]] • [[Speckled Rattler]] • [[Spiked Horn Grass]] • [[Spore Sack]] • [[Spotted Dockleaf]] • [[Veined Nettle]] • [[Violet Beau]] • [[Voxel Shrub]] • [[Writhing Weed]] |
|||
|group2 = Non-harvestable |
|||
|list2 = [[Bloodgrass]] • [[Floating Stones]] • [[Giant Cove Tree]] • [[Green Reeds]] • [[Grue Cluster]] • [[Red Branches]] • [[Tree Leech]] • [[Treespawn]] |
|||
|group3 = Hazardous |
|||
|list3 = [[Acid Mushroom]] • [[Deep Shroom]] • [[Drooping Stingers]] • [[Tiger Plant]] |
|||
|group4 = In Development |
|||
|list4 = [[Mohawk]] • [[Spike Trap]]}} |
|||
Revision as of 17:38, 20 April 2017
Twitter scm test
Real time development tracker
<twitter screen-name="Subnauticascm" chrome="transparent nofooter" tweet-limit="2" height="500" width="300" theme="dark"> </twitter>
TOC Test
| Contents | 0–9 A B C D E F G H I J K L M N O P Q R S T U V W X Y Z |
|---|
| Contents: | 0–9 · A · B · C · D · E · F · G · H · I · J · K · L · M · N · O · P · Q · R · S · T · U · V · W · X · Y · Z |
|---|
Add tabbers into a box
Description
The Lost River is generally gloomy and foggy, possessing a distinct greenish water tint that is mostly illuminated by acidic brine pools. These pools cover almost all of the lower portions of the caverns. The green brine found throughout most of the cave system will harm the player, but the blue brine found within the Tree Cove is harmless.
The Disease Research Facility is located in the Lost River, inside a cavern.
The Lost River is composed of five distinct areas:
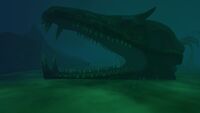
<tabber> Bones Field=

The Bones Field is a vast cavern within the Lost River, where a massive skeleton of an unknown fauna can be seen laying. It connects to the first Blood Kelp Zone, through passages, each of them having its own flora and particular landscape, as well as the Ghost Canyon.
<tabber> Fauna=
|-|
Flora=
|-|
Resources=
</tabber>Gallery
A view of the gigantic skeleton
A size comparison between the larger of the two skulls, and the player
Some Ghost Weeds and a Mesmer inside the Bones Field


|-|
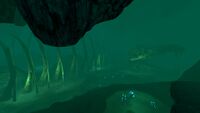
Ghost Canyon=

The Ghost Canyon is a huge passage featuring multiple caves and tunnels branching out from one main canyon. It connects to the Bones Field from the south. Numerous roots and luminescent-tipped branches litter the sides and bottom of the brine-filled trenches.
Gallery

Overview of the Ghost Canyon
The Ghost Canyon entrance from the Bone Field
View of the entrance from the Ghost Canyon to the Deep Grand Reef


|-|
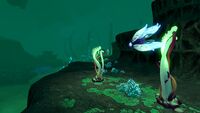
Ghost Forest=
A large chamber that leads from the main entrance of the Lost River (located in the second Blood Kelp Zone). This area is filled with whitish glowing blobs and dark brown, bioluminescent giant Ghost Trees, and is also the starting point of the brine river. From there, the player can either go straight forward into the Bones Field, or turn right to enter the Tree Cove. Brinefalls of various sizes are present, and a smaller version of the skull found in the Bones Field can be found here.
<tabber>
Fauna=
|-|
Resources=
</tabber>Gallery
Overview
Brinefalls in the Ghost Forest

A smaller skull found within the area

A small cave found in the Forest
A small brine pool, notice the River Prowler


|-|
Tree Cove=
The Tree Cove is a large cavern within the Lost River. The brine river forms a large lake there, with the luminous Giant Cove Tree in its center. However, the color of the brine is a bright blue, compared to the green brine of the other sections of the Lost River One end opens to the north tunnel leading to the Bones Field, and the other, a corridor, to the Inactive Lava Zone. Roots and branches grow scattered on the brine-lake and numerous Ghostrays inhabit the chamber.
<tabber>
Fauna=
|-|
Flora=
|-|
Resources=
</tabber>Gallery

Overview of the Tree Cove
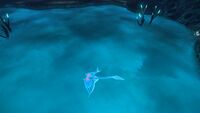
A Ghostray under the blue brine
A smoker within the Tree Cove


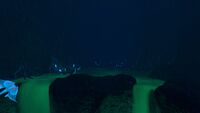
|-| Junction=
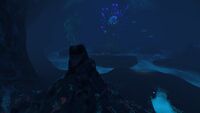
The Junction is characterised by a large plateau surrounded by a ring of brine. At the top of the plateau are several smokers, and a few glowing blobs. A naturally formed bridge connects the plateau to the northern side of the cavern, towards the Ghost Forest. Brinefalls from the north and south flow into the brine here, which contains some ghost trees and roots. The Junction connects to the Bones Field to the south, the Ghost Forest to the north, the Disease Research Facility's cavern to the east, and the Tree Cove to the west.
<tabber>
Fauna=
|-|
Resources=
</tabber>Gallery
<gallery widths="200" spacing="small"> Junction-Overview.jpg|Overview Junction-Bridge.jpg|A naturally formed bridge, connecting the plateau to another side of the Junction Junction-Smoker.jpg|Some smokers nearby the Disease Research Facility cave entrance </tabber>
To Do:
- Add Navboxes to the sites
- Navbox items upgrade modules, in development, seabase modules is missing
- Alphabetical order
- in all lists, too
- Check with Blueprints
- Check all Navboxes before adding new Navboxes
- what about floodlight and light stick and other light in seabase modules
- add interior, exterior modules, ...
- add categorys for flora, biomes
Fauna ✓
Lua error in package.lua at line 80: module 'Dev:Navbox' not found.
Biomes ✓
Lua error in package.lua at line 80: module 'Dev:Navbox' not found.
Items
Lua error in package.lua at line 80: module 'Dev:Navbox' not found.
Corals ✓
Lua error in package.lua at line 80: module 'Dev:Navbox' not found.
Seabase Modules ✓
Lua error in package.lua at line 80: module 'Dev:Navbox' not found.
Flora ✓
Lua error in package.lua at line 80: module 'Dev:Navbox' not found.