
Wrecks: Difference between revisions
Destiny Hale (talk | contribs) No edit summary Tags: Visual edit apiedit |
(Some big fixes) Tag: sourceedit |
||
| Line 29: | Line 29: | ||
| style="text-align:center; font-size:12px;" |[[Safe Shallows]] |
| style="text-align:center; font-size:12px;" |[[Safe Shallows]] |
||
| style="text-align:left; font-size:12px;" | |
| style="text-align:left; font-size:12px;" | |
||
*[[Seaglide |
*[[Seaglide|Seaglide Fragments]] |
||
*[[Chair]] |
*[[Chair]] |
||
*[[Desk]] |
*[[Desk]] |
||
| Line 37: | Line 37: | ||
| style="text-align:center; font-size:12px;" |[[Kelp Forest]] |
| style="text-align:center; font-size:12px;" |[[Kelp Forest]] |
||
| style="text-align:left; font-size:12px;" | |
| style="text-align:left; font-size:12px;" | |
||
*[[Seaglide |
*[[Seaglide|Seaglide Fragments]] |
||
*[[Bench]] |
*[[Bench]] |
||
*[[Chair]] |
*[[Chair]] |
||
| Line 46: | Line 46: | ||
| style="text-align:center; font-size:12px;" |[[Kelp Forest]] |
| style="text-align:center; font-size:12px;" |[[Kelp Forest]] |
||
| style="text-align:left; font-size:12px;" | |
| style="text-align:left; font-size:12px;" | |
||
*[[Mobile Vehicle Bay |
*[[Mobile Vehicle Bay|Mobile Vehicle Bay Fragments]] |
||
*[[Seaglide |
*[[Seaglide|Seaglide Fragments]] |
||
*[[Chair]] |
*[[Chair]] |
||
*[[Desk]] |
*[[Desk]] |
||
| Line 56: | Line 56: | ||
| style="text-align:center; font-size:12px;" |[[Kelp Forest]] |
| style="text-align:center; font-size:12px;" |[[Kelp Forest]] |
||
| style="text-align:left; font-size:12px;" | |
| style="text-align:left; font-size:12px;" | |
||
*[[Mobile Vehicle Bay]] |
*[[Mobile Vehicle Bay|Mobile Vehicle Bay Fragments]] |
||
*[[Seaglide |
*[[Seaglide|Seaglide Fragments]] |
||
*[[Chair]] |
*[[Chair]] |
||
*[[Desk]] |
*[[Desk]] |
||
| Line 65: | Line 65: | ||
| style="text-align:center; font-size:12px;" |[[Kelp Forest]] |
| style="text-align:center; font-size:12px;" |[[Kelp Forest]] |
||
| style="text-align:left; font-size:12px;" | |
| style="text-align:left; font-size:12px;" | |
||
*[[Battery Charger]] |
*[[Battery Charger|Battery Charger Fragments]] |
||
*[[Bioreactor]] |
*[[Bioreactor|Bioreactor Fragments]] |
||
*[[Mobile Vehicle Bay |
*[[Mobile Vehicle Bay|Mobile Vehicle Bay Fragments]] |
||
*[[Seaglide |
*[[Seaglide|Seaglide Fragments]] |
||
*[[Stillsuit]] |
*[[Stillsuit|Stillsuit Fragments]] |
||
*[[Bench]] |
*[[Bench]] |
||
*[[Chair]] |
*[[Chair]] |
||
| Line 80: | Line 80: | ||
| style="text-align:center; font-size:12px;" |[[Grassy Plateaus]] |
| style="text-align:center; font-size:12px;" |[[Grassy Plateaus]] |
||
| style="text-align:left; font-size:12px;" | |
| style="text-align:left; font-size:12px;" | |
||
*[[Battery Charger |
*[[Battery Charger|Battery Charger Fragments]] |
||
*[[Bioreactor |
*[[Bioreactor|Bioreactor Fragments]] |
||
*[[Seamoth |
*[[Seamoth|Seamoth Fragments]] |
||
*[[Seaglide |
*[[Seaglide|Seaglide Fragments]] |
||
*[[Bar Table]] |
*[[Bar Table]] |
||
*[[Chair]] |
*[[Chair]] |
||
| Line 94: | Line 94: | ||
| style="text-align:center; font-size:12px;" |[[Grassy Plateaus]] |
| style="text-align:center; font-size:12px;" |[[Grassy Plateaus]] |
||
| style="text-align:left; font-size:12px;" | |
| style="text-align:left; font-size:12px;" | |
||
*[[Battery Charger |
*[[Battery Charger|Battery Fragments]] |
||
*[[Bioreactor |
*[[Bioreactor|Bioreactor Fragments]] |
||
*[[Light Stick|Light Stick Fragments]] |
|||
*[[Prawn Suit Drill Arm]] Fragments |
|||
*[[ |
*[[Mobile Vehicle Bay|Mobile Vehicle Bay Fragments]] |
||
*[[Seamoth|Seamoth Fragments]] |
|||
*[[Mobile Vehicle Bay]] Fragments |
|||
*[[ |
*[[Prawn Suit Drill Arm|Prawn Suit Drill Arm Fragments]] |
||
*[[Prawn Suit Torpedo Arm |
*[[Prawn Suit Torpedo Arm|Prawn Suit Torpedo Arm Fragments]] |
||
*[[Bench]] |
*[[Bench]] |
||
*[[Floodlight]] |
*[[Floodlight]] |
||
| Line 113: | Line 113: | ||
| style="text-align:center; font-size:12px;" |[[Grassy Plateaus]] |
| style="text-align:center; font-size:12px;" |[[Grassy Plateaus]] |
||
| style="text-align:left; font-size:12px;" | |
| style="text-align:left; font-size:12px;" | |
||
*[[Seaglide |
*[[Seaglide|Seaglide Fragments]] |
||
*[[Seamoth |
*[[Seamoth|Seamoth Fragments]] |
||
*[[Bioreactor |
*[[Bioreactor|Bioreactor Fragments]] |
||
*[[Battery Charger |
*[[Battery Charger|Battery Charger Fragments]] |
||
*[[Chair]] |
*[[Chair]] |
||
*[[Desk]] |
*[[Desk]] |
||
| Line 124: | Line 124: | ||
| style="text-align:center; font-size:12px;" |[[Grassy Plateaus]] |
| style="text-align:center; font-size:12px;" |[[Grassy Plateaus]] |
||
| style="text-align:left; font-size:12px;" | |
| style="text-align:left; font-size:12px;" | |
||
*[[Battery Charger |
*[[Battery Charger|Battery Charger Fragments]] |
||
*[[Bioreactor |
*[[Bioreactor|Bioreactor Fragments]] |
||
*[[Prawn Suit Drill Arm |
*[[Prawn Suit Drill Arm|Prawn Suit Drill Arm Fragments]] |
||
*[[Prawn Suit|Prawn Suit Claw Arm |
*[[Prawn Suit Claw Arm|Prawn Suit Claw Arm Fragments]] |
||
*[[Prawn Suit Torpedo Arm |
*[[Prawn Suit Torpedo Arm|Prawn Suit Torpedo Arm Fragments]] |
||
*[[Seamoth |
*[[Seamoth|Seamoth Fragments]] |
||
*[[Mobile Vehicle Bay |
*[[Mobile Vehicle Bay|Mobile Vehicle Bay Fragments]] |
||
*[[Stillsuit]] |
*[[Stillsuit|Stillsuit Fragments]] |
||
*[[Bench]] |
*[[Bench]] |
||
*[[Chair]] |
*[[Chair]] |
||
| Line 145: | Line 145: | ||
| style="text-align:center; font-size:12px;" |[[Grassy Plateaus]] |
| style="text-align:center; font-size:12px;" |[[Grassy Plateaus]] |
||
| style="text-align:left; font-size:12px;" | |
| style="text-align:left; font-size:12px;" | |
||
*[[Seaglide |
*[[Seaglide|Seaglide Fragments]] |
||
*[[Seamoth |
*[[Seamoth|Seamoth Fragments]] |
||
*[[Bioreactor |
*[[Bioreactor|Bioreactor Fragments]] |
||
*[[Chair]] |
*[[Chair]] |
||
*[[Desk]] |
*[[Desk]] |
||
| Line 155: | Line 155: | ||
| style="text-align:center; font-size:12px;" |[[Koosh Zone]] |
| style="text-align:center; font-size:12px;" |[[Koosh Zone]] |
||
| style="text-align:left; font-size:12px;" | |
| style="text-align:left; font-size:12px;" | |
||
*[[Alien Containment |
*[[Alien Containment|Alien Containment Fragments]] |
||
*[[Water Filtration Machine |
*[[Water Filtration Machine|Water Filtration Machine Fragments]] |
||
*[[Light Stick |
*[[Light Stick|Light Stick Fragments]] |
||
*[[Stasis Rifle |
*[[Stasis Rifle|Stasis Rifle Fragments]] |
||
*[[Exterior Growbed]] |
*[[Exterior Growbed]] |
||
*[[ |
*[[Interior Growbed]] |
||
*[[Floodlight]] |
*[[Floodlight]] |
||
*[[Plant Pot]] |
*[[Plant Pot]] |
||
| Line 170: | Line 170: | ||
| style="text-align:center; font-size:12px;" |[[Underwater Islands]] |
| style="text-align:center; font-size:12px;" |[[Underwater Islands]] |
||
| style="text-align:left; font-size:12px;" | |
| style="text-align:left; font-size:12px;" | |
||
*[[Cyclops|Cyclops Engine |
*[[Cyclops|Cyclops Engine Fragments]] |
||
*[[Stasis Rifle |
*[[Stasis Rifle|Stasis Rifle Fragments]] |
||
*[[Prawn Suit |
*[[Prawn Suit|Prawn Suit Fragments]] |
||
*[[Prawn Suit Grappling Arm |
*[[Prawn Suit Grappling Arm|Prawn Suit Grappling Arm Fragments]] |
||
*[[Prawn Suit|Prawn Suit Claw Arm |
*[[Prawn Suit Claw Arm|Prawn Suit Claw Arm Fragments]] |
||
*[[Propulsion Cannon |
*[[Propulsion Cannon|Propulsion Cannon Fragments]] |
||
*[[Chair|Chair 2]] |
*[[Chair|Chair 2]] |
||
*[[Chair|Chair 3]] |
*[[Chair|Chair 3]] |
||
| Line 189: | Line 189: | ||
| style="text-align:center; font-size:12px;" |[[Mountains]] |
| style="text-align:center; font-size:12px;" |[[Mountains]] |
||
| style="text-align:left; font-size:12px;" | |
| style="text-align:left; font-size:12px;" | |
||
*[[Prawn Suit Torpedo Arm |
*[[Prawn Suit Torpedo Arm|Prawn Suit Torpedo Arm Fragments]] |
||
*[[Prawn Suit|Prawn Suit Claw Arm |
*[[Prawn Suit Claw Arm|Prawn Suit Claw Arm Fragments]] |
||
*[[Prawn Suit |
*[[Prawn Suit|Prawn Suit Fragments]] |
||
*[[Cyclops|Cyclops Engine |
*[[Cyclops|Cyclops Engine Fragments]] |
||
*[[Modification Station |
*[[Modification Station|Modification Station Fragments]] |
||
*[[Moonpool |
*[[Moonpool|Moonpool Fragments]] |
||
*[[Vehicle Modification Station |
*[[Vehicle Modification Station|Vehicle Modification Station Fragments]] |
||
*[[Stillsuit |
*[[Stillsuit|Stillsuit Fragments]] |
||
*[[Reinforced Dive Suit |
*[[Reinforced Dive Suit|Reinforced Dive Suit Fragments]] |
||
*[[Bench]] |
*[[Bench]] |
||
*[[Chair]] |
*[[Chair]] |
||
| Line 217: | Line 217: | ||
| style="text-align:center; font-size:12px;" |[[Mushroom Forest]] |
| style="text-align:center; font-size:12px;" |[[Mushroom Forest]] |
||
| style="text-align:left; font-size:12px;" | |
| style="text-align:left; font-size:12px;" | |
||
* [[Cyclops|Cyclops Hull |
* [[Cyclops|Cyclops Hull Fragments]] |
||
* [[Power Cell Charger |
* [[Power Cell Charger|Power Cell Charger Fragments]] |
||
* [[Power Transmitter |
* [[Power Transmitter|Power Transmitter Fragments]] |
||
* [[Propulsion Cannon |
* [[Propulsion Cannon|Propulsion Cannon Fragments]] |
||
* [[Multipurpose Room |
* [[Multipurpose Room|Multipurpose Room Fragments]] |
||
* [[Bench]] |
* [[Bench]] |
||
* [[Chair 2]] |
* [[Chair 2]] |
||
| Line 236: | Line 236: | ||
| style="text-align:center; font-size:12px;" |[[Dunes]] |
| style="text-align:center; font-size:12px;" |[[Dunes]] |
||
| style="text-align:left; font-size:12px;" | |
| style="text-align:left; font-size:12px;" | |
||
*[[Vehicle Modification Station |
*[[Vehicle Modification Station|Vehicle Modification Station Fragments]] |
||
*[[Moonpool |
*[[Moonpool|Moonpool Fragments]] |
||
*[[Stillsuit |
*[[Stillsuit|Stillsuit Fragments]] |
||
*[[Thermal Plant |
*[[Thermal Plant|Thermal Plant Fragments]] |
||
*[[Bulkhead |
*[[Bulkhead|Bulkhead Fragments]] |
||
*[[Reinforced Dive Suit |
*[[Reinforced Dive Suit|Reinforced Dive Suit Fragments]] |
||
*[[Bench]] |
*[[Bench]] |
||
*[[Chair]] |
*[[Chair]] |
||
| Line 253: | Line 253: | ||
| style="text-align:center; font-size:12px;" |[[Sea Treader's Path]] |
| style="text-align:center; font-size:12px;" |[[Sea Treader's Path]] |
||
| style="text-align:left; font-size:12px;" | |
| style="text-align:left; font-size:12px;" | |
||
*[[Alien Containment |
*[[Alien Containment|Alien Containment Fragments]] |
||
*[[Cyclops|Cyclops Hull |
*[[Cyclops|Cyclops Hull Fragments]] |
||
*[[Cyclops|Cyclops Bridge |
*[[Cyclops|Cyclops Bridge Fragments]] |
||
*[[Prawn Suit Propulsion Cannon |
*[[Prawn Suit Propulsion Cannon|Prawn Suit Propulsion Cannon Fragments]] |
||
*[[Prawn Suit |
*[[Prawn Suit|Prawn Suit Fragments]] |
||
*[[Nuclear Reactor |
*[[Nuclear Reactor|Nuclear Reactor Fragments]] |
||
*[[Stillsuit |
*[[Stillsuit|Stillsuit Fragments]] |
||
*[[Bench]] |
*[[Bench]] |
||
*[[Chair]] |
*[[Chair]] |
||
| Line 272: | Line 272: | ||
| style="text-align:center; font-size:12px;" |[[Blood Kelp Zone]] |
| style="text-align:center; font-size:12px;" |[[Blood Kelp Zone]] |
||
| style="text-align:left; font-size:12px;" | |
| style="text-align:left; font-size:12px;" | |
||
*[[Alien Containment |
*[[Alien Containment|Alien Containment Fragments]] |
||
*[[Cyclops Pressure Compensator |
*[[Cyclops Pressure Compensator|Cyclops Pressure Compensator Fragments]] |
||
*[[Modification Station |
*[[Modification Station|Modification Station Fragments]] |
||
*[[Moonpool |
*[[Moonpool|Moonpool Fragments]] |
||
*[[Nuclear Reactor |
*[[Nuclear Reactor|Nuclear Reactor Fragments]] |
||
*[[Floodlight]] |
*[[Floodlight]] |
||
| style="text-align:center; font-size:13px;" | -1208 -332 -390 |
| style="text-align:center; font-size:13px;" | -1208 -332 -390 |
||
| Line 283: | Line 283: | ||
| style="text-align:center; font-size:12px;" |[[Grand Reef]] |
| style="text-align:center; font-size:12px;" |[[Grand Reef]] |
||
| style="text-align:left; font-size:12px;" | |
| style="text-align:left; font-size:12px;" | |
||
* [[Cyclops Pressure Compensator |
* [[Cyclops Pressure Compensator|Cyclops Pressure Compensator Fragments]] |
||
*[ |
* [[Prawn Suit Grappling Arm|Prawn Suit Grappling Arm Fragments]] |
||
*[[Prawn Suit Drill Arm |
* [[Prawn Suit Drill Arm|Prawn Suit Drill Arm Fragments]] |
||
* [[Moonpool |
* [[Moonpool|Moonpool Fragments]] |
||
* [[Scanner Room |
* [[Scanner Room|Scanner Room Fragments]] |
||
* [[Thermal Plant]] |
* [[Thermal Plant|Thermal Plant Fragments]] |
||
* [[Chair]] |
* [[Chair]] |
||
* [[Desk]] |
* [[Desk]] |
||
| Line 296: | Line 296: | ||
| style="text-align:center; font-size:12px;" |[[Grand Reef]] |
| style="text-align:center; font-size:12px;" |[[Grand Reef]] |
||
| style="text-align:left; font-size:12px;" | |
| style="text-align:left; font-size:12px;" | |
||
* [[Cyclops Pressure Compensator |
* [[Cyclops Pressure Compensator|Cyclops Pressure Compensator Fragments]] |
||
* [[Moonpool |
* [[Moonpool|Moonpool Fragments]] |
||
* [[Scanner Room |
* [[Scanner Room|Scanner Room Fragments]] |
||
* [[Vehicle Modification Station |
* [[Vehicle Modification Station|Vehicle Modification Station Fragments]] |
||
* [[Thermal Plant |
* [[Thermal Plant|Thermal Plant Fragments]] |
||
* [[Bed 1]] |
* [[Bed 1]] |
||
* [[Chair]] |
* [[Chair]] |
||
| Line 327: | Line 327: | ||
|[[File:SafeShallowsSmallWreck-2.jpg|thumb|160px]] |
|[[File:SafeShallowsSmallWreck-2.jpg|thumb|160px]] |
||
| style="text-align:center; font-size:12px;" |[[Safe Shallows]] |
| style="text-align:center; font-size:12px;" |[[Safe Shallows]] |
||
| style="text-align:left; font-size:12px;" | |
| style="text-align:left; font-size:12px;" |- |
||
* |
|||
| style="text-align:center; font-size:13px;" | 90 -20 120 |
| style="text-align:center; font-size:13px;" | 90 -20 120 |
||
|- |
|- |
||
| Line 357: | Line 356: | ||
| style="text-align:center; font-size:12px;" |[[Safe Shallows]] |
| style="text-align:center; font-size:12px;" |[[Safe Shallows]] |
||
| style="text-align:left; font-size:12px;" | |
| style="text-align:left; font-size:12px;" | |
||
*[[ |
*[[Coffee Vending Machine]] |
||
*[[Luggage Bag]] |
*[[Luggage Bag]] |
||
| style="text-align:center; font-size:13px;" | 310 -23 -119 |
| style="text-align:center; font-size:13px;" | 310 -23 -119 |
||
| Line 370: | Line 369: | ||
| style="text-align:center; font-size:12px;" |[[Grassy Plateaus]] |
| style="text-align:center; font-size:12px;" |[[Grassy Plateaus]] |
||
| style="text-align:left; font-size:12px;" | |
| style="text-align:left; font-size:12px;" | |
||
*[[ |
*[[Bioreactor|Bioreactor Fragments]] |
||
| style="text-align:center; font-size:13px;" | 165 -86 -520 |
| style="text-align:center; font-size:13px;" | 165 -86 -520 |
||
|- |
|- |
||
| Line 376: | Line 375: | ||
| style="text-align:center; font-size:12px;" |[[Grassy Plateaus]] |
| style="text-align:center; font-size:12px;" |[[Grassy Plateaus]] |
||
| style="text-align:left; font-size:12px;" | |
| style="text-align:left; font-size:12px;" | |
||
*[[ |
*[[Battery Charger|Battery Charger Fragments]] |
||
*[[ |
*[[Bioreactor|Bioreactor Fragments]] |
||
*[[ |
*[[Coffee Vending Machine]] |
||
*[[Bar Table]] |
*[[Bar Table]] |
||
*[[Trash Cans]] |
*[[Trash Cans]] |
||
| Line 392: | Line 391: | ||
| style="text-align:center; font-size:12px;" |[[Grassy Plateaus]] |
| style="text-align:center; font-size:12px;" |[[Grassy Plateaus]] |
||
| style="text-align:left; font-size:12px;" | |
| style="text-align:left; font-size:12px;" | |
||
*[[ |
*[[Battery Charger|Battery Charger Fragments]] |
||
| style="text-align:center; font-size:13px;" | -370 -100 475 |
| style="text-align:center; font-size:13px;" | -370 -100 475 |
||
|- |
|- |
||
| Line 398: | Line 397: | ||
| style="text-align:center; font-size:12px;" |[[Grassy Plateaus]] |
| style="text-align:center; font-size:12px;" |[[Grassy Plateaus]] |
||
| style="text-align:left; font-size:12px;" | |
| style="text-align:left; font-size:12px;" | |
||
*[[ |
*[[Battery Charger|Battery Charger Fragments]] |
||
*[[ |
*[[Bioreactor|Bioreactor Fragments]] |
||
*[[ |
*[[Seamoth|Seamoth Fragments]] |
||
| style="text-align:center; font-size:13px;" | -284 -93 606 |
| style="text-align:center; font-size:13px;" | -284 -93 606 |
||
|- |
|- |
||
| Line 414: | Line 413: | ||
<gallery position="left" widths="200" spacing="small" captionalign="left"> |
<gallery position="left" widths="200" spacing="small" captionalign="left"> |
||
Explorablewreckmodel.png|'''Large Explorable Wreck''' Model from [https://sketchfab.com/models/7bd5aaf2ee54451aa70fc672dc7e2e8d Sketchfab] |
Explorablewreckmodel.png|'''Large Explorable Wreck''' Model from [https://sketchfab.com/models/7bd5aaf2ee54451aa70fc672dc7e2e8d Sketchfab] |
||
Wreck3model.png|''' |
Wreck3model.png|Another '''Large Explorable Wreck''' Model from [https://sketchfab.com/models/e8021897236e40c3b9dd64cde6f5e339 Sketchfab] |
||
Aurora_debris.png|'''Small Explorable Wreck's''' Model from [https://sketchfab.com/models/e612f9449de8479f9ecc1235e482ddf5 Sketchfab] |
Aurora_debris.png|'''Small Explorable Wreck's''' Model from [https://sketchfab.com/models/e612f9449de8479f9ecc1235e482ddf5 Sketchfab] |
||
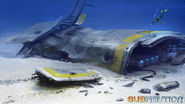
WrecksConcept2.jpeg|'''Large Explorable Wreck's''' [[Concept Art]] |
WrecksConcept2.jpeg|'''Large Explorable Wreck's''' [[Concept Art]] |
||
| Line 425: | Line 424: | ||
[[Category:Explorable Structures]] |
[[Category:Explorable Structures]] |
||
[[Category:Wrecks]] |
[[Category:Wrecks]] |
||
[[Category:Experimental Mode]] |
|||
Revision as of 14:34, 19 December 2016

|
This seems new This article contains information that is updated for the latest Experimental Version of Subnautica. Players using stable mode may find this information inaccurate. |
Template:Infobox Biome The Wrecks are explorable pieces of debris from the Aurora, which can only be located after its explosion. Large Wrecks contain valuable technology in the form of Fragments while Small Wrecks contain only Supply Crates.
Large Wrecks
There are 20 Large Wrecks spread throughout the ocean after the Aurora explodes. Each of them are surrounded by their local Flora and Fauna and possess their own unique challenges. Many of them include sections that are only accessible with the Laser Cutter. While each contains a unique set of fragments, there are common items found in many wrecks.
Large Wreck List


Small Wrecks
Small Wrecks can be found surrounding the Large Wrecks and inside the Crash Zone. They can contain useful items and fragments.
| Image | Biome | Items | Coordinates |
|---|---|---|---|
| Safe Shallows | 20 -10 300 | ||
| Safe Shallows | - | 90 -20 120 | |
| Safe Shallows | 65 -10 -85 | ||
| Safe Shallows | -160 -20 -225 | ||
| Safe Shallows | 175 -23 -253 | ||
| Safe Shallows | 310 -23 -119 | ||
| Safe Shallows | 527 -23 -43 | ||
| Grassy Plateaus | 165 -86 -520 | ||
| Grassy Plateaus | 315 -90 215 | ||
| Grassy Plateaus | 270 -85 70 | ||
| Grassy Plateaus | -370 -100 475 | ||
| Grassy Plateaus | -284 -93 606 | ||
| Grassy Plateaus | -520 -90 -215 |


Gallery
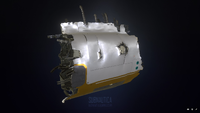
Large Explorable Wreck Model from Sketchfab
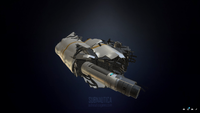
Another Large Explorable Wreck Model from Sketchfab

Small Explorable Wreck's Model from Sketchfab

Large Explorable Wreck's Concept Art
Small Explorable Wreck's Concept Art

Small wreckage, found in the Crash Zone


.jpg)
For a more complete gallery, see Wrecks/Gallery.