
Wrecks: Difference between revisions
No edit summary Tag: rte-source |
Tag: rte-wysiwyg |
||
| Line 5: | Line 5: | ||
==Large Wrecks== |
==Large Wrecks== |
||
There are 20 '''Large Wrecks''' spread throughout the ocean after the Aurora explodes. Each of them are surrounded by their local [[Flora]] and [[Fauna]] and possess their own unique challenges. Many of them include sections that are only accessible with the [[Laser Cutter]], [[Repulsion Cannon]] and [[Propulsion Cannon]]. |
There are 20 '''Large Wrecks''' spread throughout the ocean after the Aurora explodes. Each of them are surrounded by their local [[Flora]] and [[Fauna]] and possess their own unique challenges. Many of them include sections that are only accessible with the [[Laser Cutter]], [[Repulsion Cannon]] and [[Propulsion Cannon]]. While each contains a unique set of fragments, there are common items found in many wrecks. They are: |
||
<table style="width:100%;"><tr> |
|||
===Safe Shallows Wrecks=== |
|||
<td style="width:50%; vertical-align:top;"> |
|||
*[[Bar Table]] |
|||
<div class="mw-collapsible mw-collapsed"> |
|||
*[[Bed]] |
|||
*[[Bench]] |
|||
<table style="width:100%;"> |
|||
<tr> |
|||
<td style="vertical-align:top; width:50%;"> |
|||
*[[Chair]] |
*[[Chair]] |
||
*[[Desk]] |
*[[Desk]] |
||
*[[Exterior Growbed]] |
|||
*[[Fragments]] |
|||
*[[Floodlight]] |
|||
</td> |
</td> |
||
<td style="vertical-align:top |
<td style="width:50%; vertical-align:top;"> |
||
*[[Interior Growbed]] |
|||
*[[Seaglide]] Fragments |
|||
*[[Data Downloads|Abandoned PDA]] |
*[[Data Downloads|Abandoned PDA]] |
||
*[[Picture Frame]] |
|||
*[[Plant Pot]] |
|||
*[[Plant Shelf]] |
|||
*[[Poster]] |
|||
*[[Supply Crate]]s |
|||
*[[Wall Shelves]] |
|||
</td> |
</td> |
||
</tr> |
</tr> |
||
</table> |
</table> |
||
==Large Wreck List== |
|||
{| style="width: 100%;" class="article-table sortable" border="0" cellpadding="1" cellspacing="1" |
{| style="width: 100%;" class="article-table sortable" border="0" cellpadding="1" cellspacing="1" |
||
|- |
|- |
||
! class="unsortable" style="width: |
! class="unsortable" style="width: 160px; text-align: center;" |Image |
||
! |
! data-sort-type="text" style="width: 100px; text-align: center;" |Biome |
||
! class="unsortable" style="width: auto; text-align: center;" |Unique Fragments |
|||
! data-sort-type="text" style="width: 100px; text-align: center;" |Coordinates |
|||
|- |
|- |
||
|[[File:SafeShallowsWreck-1.jpg|thumb|160px]] |
|||
| style="text-align:left;" colspan="2" | |
|||
|[[Safe Shallows]] |
|||
<table style="width=100%;"> |
|||
| |
|||
<tr> |
|||
*[[Chair]] |
|||
<td style="width=auto;"> |
|||
*[[Desk]] |
|||
<gallery captionalign="center" widths="250" orientation="none"> |
|||
*[[Data Downloads|Abandoned PDA]] |
|||
SafeShallowsWreck-1.jpg|[[Safe Shallows]] Wreck 1 |
|||
*[[Fragments|Seaglide Fragments]] |
|||
</gallery> |
|||
| -40 -14 -400 |
|||
</td> |
|||
<td style="vertical-align:top; font-size:12px;"> |
|||
*[[File:Chair.png|50px|link=Chair]] |
|||
*[[File:Desk.png|50px|link=Desk]] |
|||
</td> |
|||
<td style="vertical-align:top; font-size:12px;"> |
|||
*[[File:Seaglide.png|50px|link=Seaglide]] |
|||
</td> |
|||
<td style="vertical-align:top; font-size:12px;"> |
|||
*[[File:PDA.png|50px|link=Data Downloads]] |
|||
</td> |
|||
</tr> |
|||
</table> |
|||
|} |
|||
{| style="width: 100%;" class="article-table sortable" border="0" cellpadding="1" cellspacing="1" |
|||
|- |
|- |
||
|[[File:SafeShallowsWreck-2.jpg|thumb|160px]] |
|||
! class="unsortable" style="width: auto; text-align: left; font-size:12px;" |Wreck #2 |
|||
|[[Safe Shallows]] |
|||
! class="unsortable" style="width: auto; text-align: right; font-size:12px;" |366 -6 -203 |
|||
| |
|||
*[[Fragments|Seaglide Fragments]] |
|||
*[[Chair]] |
|||
*[[Desk]] |
|||
| 366 -6 -203 |
|||
|- |
|- |
||
|[[File:KelpForestWreck-1.jpg|thumb|160px]] |
|||
| style="text-align:left;" colspan="2" | |
|||
|[[Kelp Forest]] |
|||
<table> |
|||
| |
|||
<tr> |
|||
*[[Fragments|Seaglide Fragments]] |
|||
<td style="width=100%;"> |
|||
<gallery captionalign="center" widths="250" orientation="none"> |
|||
SafeShallowsWreck-2.jpg|[[Safe Shallows]] Wreck 2 |
|||
</gallery> |
|||
</td> |
|||
<td style="vertical-align:top;"> |
|||
*[[File:Chair.png|50px|link=Chair]] |
|||
*[[File:Desk.png|50px|link=Desk]] |
|||
</td> |
|||
<td style="vertical-align:top;"> |
|||
*[[File:Seaglide.png|50px|link=Seaglide]] |
|||
</td> |
|||
</tr> |
|||
</table> |
|||
|} |
|||
</div> |
|||
===Kelp Forest Wrecks=== |
|||
<div class="mw-collapsible mw-collapsed"> |
|||
<table style="width:100%;"> |
|||
<tr> |
|||
<td style="vertical-align:top; width:50%;"> |
|||
*[[Bench]] |
*[[Bench]] |
||
*[[Chair]] |
*[[Chair]] |
||
*[[Floodlight]] |
|||
*[[Desk]] |
*[[Desk]] |
||
| 320 -40 -336 |
|||
</td> |
|||
<td style="vertical-align:top; width:50%;"> |
|||
*[[Seaglide]] Fragments |
|||
*[[Mobile Vehicle Bay]] Fragments |
|||
*[[Data Downloads|Abandoned PDA]] |
|||
</td> |
|||
</tr> |
|||
</table> |
|||
{| style="width: 100%;" class="article-table sortable" border="0" cellpadding="1" cellspacing="1" |
|||
|- |
|- |
||
|[[File:KelpForestWreck-2.jpg|thumb|160px]] |
|||
! class="unsortable" style="width: auto; text-align: left; font-size:12px;" |Wreck #1 |
|||
|[[Kelp Forest]] |
|||
! class="unsortable" style="width: auto; text-align: right; font-size:12px;" |-40 -14 -400 |
|||
| |
|||
*[[Fragments|Mobile Vehicle Bay Fragments]] |
|||
*[[Fragments|Seaglide Fragments]] |
|||
*[[Chair]] |
|||
*[[Desk]] |
|||
*[[Floodlight]] |
|||
| -413 -43 310 |
|||
|- |
|- |
||
|[[File:KelpForestWreck-3.jpg|thumb|160px]] |
|||
| style="text-align:left;" colspan="2" | |
|||
|[[Kelp Forest]] |
|||
<table> |
|||
| |
|||
<tr> |
|||
*[[Fragments|Seaglide Fragments]] |
|||
<td style="width=100%;"> |
|||
*[[Chair]] |
|||
<gallery captionalign="center" widths="250" orientation="none"> |
|||
*[[Desk]] |
|||
KelpForestWreck-1.jpg|[[Kelp Forest]] Wreck 1 |
|||
| -320 -57 252 |
|||
</gallery> |
|||
</td> |
|||
<td style="vertical-align:top;"> |
|||
*[[File:Bench.png|50px|link=Bench]] |
|||
*[[File:Chair.png|50px|link=Chair]] |
|||
*[[File:Desk.png|50px|link=Desk]] |
|||
</td> |
|||
<td style="vertical-align:top;"> |
|||
*[[File:Seaglide.png|50px|link=Seaglide]] |
|||
</td> |
|||
</tr> |
|||
</table> |
|||
|} |
|||
{| style="width: 100%;" class="article-table sortable" border="0" cellpadding="1" cellspacing="1" |
|||
|- |
|- |
||
|[[File:KelpForestWreck-4.jpg|thumb|160px]] |
|||
! class="unsortable" style="width: auto; text-align: left; font-size:12px;" |Wreck #2 |
|||
|[[Kelp Forest]] |
|||
! class="unsortable" style="width: auto; text-align: right; font-size:12px;" |-413 -43 310 |
|||
| |
|||
*[[Fragments|Seaglide Fragments]] |
|||
*[[Bench]] |
|||
*[[Chair]] |
|||
*[[Desk]] |
|||
*[[Floodlight]] |
|||
*[[Data Downloads|Abandoned PDA]] |
|||
| 65 -25 385 |
|||
|- |
|- |
||
|[[File:GrassyPlateausWreck-1.jpg|thumb|160px]] |
|||
| style="text-align:left;" colspan="2" | |
|||
| |
|||
<table> |
|||
[[Grassy Plateaus]] |
|||
<tr> |
|||
| |
|||
<td style="width=100%;"> |
|||
*[[Fragments|Battery Charger Fragment]] |
|||
<gallery captionalign="center" widths="250" orientation="none"> |
|||
*[[Fragments|Seamoth Fragment]] |
|||
KelpForestWreck-2.jpg|[[Kelp Forest]] Wreck 2 |
|||
*[[Bar Table]] |
|||
</gallery> |
|||
*[[Chair]] |
|||
</td> |
|||
*[[Desk]] |
|||
<td style="vertical-align:top;"> |
|||
*[[Floodlight]] |
|||
*[[File:Chair.png|50px|link=Chair]] |
|||
*[[Data Downloads|Abandoned PDA]] |
|||
*[[File:Desk.png|50px|link=Desk]] |
|||
| -25 -88 -615 |
|||
*[[File:Floodlight.png|50px|link=Floodlight]] |
|||
</td> |
|||
<td style="vertical-align:top;"> |
|||
*[[File:Mobile Vehicle Bay.png|50px|link=Mobile Vehicle Bay]] |
|||
*[[File:Seaglide.png|50px|link=Seaglide]] |
|||
</td> |
|||
</tr> |
|||
</table> |
|||
|} |
|||
{| style="width: 100%;" class="article-table sortable" border="0" cellpadding="1" cellspacing="1" |
|||
|- |
|- |
||
|[[File:GrassyPlateausWreck-2.jpg|thumb|160px]] |
|||
! class="unsortable" style="width: auto; text-align: left; font-size:12px;" |Wreck #3 |
|||
| |
|||
! class="unsortable" style="width: auto; text-align: right; font-size:12px;" |-320 -57 252 |
|||
[[Grassy Plateaus]] |
|||
| |
|||
*[[Fragments|Battery Charger Fragment]] |
|||
*[[Fragments|Bioreactor Fragment]] |
|||
*[[Fragments|LedLight Fragments]] |
|||
*[[Fragments|Mobile Vehicle Bay Fragments]] |
|||
*[[Fragments|Seamoth Fragments]] |
|||
*[[Bench]] |
|||
*[[Floodlight]] |
|||
*[[Picture Frame]] |
|||
*[[Plant Pot]] |
|||
*[[Plant Shelf]] |
|||
*[[Poster]] |
|||
*[[Supply Crate]]s |
|||
| 320 -66 431 |
|||
|- |
|- |
||
|[[File:GrassyPlateausWreck-3.jpg|thumb|160px]] |
|||
| style="text-align:left;" colspan="2" | |
|||
| |
|||
<table> |
|||
[[Grassy Plateaus]] |
|||
<tr> |
|||
| |
|||
<td style="width=100%;"> |
|||
*[[Fragments|Seaglide Fragment]] |
|||
<gallery captionalign="center" widths="250" orientation="none"> |
|||
*[[Fragments|Seamoth Fragments]] |
|||
KelpForestWreck-3.jpg|[[Kelp Forest]] Wreck 3 |
|||
*[[Fragments|Battery Charger Fragments]] |
|||
</gallery> |
|||
*[[Chair]] |
|||
</td> |
|||
*[[Desk]] |
|||
<td style="vertical-align:top;"> |
|||
| -390 -120 648 |
|||
*[[File:Chair.png|50px|link=Chair]] |
|||
*[[File:Desk.png|50px|link=Desk]] |
|||
</td> |
|||
<td style="vertical-align:top;"> |
|||
*[[File:Seaglide.png|50px|link=Seaglide]] |
|||
</td> |
|||
</tr> |
|||
</table> |
|||
|} |
|||
{| style="width: 100%;" class="article-table sortable" border="0" cellpadding="1" cellspacing="1" |
|||
|- |
|- |
||
|[[File:GrassyPlateausWreck-4.jpg|thumb|160px]] |
|||
! class="unsortable" style="width: auto; text-align: left; font-size:12px;" |Wreck #4 |
|||
| |
|||
! class="unsortable" style="width: auto; text-align: right; font-size:12px;" |65 -25 385 |
|||
[[Grassy Plateaus]] |
|||
|- |
|||
| |
|||
| style="text-align:left;" colspan="2" | |
|||
*[[Fragments|Battery Charger Fragment]] |
|||
<table> |
|||
*[[Fragments|Bioreactor Fragment]] |
|||
<tr> |
|||
*[[Fragments|Mobile Vehicle Bay Fragments]] |
|||
<td style="width=100%;"> |
|||
<gallery captionalign="center" widths="250" orientation="none"> |
|||
KelpForestWreck-4.jpg|[[Kelp Forest]] Wreck 4 |
|||
</gallery> |
|||
</td> |
|||
<td style="vertical-align:top;"> |
|||
*[[File:Bench.png|50px|link=Bench]] |
|||
*[[File:Chair.png|50px|link=Chair]] |
|||
*[[File:Desk.png|50px|link=Desk]] |
|||
*[[File:Floodlight.png|50px|link=Floodlight]] |
|||
</td> |
|||
<td style="vertical-align:top;"> |
|||
*[[File:Seaglide.png|50px|link=Seaglide]] |
|||
</td> |
|||
<td style="vertical-align:top;"> |
|||
*[[File:PDA.png|50px|link=Data Downloads]] |
|||
</td> |
|||
</tr> |
|||
</table> |
|||
|} |
|||
</div> |
|||
===Grassy Plateaus Wrecks=== |
|||
<div class="mw-collapsible mw-collapsed"> |
|||
<table style="width:100%;"> |
|||
<tr> |
|||
<td style="vertical-align:top; width:50%;"> |
|||
*[[Bar Table]] |
|||
*[[Bench]] |
*[[Bench]] |
||
*[[Chair]] |
*[[Chair]] |
||
*[[Chair 3]] |
|||
*[[Desk]] |
*[[Desk]] |
||
*[[Floodlight]] |
*[[Floodlight]] |
||
*[[Bioreactor]] Fragments |
|||
*[[Mobile Vehicle Bay]] Fragments |
|||
*[[Seamoth]] Fragments |
|||
</td> |
|||
<td style="vertical-align:top; width:50%;"> |
|||
*[[Battery Charger]] Fragments |
|||
*[[Data Downloads|Abandoned PDA]] |
|||
*[[Picture Frame]] |
*[[Picture Frame]] |
||
*[[Plant Pot]] |
*[[Plant Pot]] |
||
*[[Plant Pot|Plant Pot 3]] |
|||
*[[Plant Shelf]] |
*[[Plant Shelf]] |
||
*[[Data Downloads|Abandoned PDA]] |
|||
*[[Posters|Poster]] |
|||
| -630 -50 -6 |
|||
*[[Supply Crate|Supply Crates]] |
|||
</td> |
|||
</tr> |
|||
</table> |
|||
{| style="width: 100%;" class="article-table sortable" border="0" cellpadding="1" cellspacing="1" |
|||
|- |
|- |
||
|[[File:GrassyPlateausWreck-5.jpg|thumb|160px]] |
|||
! class="unsortable" style="width: auto; text-align: left; font-size:12px;" |Wreck #1 |
|||
| |
|||
! class="unsortable" style="width: auto; text-align: right; font-size:12px;" |-25 -88 -615 |
|||
[[Grassy Plateaus]] |
|||
| |
|||
*[[Fragments|Bioreactor Fragment]] |
|||
*[[Fragments|Seaglide Fragment]] |
|||
*[[Fragments|Seamoth Fragment]] |
|||
*[[Chair]] |
|||
*[[Desk]] |
|||
| -432 –90 -268 |
|||
|- |
|- |
||
|[[File:Wrecks (3).jpg|thumb|center|160px]] |
|||
| style="text-align:left;" colspan="2" | |
|||
|[[Koosh Zone]] |
|||
<table> |
|||
| |
|||
<tr> |
|||
*[[Fragments|Filtration Machine Fragments]] |
|||
<td style="width=100%;"> |
|||
*[[Fragments|LedLight Fragments]] |
|||
<gallery captionalign="center" widths="250" orientation="none"> |
|||
*[[Fragments|Stasis Rifle Fragments]] |
|||
GrassyPlateausWreck-1.jpg|[[Grassy Plateaus]] Wreck 1 |
|||
</gallery> |
|||
</td> |
|||
<td style="vertical-align:top;"> |
|||
*[[File:Bar Table.png|50px|link=Bar Table]] |
|||
*[[File:Chair.png|50px|link=Chair]] |
|||
*[[File:Desk.png|50px|link=Desk]] |
|||
*[[File:Floodlight.png|50px|link=Floodlight]] |
|||
</td> |
|||
<td style="vertical-align:top;"> |
|||
*[[File:Seamoth.png|50px|link=Seamoth]] |
|||
*[[File:Battery Charger.png|50px|link=Battery Charger]] |
|||
</td> |
|||
<td style="vertical-align:top;"> |
|||
*[[File:PDA.png|50px|link=Data Downloads]] |
|||
</td> |
|||
</tr> |
|||
</table> |
|||
|} |
|||
{| style="width: 100%;" class="article-table sortable" border="0" cellpadding="1" cellspacing="1" |
|||
|- |
|||
! class="unsortable" style="width: auto; text-align: left; font-size:12px;" |Wreck #2 |
|||
! class="unsortable" style="width: auto; text-align: right; font-size:12px;" |320 -66 431 |
|||
|- |
|||
| style="text-align:left;" colspan="2" | |
|||
<table> |
|||
<tr> |
|||
<td style="width=100%;"> |
|||
<gallery captionalign="center" widths="250" orientation="none"> |
|||
GrassyPlateausWreck-2.jpg|[[Grassy Plateaus]] Wreck 2 |
|||
</gallery> |
|||
</td> |
|||
<td style="vertical-align:top;"> |
|||
*[[File:Bench.png|50px|link=Bench]] |
|||
*[[File:Chair.png|50px|link=Chair]] |
|||
*[[File:Desk.png|50px|link=Desk]] |
|||
</td> |
|||
<td style="vertical-align:top;"> |
|||
*[[File:Floodlight.png|50px|link=Floodlight]] |
|||
*[[File:Picture Frame.png|50px|link=Picture Frame]] |
|||
*[[File:Plant Pot.png|50px|link=Plant Pot]] |
|||
*[[File:Planter Shelf.png|50px|link=Plant Shelf]] |
|||
</td> |
|||
<td style="vertical-align:top;"> |
|||
*[[File:Seamoth.png|50px|link=Seamoth]] |
|||
*[[File:Bioreactor.png|50px|link=Bioreactor]] |
|||
*[[File:Battery Charger.png|50px|link=Battery Charger]] |
|||
*[[File:Mobile Vehicle Bay.png|50px|link=Mobile Vehicle Bay]] |
|||
</td> |
|||
<td style="vertical-align:top;"> |
|||
*[[File:Natural_Selection_2_Poster.png|50px|link=Poster]] |
|||
*[[File:Supply Crate.png|50px|link=Supply Crate]] |
|||
</td> |
|||
</tr> |
|||
</table> |
|||
|} |
|||
{| style="width: 100%;" class="article-table sortable" border="0" cellpadding="1" cellspacing="1" |
|||
|- |
|||
! class="unsortable" style="width: auto; text-align: left; font-size:12px;" |Wreck #3 |
|||
! class="unsortable" style="width: auto; text-align: right; font-size:12px;" |-390 -120 648 |
|||
|- |
|||
| style="text-align:left;" colspan="2" | |
|||
<table> |
|||
<tr> |
|||
<td style="width=100%;"> |
|||
<gallery captionalign="center" widths="250" orientation="none"> |
|||
GrassyPlateausWreck-3.jpg|[[Grassy Plateaus]] Wreck 3 |
|||
</gallery> |
|||
</td> |
|||
<td style="vertical-align:top;"> |
|||
*[[File:Chair.png|50px|link=Chair]] |
|||
*[[File:Desk.png|50px|link=Desk]] |
|||
</td> |
|||
<td style="vertical-align:top;"> |
|||
*[[File:Seamoth.png|50px|link=Seamoth]] |
|||
*[[File:Battery Charger.png|50px|link=Battery Charger]] |
|||
*[[File:Seaglide.png|50px|link=Seaglide]] |
|||
</td> |
|||
<td style="vertical-align:top;"> </td> |
|||
</tr> |
|||
</table> |
|||
|} |
|||
{| style="width: 100%;" class="article-table sortable" border="0" cellpadding="1" cellspacing="1" |
|||
|- |
|||
! class="unsortable" style="width: auto; text-align: left; font-size:12px;" |Wreck #4 |
|||
! class="unsortable" style="width: auto; text-align: right; font-size:12px;" |-630 -50 -6 |
|||
|- |
|||
| style="text-align:left;" colspan="2" | |
|||
<table> |
|||
<tr> |
|||
<td style="width=100%;"> |
|||
<gallery captionalign="center" widths="250" orientation="none"> |
|||
GrassyPlateausWreck-4.jpg|[[Grassy Plateaus]] Wreck 4 |
|||
</gallery> |
|||
</td> |
|||
<td style="vertical-align:top;"> |
|||
*[[File:Bench.png|50px|link=Bench]] |
|||
*[[File:Chair.png|50px|link=Chair]] |
|||
*[[File:Chair 3.png|50px|link=Chair]] |
|||
*[[File:Desk.png|50px|link=Desk]] |
|||
*[[File:Floodlight.png|50px|link=Floodlight]] |
|||
</td> |
|||
<td style="vertical-align:top;"> |
|||
*[[File:Picture Frame.png|50px|link=Picture Frame]] |
|||
*[[File:Plant Pot.png|50px|link=Plant Pot]] |
|||
*[[File:Plant_Pot_3.png|50px|link=Plant Pot]] |
|||
*[[File:Planter Shelf.png|50px|link=Plant Shelf]] |
|||
</td> |
|||
<td style="vertical-align:top;"> |
|||
*[[File:Bioreactor.png|50px|link=Bioreactor]] |
|||
*[[File:Battery Charger.png|50px|link=Battery Charger]] |
|||
*[[File:Mobile Vehicle Bay.png|50px|link=Mobile Vehicle Bay]] |
|||
</td> |
|||
<td style="vertical-align:top;"> |
|||
* [[File:PDA.png|50px|link=Data Downloads]] |
|||
</td> |
|||
</tr> |
|||
</table> |
|||
|} |
|||
{| style="width: 100%;" class="article-table sortable" border="0" cellpadding="1" cellspacing="1" |
|||
|- |
|||
! class="unsortable" style="width: auto; text-align: left; font-size:12px;" |Wreck #5 |
|||
! class="unsortable" style="width: auto; text-align: right; font-size:12px;" |-432 –90 -268 |
|||
|- |
|||
| style="text-align:left;" colspan="2" | |
|||
<table> |
|||
<tr> |
|||
<td style="width=100%;"> |
|||
<gallery captionalign="center" widths="250" orientation="none"> |
|||
GrassyPlateausWreck-5.jpg|[[Grassy Plateaus]] Wreck 5 |
|||
</gallery> |
|||
</td> |
|||
<td style="vertical-align:top;"> |
|||
*[[File:Chair.png|50px|link=Chair]] |
|||
*[[File:Desk.png|50px|link=Desk]] |
|||
</td> |
|||
<td style="vertical-align:top;"> |
|||
*[[File:Seamoth.png|50px|link=Seamoth]] |
|||
*[[File:Bioreactor.png|50px|link=Bioreactor]] |
|||
*[[File:Seaglide.png|50px|link=Seaglide]] |
|||
</td> |
|||
<td style="vertical-align:top;"> </td> |
|||
</tr> |
|||
</table> |
|||
|} |
|||
</div> |
|||
===Koosh Zone Wreck=== |
|||
<div class="mw-collapsible mw-collapsed"> |
|||
<table style="width:100%;"> |
|||
<tr> |
|||
<td style="vertical-align:top; width:50%;"> |
|||
*[[Interior Growbed]] |
|||
*[[Exterior Growbed]] |
*[[Exterior Growbed]] |
||
*[[Indoor Growbed|Interior Growbed]] |
|||
*[[Floodlight]] |
|||
*[[Plant Pot]] |
*[[Plant Pot]] |
||
| 940 -198 593 |
|||
</td> |
|||
<td style="vertical-align:top; width:50%;"> |
|||
*[[Floodlight]] |
|||
*[[Light Stick]] |
|||
*[[Water Filtration Machine]] Fragments |
|||
*[[Stasis Rifle]] Fragments |
|||
</td> |
|||
</tr> |
|||
</table> |
|||
{| style="width: 100%;" class="article-table sortable" border="0" cellpadding="1" cellspacing="1" |
|||
|- |
|- |
||
|[[File:Wrecks (4).jpg|thumb|center|160px]] |
|||
! class="unsortable" style="width: auto; text-align: left; font-size:12px;" |Wreck #1 |
|||
|[[Underwater Islands]] |
|||
! class="unsortable" style="width: auto; text-align: right; font-size:12px;" |940 -198 593 |
|||
| |
| |
||
*[[Fragments|Cyclops Engine Fragments]] |
|||
| style="text-align:left;" colspan="2" | |
|||
*[[Fragments|Stasis Rifle Fragments]] |
|||
<table> |
|||
*[[Fragments|Propulsion Cannon Fragments]] |
|||
<tr> |
|||
*[[Chair]] |
|||
<td style="width=100%;"> |
|||
<gallery captionalign="center" widths="250" orientation="none"> |
|||
Wrecks_(3).jpg|[[Koosh Zone]] Wreck 1 |
|||
</gallery> |
|||
</td> |
|||
<td style="vertical-align:top;"> |
|||
*[[File:Exterior Growbed.png|50px|link=Exterior Growbed]] |
|||
*[[File:Indoor_Growbed.png|50px|link=Interior Growbed]] |
|||
*[[File:Plant Pot.png|50px|link=Plant Pot]] |
|||
</td> |
|||
<td style="vertical-align:top;"> |
|||
*[[File:Floodlight.png|50px|link=Floodlight]] |
|||
*[[File:LED_Light.png|50px|link=Light Stick]] |
|||
</td> |
|||
<td style="vertical-align:top;"> |
|||
*[[File:Water Filtration Machine.png|50px|link=Water Filtration Machine]] |
|||
*[[File:Stasis Rifle.png|50px|link=Stasis Rifle]] |
|||
</td> |
|||
</tr> |
|||
</table> |
|||
|} |
|||
</div> |
|||
===Underwater Islands Wreck=== |
|||
<div class="mw-collapsible mw-collapsed"> |
|||
<table style="width:100%;"> |
|||
<tr> |
|||
<td style="vertical-align:top; width:50%;"> |
|||
*[[Bench]] |
*[[Bench]] |
||
*[[Chair]] |
|||
*[[Desk]] |
*[[Desk]] |
||
*[[Floodlight]] |
*[[Floodlight]] |
||
*[[Light Stick]] |
|||
*[[Picture Frame]] |
*[[Picture Frame]] |
||
</td> |
|||
<td style="vertical-align:top; width:50%;"> |
|||
*[[Plant Pot 2]] |
*[[Plant Pot 2]] |
||
*[[Plant Pot 3]] |
*[[Plant Pot 3]] |
||
| -102 -179 860 |
|||
*[[Cyclops|Cyclops Engine]] Fragments |
|||
*[[Stasis Rifle]] Fragments |
|||
*[[Propulsion Cannon]] Fragments |
|||
</td> |
|||
</tr> |
|||
</table> |
|||
{| style="width: 100%;" class="article-table sortable" border="0" cellpadding="1" cellspacing="1" |
|||
|- |
|- |
||
|[[File:Wrecks (11).jpg|thumb|center|160px]] |
|||
! class="unsortable" style="width: auto; text-align: left; font-size:12px;" |Wreck #1 |
|||
|[[Mountains]] |
|||
! class="unsortable" style="width: auto; text-align: right; font-size:12px;" |-102 -179 860 |
|||
| |
| |
||
*[[Fragments|Bulkhead Fragments]] |
|||
| style="text-align:left;" colspan="2" | |
|||
*[[Fragments|LEDLight Fragments]] |
|||
<table> |
|||
*[[Fragments|Modification Station Fragments]] |
|||
<tr> |
|||
*[[Fragments|Moonpool Fragments]] |
|||
<td style="width=100%;"> |
|||
*[[Fragments|Seamoth Upgrade Console Fragments]] |
|||
<gallery captionalign="center" widths="250" orientation="none"> |
|||
Wrecks_(4).jpg|[[Underwater Islands]] Wreck 1 |
|||
</gallery> |
|||
</td> |
|||
<td style="vertical-align:top;"> |
|||
*[[File:Bench.png|50px|link=Bench]] |
|||
*[[File:Chair.png|50px|link=Chair]] |
|||
*[[File:Desk.png|50px|link=Desk]] |
|||
*[[File:Floodlight.png|50px|link=Floodlight]] |
|||
</td> |
|||
<td style="vertical-align:top;"> |
|||
*[[File:LED_Light.png|50px|link=Light Stick]] |
|||
*[[File:Picture Frame.png|50px|link=Picture Frame]] |
|||
*[[File:Plant Pot 2.png|50px|link=Plant Pot]] |
|||
*[[File:Plant Pot 3.png|50px|link=Plant Pot]] |
|||
</td> |
|||
<td style="vertical-align:top;"> |
|||
*[[File:Cyclops Engine Fragment.png|50px|link=Cyclops]] |
|||
*[[File:Stasis Rifle.png|50px|link=Stasis Rifle]] |
|||
*[[File:Propulsion Cannon.png|50px|link=Propulsion Cannon]] |
|||
</td> |
|||
</tr> |
|||
</table> |
|||
|} |
|||
</div> |
|||
===Mountains Wreck=== |
|||
<div class="mw-collapsible mw-collapsed"> |
|||
<table style="width:100%;"> |
|||
<tr> |
|||
<td style="vertical-align:top; width:50%;"> |
|||
*[[Bench]] |
*[[Bench]] |
||
*[[Chair]] |
*[[Chair]] |
||
*[[Desk]] |
*[[Desk]] |
||
*[[Floodlight]] |
*[[Floodlight]] |
||
*[[Picture Frame]] |
|||
*[[Plant Pot]] |
*[[Plant Pot]] |
||
*[[Plant Pot 2]] |
*[[Plant Pot 2]] |
||
*[[Plant Pot 3]] |
*[[Plant Pot 3]] |
||
| 701 -346 1224 |
|||
</td> |
|||
<td style="vertical-align:top; width:50%;"> |
|||
*[[Light Stick]] |
|||
*[[Picture Frame]] |
|||
*[[Bulkhead]] |
|||
*[[Modification Station]] Fragments |
|||
*[[Moon Pool]] Fragments |
|||
*[[Seamoth Modification Station]] Fragments |
|||
</td> |
|||
</tr> |
|||
</table> |
|||
{| style="width: 100%;" class="article-table sortable" border="0" cellpadding="1" cellspacing="1" |
|||
|- |
|- |
||
|[[File:Wrecks (5).jpg|thumb|center|160px]] |
|||
! class="unsortable" style="width: auto; text-align: left; font-size:12px;" |Wreck #1 |
|||
|[[Mushroom Forest]] |
|||
! class="unsortable" style="width: auto; text-align: right; font-size:12px;" |701 -346 1224 |
|||
| |
|||
* [[Fragments|Cyclops Bridge Fragments]] |
|||
* [[Fragments|Cyclops Hull Fragments]] |
|||
* [[Fragments|Power Cell Charger Fragments]] |
|||
* [[Fragments|Power Transmitter Fragments]] |
|||
* [[Bench]] |
|||
* [[Chair 2]] |
|||
* [[Chair 3]] |
|||
* [[Desk]] |
|||
* [[Floodlight]] |
|||
* [[Picture Frame]] |
|||
* [[Plant Pot 2]] |
|||
* [[Plant Shelf]] |
|||
* [[Data Downloads|Abandoned PDA]] |
|||
| -630 -125 752 |
|||
|- |
|- |
||
|[[File:Wrecks (6).jpg|thumb|center|160px]] |
|||
| style="text-align:left;" colspan="2" | |
|||
|[[Dunes]] |
|||
<table> |
|||
| |
|||
<tr> |
|||
*[[Fragments|Seamoth Upgrade Console Fragments]] |
|||
<td style="width=100%;"> |
|||
*[[Fragments|Thermal Plant Fragments]] |
|||
<gallery captionalign="center" widths="250" orientation="none"> |
|||
*[[Fragments|Bulkhead Fragments]] |
|||
Wrecks_(11).jpg|[[Mountains]] Wreck 1 |
|||
</gallery> |
|||
</td> |
|||
<td style="vertical-align:top;"> |
|||
*[[File:Bench.png|50px|link=Bench]] |
|||
*[[File:Chair.png|50px|link=Chair]] |
|||
*[[File:Desk.png|50px|link=Desk]] |
|||
*[[File:Plant Pot.png|50px|link=Plant Pot]] |
|||
*[[File:Floodlight.png|50px|link=Floodlight]] |
|||
</td> |
|||
<td style="vertical-align:top;"> |
|||
*[[File:LED_Light.png|50px|link=Light Stick]] |
|||
*[[File:Picture Frame.png|50px|link=Picture Frame]] |
|||
*[[File:Plant Pot 2.png|50px|link=Plant Pot]] |
|||
*[[File:Plant Pot 3.png|50px|link=Plant Pot]] |
|||
</td> |
|||
<td style="vertical-align:top;"> |
|||
*[[File:Bulkhead.png|50px|link=Bulkhead]] |
|||
*[[File:Modification Station.png|50px|link=Modification Station]] |
|||
*[[File:Moon_Pool.png|50px|link=Moon Pool]] |
|||
*[[File:Seamoth Modification Station.png|50px|link=Seamoth Modification Station]] |
|||
</td> |
|||
</tr> |
|||
</table> |
|||
|} |
|||
</div> |
|||
===Mushroom Forest Wreck=== |
|||
<div class="mw-collapsible mw-collapsed"> |
|||
<table style="width:100%;"> |
|||
<tr> |
|||
<td style="vertical-align:top; width:50%;"> |
|||
*[[Bench]] |
|||
*[[Chair 2]] |
|||
*[[Chair 3]] |
|||
*[[Desk]] |
|||
*[[Floodlight]] |
|||
*[[Picture Frame]] |
|||
*[[Plant Pot 2]] |
|||
</td> |
|||
<td style="vertical-align:top; width:50%;"> |
|||
*[[Plant Shelf]] |
|||
*[[Cyclops|Cyclops Bridge]] Fragments |
|||
*[[Cyclops|Cyclops Hull]] Fragments |
|||
*[[Power Cell Charger]] Fragments |
|||
*[[Power Transmitter]] Fragments |
|||
*[[Data Downloads|Abandoned PDA]] |
|||
</td> |
|||
</tr> |
|||
</table> |
|||
{| style="width: 100%;" class="article-table sortable" border="0" cellpadding="1" cellspacing="1" |
|||
|- |
|||
! class="unsortable" style="width: auto; text-align: left; font-size:12px;" |Wreck #1 |
|||
! class="unsortable" style="width: auto; text-align: right; font-size:12px;" |-630 -125 752 |
|||
|- |
|||
| style="text-align:left;" colspan="2" | |
|||
<table> |
|||
<tr> |
|||
<td style="width=100%;"> |
|||
<gallery captionalign="center" widths="250" orientation="none"> |
|||
Wrecks_(5).jpg|[[Mountains]] Wreck 1 |
|||
</gallery> |
|||
</td> |
|||
<td style="vertical-align:top;"> |
|||
*[[File:Bench.png|50px|link=Bench]] |
|||
*[[File:Chair 2.png|50px|link=Chair]] |
|||
*[[File:Chair 3.png|50px|link=Chair]] |
|||
*[[File:Desk.png|50px|link=Desk]] |
|||
*[[File:Floodlight.png|50px|link=Floodlight]] |
|||
</td> |
|||
<td style="vertical-align:top;"> |
|||
*[[File:Picture Frame.png|50px|link=Picture Frame]] |
|||
*[[File:Plant Pot 2.png|50px|link=Plant Pot]] |
|||
*[[File:Planter Shelf.png|50px|link=Plant Shelf]] |
|||
</td> |
|||
<td style="vertical-align:top;"> |
|||
*[[File:Cyclops Bridge Fragment.png|50px|link=Cyclops]] |
|||
*[[File:Cyclops Hull Fragment.png|50px|link=Cyclops]] |
|||
*[[File:Power Cell Charger.png|50px|link=Power Cell Charger]] |
|||
*[[File:Power Transmitter.png|50px|link=Power Transmitter]] |
|||
</td> |
|||
<td style="vertical-align:top;"> |
|||
* [[File:PDA.png|50px|link=Data Downloads]] |
|||
</td> |
|||
</tr> |
|||
</table> |
|||
|} |
|||
</div> |
|||
===Dunes Wreck=== |
|||
<div class="mw-collapsible mw-collapsed"> |
|||
<table style="width:100%;"> |
|||
<tr> |
|||
<td style="vertical-align:top; width:50%;"> |
|||
*[[Bench]] |
*[[Bench]] |
||
*[[Chair]] |
*[[Chair]] |
||
*[[Desk]] |
*[[Desk]] |
||
*[[Floodlight]] |
*[[Floodlight]] |
||
| -1448 -332 732 |
|||
</td> |
|||
<td style="vertical-align:top; width:50%;"> |
|||
*[[Bulkhead]] Fragments |
|||
*[[Thermal Plant]] Fragments |
|||
*[[Seamoth Modification Station]] Fragments |
|||
</td> |
|||
</tr> |
|||
</table> |
|||
{| style="width: 100%;" class="article-table sortable" border="0" cellpadding="1" cellspacing="1" |
|||
|- |
|- |
||
|[[File:Wrecks (9).jpg|thumb|center|160px]] |
|||
! class="unsortable" style="width: auto; text-align: left; font-size:12px;" |Wreck #1 |
|||
|[[Sea Treader's Path]] |
|||
! class="unsortable" style="width: auto; text-align: right; font-size:12px;" |-1448 -332 732 |
|||
| |
| |
||
*[[Fragments|Alien Containment Fragments]] |
|||
| style="text-align:left;" colspan="2" | |
|||
*[[Fragments|Cyclops Hull Fragment]] |
|||
<table> |
|||
*[[Fragments|Cyclops Bridge Fragments]] |
|||
<tr> |
|||
*[[Fragments|Nuclear Reactor Fragment]] |
|||
<td style="width=100%;"> |
|||
<gallery captionalign="center" widths="250" orientation="none"> |
|||
Wrecks_(6).jpg|[[Dunes]] Wreck 1 |
|||
</gallery> |
|||
</td> |
|||
<td style="vertical-align:top;"> |
|||
*[[File:Bench.png|50px|link=Bench]] |
|||
*[[File:Chair.png|50px|link=Chair]] |
|||
</td> |
|||
<td style="vertical-align:top;"> |
|||
*[[File:Desk.png|50px|link=Desk]] |
|||
*[[File:Floodlight.png|50px|link=Floodlight]] |
|||
</td> |
|||
<td style="vertical-align:top;"> |
|||
*[[File:Bulkhead.png|50px|link=Bulkhead]] |
|||
*[[File:Thermal Plant.png|50px|link=Thermal Plant]] |
|||
*[[File:Seamoth Modification Station.png|50px|link=Seamoth Modification Station]] |
|||
</td> |
|||
<td style="vertical-align:top;"></td> |
|||
</tr> |
|||
</table> |
|||
|} |
|||
</div> |
|||
===Sea Treader's Path Wreck=== |
|||
<div class="mw-collapsible mw-collapsed"> |
|||
<table style="width:100%;"> |
|||
<tr> |
|||
<td style="vertical-align:top; width:50%;"> |
|||
*[[Bench]] |
*[[Bench]] |
||
*[[Chair]] |
*[[Chair]] |
||
| Line 661: | Line 254: | ||
*[[Picture Frame]] |
*[[Picture Frame]] |
||
*[[Plant Pot 2]] |
*[[Plant Pot 2]] |
||
</td> |
|||
<td style="vertical-align:top; width:50%;"> |
|||
*[[Plant Shelf]] |
*[[Plant Shelf]] |
||
| -1083 -190 -735 |
|||
*[[Alien Containment]] Fragments |
|||
*[[Cyclops|Cyclops Hull]] Fragments |
|||
*[[Cyclops|Cyclops Bridge]] Fragments |
|||
*[[Nuclear Reactor]] Fragments |
|||
</td> |
|||
</tr> |
|||
</table> |
|||
{| style="width: 100%;" class="article-table sortable" border="0" cellpadding="1" cellspacing="1" |
|||
|- |
|- |
||
|[[File:Wrecks (7).jpg|thumb|center|160px]] |
|||
! class="unsortable" style="width: auto; text-align: left; font-size:12px;" |Wreck #1 |
|||
|[[Blood Kelp Zone]] |
|||
! class="unsortable" style="width: auto; text-align: right; font-size:12px;" |-1083 -190 -735 |
|||
| |
| |
||
*[[Fragments|Alien Containment Fragments]] |
|||
| style="text-align:left;" colspan="2" | |
|||
*[[Fragments|Cyclops Pressure Compensator Fragment]] |
|||
<table> |
|||
*[[Fragments|Modification Station Fragments]] |
|||
<tr> |
|||
*[[Fragments|Moonpool Fragment]] |
|||
<td style="width=100%;"> |
|||
*[[Fragments|Nuclear Reactor Fragments]] |
|||
<gallery captionalign="center" widths="250" orientation="none"> |
|||
*[[Fragments|Scanner Room Fragments]] |
|||
Wrecks_(9).jpg|[[Sea Treader's Path]] Wreck 1 |
|||
</gallery> |
|||
</td> |
|||
<td style="vertical-align:top;"> |
|||
*[[File:Bench.png|50px|link=Bench]] |
|||
*[[File:Chair.png|50px|link=Chair]] |
|||
*[[File:Desk.png|50px|link=Desk]] |
|||
*[[File:Floodlight.png|50px|link=Floodlight]] |
|||
</td> |
|||
<td style="vertical-align:top;"> |
|||
*[[File:Picture Frame.png|50px|link=Picture Frame]] |
|||
*[[File:Plant Pot 2.png|50px|link=Plant Pot]] |
|||
*[[File:Planter Shelf.png|50px|link=Plant Shelf]] |
|||
</td> |
|||
<td style="vertical-align:top;"> |
|||
*[[File:Water Park.png|50px|link=Alien Containment]] |
|||
*[[File:Cyclops Hull Fragment.png|50px|link=Cyclops]] |
|||
*[[File:Cyclops Bridge Fragment.png|50px|link=Cyclops]] |
|||
*[[File:Nuclear Reactor.png|50px|link=Nuclear Reactor]] |
|||
</td> |
|||
<td style="vertical-align:top;"></td> |
|||
</tr> |
|||
</table> |
|||
|} |
|||
</div> |
|||
===Blood Kelp Zone Wreck=== |
|||
<div class="mw-collapsible mw-collapsed"> |
|||
<table style="width:100%;"> |
|||
<tr> |
|||
<td style="vertical-align:top; width:50%;"> |
|||
*[[Floodlight]] |
*[[Floodlight]] |
||
| -1208 -332 -390 |
|||
*[[Alien Containment]] Fragments |
|||
*[[Cyclops Pressure Compensator]] Fragments |
|||
*[[Modification Station]] Fragments |
|||
</td> |
|||
<td style="vertical-align:top; width:50%;"> |
|||
*[[Moon Pool]] Fragments |
|||
*[[Nuclear Reactor]] Fragments |
|||
*[[Scanner Room]] Fragments |
|||
</td> |
|||
</tr> |
|||
</table> |
|||
{| style="width: 100%;" class="article-table sortable" border="0" cellpadding="1" cellspacing="1" |
|||
|- |
|- |
||
|[[File:Wreck 10.png|centre|thumb|160x160px]] |
|||
! class="unsortable" style="width: auto; text-align: left; font-size:12px;" |Wreck #1 |
|||
|[[Grand Reef]] |
|||
! class="unsortable" style="width: auto; text-align: right; font-size:12px;" |-1208 -332 -390 |
|||
| |
|||
* [[Fragments|Cyclops Pressure Compensator Fragments]] |
|||
* [[Fragments|Moonpool Fragments]] |
|||
* [[Fragments|Seamoth Upgrade Console Fragments]] |
|||
* [[Fragments|Scanner Room Fragments]] |
|||
* [[Fragments|Thermal Plant Fragments]] |
|||
* [[Chair]] |
|||
* [[Desk]] |
|||
| -284 -250 -850 |
|||
|- |
|- |
||
|[[File:Wrack 10.jpg|thumb|160x160px|centre]] |
|||
| style="text-align:left;" colspan="2" | |
|||
|[[Grand Reef]] |
|||
<table> |
|||
| |
|||
<tr> |
|||
* [[Fragments|Cyclops Pressure Compensator Fragments]] |
|||
<td style="width=100%;"> |
|||
* [[Fragments|Moonpool Fragments]] |
|||
<gallery captionalign="center" widths="250" orientation="none"> |
|||
* [[Fragments|Scanner Room Fragments]] |
|||
Wrecks_(7).jpg|[[Blood Kelp Zone]] Wreck 1 |
|||
* [[Fragments|Seamoth Upgrade Console Fragments]] |
|||
</gallery> |
|||
* [[Fragments|Thermal Plant Fragments]] |
|||
</td> |
|||
* [[Bed 1]] |
|||
<td style="vertical-align:top;"> |
|||
* [[Chair]] |
|||
*[[File:Floodlight.png|50px|link=Floodlight]] |
|||
* [[Desk]] |
|||
*[[File:Water Park.png|50px|link=Alien Containment]] |
|||
* [[Wall Shelves]] |
|||
</td> |
|||
| -865 -430 -1420 |
|||
<td style="vertical-align:top;"> |
|||
*[[File:Modification Station.png|50px|link=Modification Station]] |
|||
*[[File:Cyclops Pressure Compensator.png|50px|link=Cyclops Pressure Compensator]] |
|||
</td> |
|||
<td style="vertical-align:top;"> |
|||
*[[File:Moon Pool.png|50px|link=Moon Pool]] |
|||
*[[File:Nuclear Reactor.png|50px|link=Nuclear Reactor]] |
|||
*[[File:Scanner Room.png|50px|link=Scanner Room]] |
|||
</td> |
|||
<td style="vertical-align:top;"></td> |
|||
</tr> |
|||
</table> |
|||
|} |
|||
</div> |
|||
===Grand Reef Wrecks=== |
|||
<div class="mw-collapsible mw-collapsed"> |
|||
<table style="width:100%;"> |
|||
<tr> |
|||
<td style="vertical-align:top; width:50%;"> |
|||
*[[Chair]] |
|||
*[[Desk]] |
|||
*[[Thermal Plant]] Fragments |
|||
*[[Scanner Room]] Fragments |
|||
</td> |
|||
<td style="vertical-align:top; width:50%;"> |
|||
*[[Seamoth Modification Station]] Fragments |
|||
*[[Moon Pool]] Fragments |
|||
*[[Cyclops Pressure Compensator]] Fragments |
|||
*[[Bed]] |
|||
*[[Wall Shelves]] |
|||
</td> |
|||
</tr> |
|||
</table> |
|||
{| style="width: 100%;" class="article-table sortable" border="0" cellpadding="1" cellspacing="1" |
|||
|- |
|||
! class="unsortable" style="width: auto; text-align: left; font-size:12px;" |Wreck #1 |
|||
! class="unsortable" style="width: auto; text-align: right; font-size:12px;" |-284 -250 -850 |
|||
|- |
|||
| style="text-align:left;" colspan="2" | |
|||
<table style="width=100%;"> |
|||
<tr> |
|||
<td style="width=auto;"> |
|||
<gallery captionalign="center" widths="250" orientation="none"> |
|||
Wreck_10.png|[[Grand Reef]] Wreck 1 |
|||
</gallery> |
|||
</td> |
|||
<td style="vertical-align:top; font-size:12px;"> |
|||
*[[File:Chair.png|50px|link=Chair]] |
|||
*[[File:Desk.png|50px|link=Desk]] |
|||
</td> |
|||
<td style="vertical-align:top; font-size:12px;"> |
|||
*[[File:Thermal Plant.png|50px|link=Thermal Plant]] |
|||
*[[File:Scanner Room.png|50px|link=Scanner Room]] |
|||
</td> |
|||
<td style="vertical-align:top; font-size:12px;"> |
|||
*[[File:Seamoth Modification Station.png|50px|link=Seamoth Modification Station]] |
|||
*[[File:Moon Pool.png|50px|link=Moon Pool]] |
|||
*[[File:Cyclops Pressure Compensator.png|50px|link=Cyclops Pressure Compensator]] |
|||
</td> |
|||
</tr> |
|||
</table> |
|||
|} |
|||
{| style="width: 100%;" class="article-table sortable" border="0" cellpadding="1" cellspacing="1" |
|||
|- |
|||
! class="unsortable" style="width: auto; text-align: left; font-size:12px;" |Wreck #2 |
|||
! class="unsortable" style="width: auto; text-align: right; font-size:12px;" |-865 -430 -1420 |
|||
|- |
|||
| style="text-align:left;" colspan="2" | |
|||
<table> |
|||
<tr> |
|||
<td style="width=100%;"> |
|||
<gallery captionalign="center" widths="250" orientation="none"> |
|||
Wrack_10.jpg|[[Grand Reef]] Wreck 2 |
|||
</gallery> |
|||
</td> |
|||
<td style="vertical-align:top;"> |
|||
*[[File:Bed.png|50px|link=Bed]] |
|||
*[[File:Chair.png|50px|link=Chair]] |
|||
*[[File:Desk.png|50px|link=Desk]] |
|||
</td> |
|||
<td style="vertical-align:top;"> |
|||
*[[File:Wall Shelves.png|50px|link=Wall Shelves]] |
|||
*[[File:Thermal Plant.png|50px|link=Thermal Plant]] |
|||
*[[File:Seamoth Modification Station.png|50px|link=Seamoth Modification Station]] |
|||
</td> |
|||
<td style="vertical-align:top;"> |
|||
*[[File:Scanner Room.png|50px|link=Scanner Room]] |
|||
*[[File:Moon Pool.png|50px|link=Moon Pool]] |
|||
*[[File:Cyclops Pressure Compensator.png|50px|link=Cyclops Pressure Compensator]] |
|||
</td> |
|||
</tr> |
|||
</table> |
|||
|} |
|} |
||
</div> |
|||
==Small Wrecks== |
==Small Wrecks== |
||
'''Small Wrecks''' can be found surrounding the '''Large Wrecks''' and inside the [[Crash Zone]]. They can contain useful items and fragments such as: |
'''Small Wrecks''' can be found surrounding the '''Large Wrecks''' and inside the [[Crash Zone]]. They can contain useful items and fragments such as: |
||
<table style="width:100%;"> |
<table style="width:100%;"><tr> |
||
<tr> |
|||
<td style="width:50%; vertical-align:top;"> |
<td style="width:50%; vertical-align:top;"> |
||
*[[Bar Table]] |
*[[Bar Table]] |
||
Revision as of 13:02, 3 August 2016

|
This seems new This article contains information that is updated for the latest Experimental Version of Subnautica. Players using stable mode may find this information inaccurate. |
Template:Infobox Biome The Wrecks are explorable pieces of debris from the Aurora, which can only be located after its explosion. Large Wrecks contain valuable technology in the form of Fragments while Small Wrecks contain only Supply Crates.
Large Wrecks
There are 20 Large Wrecks spread throughout the ocean after the Aurora explodes. Each of them are surrounded by their local Flora and Fauna and possess their own unique challenges. Many of them include sections that are only accessible with the Laser Cutter, Repulsion Cannon and Propulsion Cannon. While each contains a unique set of fragments, there are common items found in many wrecks. They are:
Large Wreck List
| Image | Biome | Unique Fragments | Coordinates |
|---|---|---|---|
| Safe Shallows | -40 -14 -400 | ||
| Safe Shallows | 366 -6 -203 | ||
| Kelp Forest | 320 -40 -336 | ||
| Kelp Forest | -413 -43 310 | ||
| Kelp Forest | -320 -57 252 | ||
| Kelp Forest | 65 -25 385 | ||
| -25 -88 -615 | |||
| 320 -66 431 | |||
| -390 -120 648 | |||
| -630 -50 -6 | |||
| -432 –90 -268 | |||
| Koosh Zone | 940 -198 593 | ||
| Underwater Islands | -102 -179 860 | ||
| Mountains | 701 -346 1224 | ||
| Mushroom Forest | -630 -125 752 | ||
| Dunes | -1448 -332 732 | ||
| Sea Treader's Path | -1083 -190 -735 | ||
| Blood Kelp Zone | -1208 -332 -390 | ||
| Grand Reef | -284 -250 -850 | ||
| Grand Reef | -865 -430 -1420 |


.jpg)
.jpg)
.jpg)
.jpg)
.jpg)
.jpg)
.jpg)


Small Wrecks
Small Wrecks can be found surrounding the Large Wrecks and inside the Crash Zone. They can contain useful items and fragments such as:
| Image | Biome | Unique Fragments | Coordinates |
|---|---|---|---|
| Safe Shallows | 20 -10 300 | ||
| Safe Shallows |
|
90 -20 120 | |
| Safe Shallows | 65 -10 -85 | ||
| Safe Shallows | -160 -20 -225 | ||
| Safe Shallows | 175 -23 -253 | ||
| Safe Shallows | 310 -23 -119 | ||
| Safe Shallows | 527 -23 -43 | ||
| Grassy Plateaus | 165 -86 -520 | ||
| Grassy Plateaus | 315 -90 215 | ||
| Grassy Plateaus | 270 -85 70 | ||
| Grassy Plateaus | -370 -100 475 | ||
| Grassy Plateaus | -284 -93 606 | ||
| Grassy Plateaus | -520 -90 -215 |


Trivia
- The Poster is a unique item that can only be found inside the First Grassy Plateaus Wrecks.
Gallery
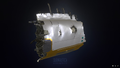
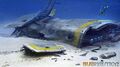
Large Explorable Wreck Model from Sketchfab
Large Explorable Wreck Model from Sketchfab
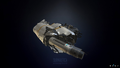
Small Explorable Wreck's Model from Sketchfab
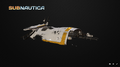
Large Explorable Wreck's Concept Art
Small Explorable Wreck's Concept Art
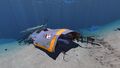
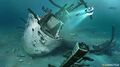
Small wreckage, found in the Crash Zone


.jpg)
For a more complete gallery, see Wrecks/Gallery.