
Picture Frame (Subnautica): Difference between revisions
(Undo revision 230553 by Arseniccatnip (talk)) Tag: rte-wysiwyg |
(Undid edit as the users against it provided no reasoning, and the edit seemed okay) Tag: sourceedit |
||
| Line 6: | Line 6: | ||
** [[Mushroom Forest]] |
** [[Mushroom Forest]] |
||
** [[Sea Treader's Path]] |
** [[Sea Treader's Path]] |
||
** 2x [[Grassy Plateaus]]|Fragments2 = 1}}The '''Picture Frame''' is an item that can be placed inside the [[Cyclops]] or a [[Seabases|Seabase]] module. It allows the player to display and view a slideshow of pictures. '''Picture Frames''' can be constructed with the [[Habitat Builder]]. |
** 2x [[Grassy Plateaus]]|Fragments2 = 1}}The '''Picture Frame''' is an item that can be placed inside the [[Cyclops]] or a [[Seabases|Seabase]] module. It allows the player to display and view a picture or a slideshow of pictures that the player has taken with their [[PDA]]. '''Picture Frames''' can be constructed with the [[Habitat Builder]]. |
||
| ⚫ | |||
The player can take pictures of the environment with their [[PDA]]. The pictures can then be displayed by the '''Picture Frame'''. The '''Picture Frame''' can be set to display a single picture or display a slideshow. |
|||
| ⚫ | |||
==How to Use== |
==How to Use== |
||
* Set up a photo shot |
* Set up a photo shot |
||
* Press {{Key|F11}} to take a picture |
* Press {{Key|F11}} to take a picture |
||
| ⚫ | |||
* Open PDA to see the photo |
|||
* Press {{Key|LMB}} to set the photo (this will open the PDA) |
|||
| ⚫ | |||
* Select the desired photo and choose "upload" |
|||
* Click the upload menu |
|||
* Set picture ({{Key|LMB}}) |
|||
* Done |
* Done |
||
| Line 24: | Line 21: | ||
While the '''Picture Frame''' is intended to display screenshots, it is also possible to have it display your own images. |
While the '''Picture Frame''' is intended to display screenshots, it is also possible to have it display your own images. |
||
To import a custom image, simply move an image into the screenshots folder. For the photo to fit in the '''Picture Frame''' properly, it must be 800x600 resolution |
To import a custom image, simply move an image into the screenshots folder. The folder's location is different if you are playing on Windows or Mac. For the photo to fit in the '''Picture Frame''' properly, it must be 800x600 resolution. |
||
Once you have imported your image, it will appear under in the "screenshots" of the PDA. You can then add it to a '''Picture Frame''' as you would any other screenshot. |
Once you have imported your image, it will appear under in the "screenshots" of the PDA. You can then add it to a '''Picture Frame''' as you would any other screenshot. |
||
| Line 30: | Line 27: | ||
=== Windows === |
=== Windows === |
||
On Windows, screenshot images are stored at: |
On Windows, screenshot images are stored at: |
||
| ⚫ | |||
| ⚫ | |||
or |
or |
||
| ⚫ | |||
| ⚫ | |||
depending on which release you have. |
depending on which release you have. |
||
| Line 41: | Line 36: | ||
=== Mac === |
=== Mac === |
||
On Mac, the location is under the Steam game folder at: |
On Mac, the location is under the Steam game folder at: |
||
| ⚫ | |||
| ⚫ | |||
| ⚫ | |||
| ⚫ | |||
==Recipe== |
==Recipe== |
||
| Line 59: | Line 52: | ||
==Trivia== |
==Trivia== |
||
* The bottom on the '''Picture Frame''' reads " |
* The bottom on the '''Picture Frame''' reads "[[Alterra Corporation|Alterra]]". |
||
{{Navbox Seabase Modules}} |
{{Navbox Seabase Modules}} |
||
Revision as of 00:06, 11 July 2017
<infobox> <title source="title1"><default>Picture Frame (Subnautica)</default></title>
<image source="image4"></image> <label>Category</label> <label>Category</label> <label>Description</label> <label>Hull Integrity</label> <label>Health</label> <label>Blueprint Source</label> <label>Acquired From</label> <label>Fragments</label> <label>Build Time</label> <label>Size</label> <label>Damage</label> <label>Drill Yield</label> <label>Biome</label> <label>Location</label> <label>Coordinates</label> <label>Perks</label> <label>Penalties</label> <label>Attribute</label> <label>Drops</label>
<label>Debug Spawn</label> <format> * {{#explode:{{{debugspawn}}}||1}} </format> <label>Debug Spawn</label> <format> * {{#explode:pictureframe||1}} </format><label>Music</label> <group layout="horizontal"> <label>Food</label> <label>H2O</label> </group> <label>Bioreactor</label> <label>Byproduct</label> <group collapse="open" class="tab-fragment"> <header>Fragments</header> <image source="image2"></image> <label>Item</label> <label>Description</label> <label>Location</label> <label>Fragments</label> <label>Attribute</label> <label>Debug Spawn</label> <format>{{{debugspawn2}}}</format> <image source="image3"></image> <label>Item</label> <label>Description</label> <label>Location</label> <label>Fragments</label> <label>Attribute</label> <label>Debug Spawn</label> <format>{{{debugspawn3}}}</format> <image source="image5"></image> <label>Item</label> <label>Description</label> <label>Location</label> <label>Fragments</label> <label>Attribute</label> <label>Debug Spawn</label> <format>{{{debugspawn4}}}</format> </group> <group collapse="open" class="tab-fragment"> <header>Data Boxes</header> <image source="image6"></image> <label>Location</label> </group> </infobox>The Picture Frame is an item that can be placed inside the Cyclops or a Seabase module. It allows the player to display and view a picture or a slideshow of pictures that the player has taken with their PDA. Picture Frames can be constructed with the Habitat Builder. Before the Picture Frame can be constructed, the player must scan a single Picture Frame Fragment, which can be found in Wrecks.
How to Use
- Set up a photo shot
- Press F11 to take a picture
- Face the Picture Frame
- Press LMB to set the photo (this will open the PDA)
- Select the desired photo and choose "upload"
- Done
Custom Images
While the Picture Frame is intended to display screenshots, it is also possible to have it display your own images.
To import a custom image, simply move an image into the screenshots folder. The folder's location is different if you are playing on Windows or Mac. For the photo to fit in the Picture Frame properly, it must be 800x600 resolution.
Once you have imported your image, it will appear under in the "screenshots" of the PDA. You can then add it to a Picture Frame as you would any other screenshot.
Windows
On Windows, screenshot images are stored at:
- (Steam game folder)\SteamApps\common\Subnautica\Subnautica_Data\SNAppData\SavedGames\slot(xxxx)\screenshots
or
- (Steam game folder)\SteamApps\common\Subnautica\SNAppData\SavedGames\slot(xxxx)\screenshots
depending on which release you have.
Mac
On Mac, the location is under the Steam game folder at:
- (Steam game folder)/steamapps/common/Subnautica/Subnautica.app/Contents/SNAppData/SavedGames/slot(xxxx)/screenshots
Note: Subnautica.app is the game application itself (this may be a bug and has been reported). To access the folder, right-click the app and choose "Show Package Contents."
Recipe


Gallery
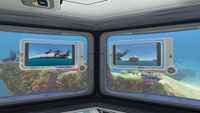
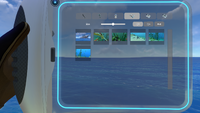
Two Picture Frames placed inside a Multipurpose Room showing screenshots.
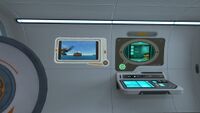
A Picture Frame mounted inside the Cyclops
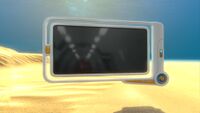
Picture Frame in an Early Development Build
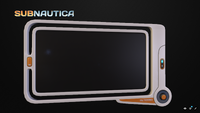
Picture Frame Model from Sketchfab
The photos show up in the PDA by taking photos with the "F11" button
.jpg)
.jpg)


Trivia
- The bottom on the Picture Frame reads "Alterra".
Lua error in package.lua at line 80: module 'Dev:Navbox' not found.