
Large Resource Deposits (Subnautica): Difference between revisions
No edit summary Tag: apiedit |
UnderseaDee (talk | contribs) No edit summary Tag: rte-source |
||
| Line 11: | Line 11: | ||
! class="unsortable" style="width: 40%; text-align: center;" |Biome |
! class="unsortable" style="width: 40%; text-align: center;" |Biome |
||
|- |
|- |
||
| style="text-align:center; font-size:12px;" |[[File:CopperLarge.png| |
| style="text-align:center; font-size:12px;" |[[File:CopperLarge.png|160px|center]] |
||
| style="text-align:center; font-size:12px;" |[[File:Copper_Ore.png|50px|center|link=Copper Ore]][[Copper Ore]] |
| style="text-align:center; font-size:12px;" |[[File:Copper_Ore.png|50px|center|link=Copper Ore]][[Copper Ore]] |
||
| style="text-align:center; font-size:14px;" |7 - 11 |
| style="text-align:center; font-size:14px;" |7 - 11 |
||
| Line 22: | Line 22: | ||
* [[Mushroom Forest]] |
* [[Mushroom Forest]] |
||
|- |
|- |
||
| style="text-align:center; font-size:12px;" |[[File:DiaomndLargeDepositNewTable.png| |
| style="text-align:center; font-size:12px;" |[[File:DiaomndLargeDepositNewTable.png|160px|center]] |
||
| style="text-align:center; font-size:12px;" |[[File:Diamond.png|50px|center|link=Diamond]][[Diamond]] |
| style="text-align:center; font-size:12px;" |[[File:Diamond.png|50px|center|link=Diamond]][[Diamond]] |
||
| style="text-align:center; font-size:14px;" |7 - 11 |
| style="text-align:center; font-size:14px;" |7 - 11 |
||
| Line 31: | Line 31: | ||
* [[Underwater Islands]] |
* [[Underwater Islands]] |
||
|- |
|- |
||
| style="text-align:center; font-size:12px;" |[[File:DrillableGold.png| |
| style="text-align:center; font-size:12px;" |[[File:DrillableGold.png|160px|center]] |
||
| style="text-align:center; font-size:12px;" |[[File:Gold.png|50px|center|link=Gold]][[Gold]] |
| style="text-align:center; font-size:12px;" |[[File:Gold.png|50px|center|link=Gold]][[Gold]] |
||
| style="text-align:center; font-size:14px;" |7 - 11 |
| style="text-align:center; font-size:14px;" |7 - 11 |
||
| Line 40: | Line 40: | ||
* [[Underwater Islands]] |
* [[Underwater Islands]] |
||
|- |
|- |
||
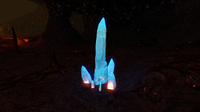
| style="text-align:center; font-size:12px;" |[[File:Drillable_Ion_Crystal_Small.png| |
| style="text-align:center; font-size:12px;" |[[File:Drillable_Ion_Crystal_Small.png|260px|center]] |
||
| style="text-align:center; font-size:12px;" |[[File:Ion Crystal.png|50px|center|link=Ion Crystal]][[Ion Crystal]] |
| style="text-align:center; font-size:12px;" |[[File:Ion Crystal.png|50px|center|link=Ion Crystal]][[Ion Crystal]] |
||
| style="text-align:center; font-size:14px;" |4 - 9 |
| style="text-align:center; font-size:14px;" |4 - 9 |
||
| Line 47: | Line 47: | ||
* [[Primary Containment Facility]] |
* [[Primary Containment Facility]] |
||
|- |
|- |
||
| style="text-align:center; font-size:12px;" |[[File:Drillable Kyanite.png| |
| style="text-align:center; font-size:12px;" |[[File:Drillable Kyanite.png|260px|center]] |
||
| style="text-align:center; font-size:12px;" |[[File:Kyanite.png|50px|center|link=Kyanite]][[Kyanite]] |
| style="text-align:center; font-size:12px;" |[[File:Kyanite.png|50px|center|link=Kyanite]][[Kyanite]] |
||
| style="text-align:center; font-size:14px;" |0 - 10 |
| style="text-align:center; font-size:14px;" |0 - 10 |
||
| Line 55: | Line 55: | ||
* [[Inactive Lava Zone]] |
* [[Inactive Lava Zone]] |
||
|- |
|- |
||
| style="text-align:center; font-size:12px;" |[[File:LeadLarge2.png| |
| style="text-align:center; font-size:12px;" |[[File:LeadLarge2.png|160px|center]] |
||
| style="text-align:center; font-size:12px;" |[[File:Lead.png|50px|center|link=Lead]][[Lead]] |
| style="text-align:center; font-size:12px;" |[[File:Lead.png|50px|center|link=Lead]][[Lead]] |
||
| style="text-align:center; font-size:14px;" |7 - 11 |
| style="text-align:center; font-size:14px;" |7 - 11 |
||
| Line 65: | Line 65: | ||
* [[Grassy Plateaus]] |
* [[Grassy Plateaus]] |
||
|- |
|- |
||
| style="text-align:center; font-size:12px;" |[[File:DrillableLithium.png| |
| style="text-align:center; font-size:12px;" |[[File:DrillableLithium.png|160px|center]] |
||
| style="text-align:center; font-size:12px;" |[[File:Lithium.png|50px|center|link=Lithium]][[Lithium]] |
| style="text-align:center; font-size:12px;" |[[File:Lithium.png|50px|center|link=Lithium]][[Lithium]] |
||
| style="text-align:center; font-size:14px;" |7 - 11 |
| style="text-align:center; font-size:14px;" |7 - 11 |
||
| Line 77: | Line 77: | ||
* [[Sparse Reef]] |
* [[Sparse Reef]] |
||
|- |
|- |
||
| style="text-align:center; font-size:12px;" |[[File:MagnetiteResourceDepositsNew.png| |
| style="text-align:center; font-size:12px;" |[[File:MagnetiteResourceDepositsNew.png|160px|center]] |
||
| style="text-align:center; font-size:12px;" |[[File:Magnetite.png|50px|center|link=Magnetite]][[Magnetite]] |
| style="text-align:center; font-size:12px;" |[[File:Magnetite.png|50px|center|link=Magnetite]][[Magnetite]] |
||
| style="text-align:center; font-size:14px;" |7 - 11 |
| style="text-align:center; font-size:14px;" |7 - 11 |
||
| Line 84: | Line 84: | ||
* [[Mountains]] |
* [[Mountains]] |
||
|- |
|- |
||
| style="text-align:center; font-size:12px;" |[[File:NickelLRS.png| |
| style="text-align:center; font-size:12px;" |[[File:NickelLRS.png|160px|center]] |
||
| style="text-align:center; font-size:12px;" |[[File:Unknown.png|50px|center|link=Nickel Ore]][[Nickel Ore]] |
| style="text-align:center; font-size:12px;" |[[File:Unknown.png|50px|center|link=Nickel Ore]][[Nickel Ore]] |
||
| style="text-align:center; font-size:14px;" | 7 - 11 |
| style="text-align:center; font-size:14px;" | 7 - 11 |
||
| Line 90: | Line 90: | ||
* [[Lost River]] |
* [[Lost River]] |
||
|- |
|- |
||
| style="text-align:center; font-size:12px;" |[[File:QuartzLargeTrue.png| |
| style="text-align:center; font-size:12px;" |[[File:QuartzLargeTrue.png|160px|center]] |
||
| style="text-align:center; font-size:12px;" |[[File:Quartz.png|50px|center|link=Quartz]][[Quartz]] |
| style="text-align:center; font-size:12px;" |[[File:Quartz.png|50px|center|link=Quartz]][[Quartz]] |
||
| style="text-align:center; font-size:14px;" |7 - 11 |
| style="text-align:center; font-size:14px;" |7 - 11 |
||
| Line 101: | Line 101: | ||
* [[Sparse Reef]] |
* [[Sparse Reef]] |
||
|- |
|- |
||
| style="text-align:center; font-size:12px;" |[[File:DrillableSalt.png| |
| style="text-align:center; font-size:12px;" |[[File:DrillableSalt.png|160px|center]] |
||
| style="text-align:center; font-size:12px;" |[[File:Salt Deposit.png|50px|center|link=Salt Deposit]][[Salt Deposit]] |
| style="text-align:center; font-size:12px;" |[[File:Salt Deposit.png|50px|center|link=Salt Deposit]][[Salt Deposit]] |
||
| style="text-align:center; font-size:14px;" |7 - 11 |
| style="text-align:center; font-size:14px;" |7 - 11 |
||
| Line 134: | Line 134: | ||
* [[Lost River]] |
* [[Lost River]] |
||
|- |
|- |
||
| style="text-align:center; font-size:12px;" |[[File:UraniniteLargeNew.png| |
| style="text-align:center; font-size:12px;" |[[File:UraniniteLargeNew.png|160px|center]] |
||
| style="text-align:center; font-size:12px;" |[[File:Uraninite Crystal.png|50px|center|link=Uraninite Crystal]][[Uraninite Crystal]] |
| style="text-align:center; font-size:12px;" |[[File:Uraninite Crystal.png|50px|center|link=Uraninite Crystal]][[Uraninite Crystal]] |
||
| style="text-align:center; font-size:14px;" |7 - 11 |
| style="text-align:center; font-size:14px;" |7 - 11 |
||
Revision as of 00:18, 11 June 2017

|
This seems new This article contains information that is updated for the latest Experimental Version of Subnautica. Players using stable mode may find this information inaccurate. |
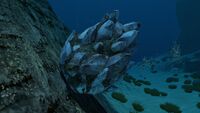
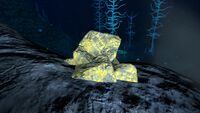
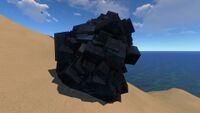
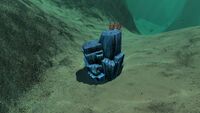
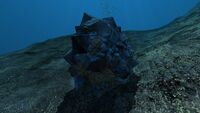
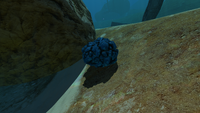
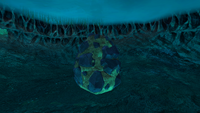
Large Resource Deposits are large versions of certain resources. They can only be drilled using the Prawn Suit Drill Arm.
The following materials can be found as Large Resource Deposits:
| Large Deposits | Minerals | Quantity | Biome |
|---|---|---|---|
 |
 |
7 - 11 | |
 |
 |
7 - 11 | |
 |
 |
7 - 11 | |
 |
 |
4 - 9 | |
 |
 |
0 - 10 | |
 |
 |
7 - 11 | |
 |
 |
7 - 11 | |
 |
 |
7 - 11 | |
 |
 |
7 - 11 | |
 |
 |
7 - 11 | |
 |
 |
7 - 11 | |
 |
 |
7 - 12 | |
 |
 |
7 - 11 | |
 |
 |
7 - 11 |
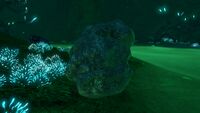
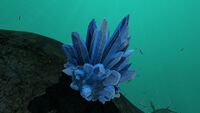
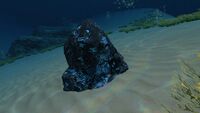
Gallery
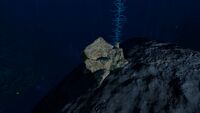
The large form of Copper
The large form of Diamond
The large form of Gold
The large form of the Ion Crystal
The large form of Kyanite
The large form of Lead
The large form of Lithium
The large form of Magnetite
The large form of Nickel
The large form of Quartz
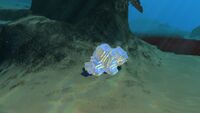
The large form of Salt
The large form of Silver
The large form of Titanium
The large form of Uraninite


Future Plans
- Copper and Gold Deposits will receive new models in the future.
Categories:
- Experimental Mode
- Grassy Plateaus
- Blood Kelp Zone
- Grand Reef
- Deep Grand Reef
- Mushroom Forest
- Underwater Islands
- Floating Island
- Mountains
- Mountain Island
- Bulb Zone
- Dunes
- Mountain Range Caves
- Bulb Zone Caves
- Crash Zone
- Inactive Lava Zone
- Active Lava Zone
- Lost River
- Precursor Technology
- Dunes Caves
- Grand Reef Caves
- Crag Field
- Bone Fields Caves
- Jelly Shroom Caves
- Raw Material
- Deep Sparse Reef