
Sea Monkey Nest: Difference between revisions
(hooray tueman actually did work) |
|||
| Line 6: | Line 6: | ||
'''Sea Monkey Nests''' are natural structures found in ''Subnautica: Below Zero''. The [[Sea Monkey]] has a habit of stealing interesting objects and returning them to its nesting grounds, therefore many [[fragments]] of [[Alterra Corporation|Alterra]] technology can be found in their nests for the player to scan. |
'''Sea Monkey Nests''' are natural structures found in ''Subnautica: Below Zero''. The [[Sea Monkey]] has a habit of stealing interesting objects and returning them to its nesting grounds, therefore many [[fragments]] of [[Alterra Corporation|Alterra]] technology can be found in their nests for the player to scan. |
||
Up to three [[Eggs|Sea Monkey Eggs]] can be found inside a nest. |
Up to three [[Eggs|Sea Monkey Eggs]] can be found inside a nest. Nests can be found in the [[Arctic Kelp Caves]] and the [[Lilypad Islands]]. |
||
==Appearance== |
==Appearance== |
||
| Line 16: | Line 16: | ||
==Fragments== |
==Fragments== |
||
{{SMNestTable| |
|||
Note that coordinates given for Fragments below are correct for the September stable build, but not for the current experimental build. |
|||
<!--Laser Cutter--> |
|||
{| class="article-table sortable" style="width: 100%;" border="0" cellpadding="1" cellspacing="1" |
|||
{{Smnr|item=Laser Cutter|count=11|scans=2|debugspawn=lasercutter|coords= |
|||
|- |
|||
{{smnc|194 -146 -3}} |
|||
! class="unsortable" style="width: 20%; text-align: center;" |Item |
|||
{{smnc|148 -102 -77}} |
|||
! class="unsortable" style="width: 15%; text-align: center;" |# of Scans |
|||
{{smnc|46 -116 -173}} |
|||
! class="unsortable" style="width: 15%; text-align: center;" |Blueprint ID |
|||
{{smnc|3 -83 -153}} |
|||
! class="unsortable" style="width: 15%; text-align: center;" |Location |
|||
{{smnc|-448 -83 9}} |
|||
|- |
|||
{{smnc|-461 138 -89}} |
|||
| rowspan="5" style="text-align:center; font-size:12px;" |[[File:Laser Cutter.png|80px|center|link=Laser Cutter]][[Laser Cutter]] |
|||
{{smnc|-474 -84 -86}} |
|||
| rowspan="5" style="text-align:center; font-size:12px;" |2 |
|||
{{smnc|-508 -134 8}} |
|||
| rowspan="5" style="text-align:center; font-size:12px;" |''lasercutter'' |
|||
{{smnc|-719 -146 -441}} |
|||
| style="text-align:center; font-size:12px;" | 50 -115 -175 |
|||
{{smnc|-725 -222 -611}} |
|||
|- |
|||
{{smnc|-653 -204 -621|end}}}} |
|||
| style="text-align:center; font-size:12px;" | 196 -145 -5 |
|||
|- |
|||
<!--Mobile Vehicle Bay--> |
|||
| style="text-align:center; font-size:12px;" | -725 -222 -611 |
|||
{{smnr|item=Mobile Vehicle Bay|count=9|scans=2|debugspawn=constructor|coords= |
|||
|- |
|||
{{smnc|265 -265 -931}} |
|||
| style="text-align:center; font-size:12px;" | -653 -204 -621 |
|||
{{smnc|129 -56 65}} |
|||
|- |
|||
{{smnc|129 -124 4}} |
|||
| style="text-align:center; font-size:12px;" | -462 -138 -89 |
|||
{{smnc|179 -105 -10}} |
|||
|- |
|||
{{smnc|-173 -50 -109}} |
|||
| rowspan="5" style="text-align:center; font-size:12px;" |[[File:Mobile Vehicle Bay.png|80px|center|link=Mobile Vehicle Bay]][[Mobile Vehicle Bay]] |
|||
{{smnc|-386 -62 -106}} |
|||
| rowspan="5" style="text-align:center; font-size:12px;" |2 |
|||
{{smnc|-582 -91 -35}} |
|||
| rowspan="5" style="text-align:center; font-size:12px;" |''constructor'' |
|||
{{smnc|-505 -103 -205}} |
|||
| style="text-align:center; font-size:12px;" | 179 -103 -8 |
|||
{{smnc|-710 -113 -370|end}}}} |
|||
|- |
|||
| style="text-align:center; font-size:12px;" | 130 -123 0 |
|||
<!--Prawn Suit Thermal Reactor--> |
|||
|- |
|||
{{smnr|item=Prawn Suit Thermal Reactor|count=4|scans=2|debugspawn=exosuitthermalreactormodule|coords= |
|||
| style="text-align:center; font-size:12px;" | 127 -53 64 |
|||
{{smnc|284 -247 -885}} |
|||
|- |
|||
{{smnc|217 -288 -889}} |
|||
| style="text-align:center; font-size:12px;" | -505 -102 -206 |
|||
{{smnc|348 -280 -1027}} |
|||
|- |
|||
{{smnc|306 -238 -962|end}}}} |
|||
| style="text-align:center; font-size:12px;" | -580 -91 -35 |
|||
|- |
|||
<!--Propulsion Cannon--> |
|||
| rowspan="5" style="text-align:center; font-size:12px;" |[[File:Propulsion Cannon.png|80px|center|link=Propulsion Cannon]][[Propulsion Cannon]] |
|||
{{Smnr|item=Propulsion Cannon|count=5|scans=2|debugspawn=propulsioncannon|coords= |
|||
| rowspan="5" style="text-align:center; font-size:12px;" |2 |
|||
{{smnc|261 -114 -103}} |
|||
| rowspan="5" style="text-align:center; font-size:12px;" |''propulsioncannon'' |
|||
{{smnc|71 -140 -84}} |
|||
| style="text-align:center; font-size:12px;" | 71 -139 -85 |
|||
{{smnc|-478 -143 -134}} |
|||
|- |
|||
{{smnc|-496 -140 -164}} |
|||
| style="text-align:center; font-size:12px;" | 266 -112 -107 |
|||
{{smnc|-651 -183 -583|end}}}} |
|||
|- |
|||
| style="text-align:center; font-size:12px;" | -653 -183 -585 |
|||
<!--Repulsion Cannon--> |
|||
|- |
|||
{{smnr|item=Repulsion Cannon|count=4|scans=2|debugspawn=repulsioncannon|coords= |
|||
| style="text-align:center; font-size:12px;" | -480 -143 -136 |
|||
{{smnc|518 -255 -849}} |
|||
|- |
|||
{{smnc|524 -244 -816}} |
|||
| style="text-align:center; font-size:12px;" | -498 -139 -162 |
|||
{{smnc|204 -264 -906}} |
|||
|- |
|||
{{smnc|307 -288 -1061}}}} |
|||
| rowspan="4" style="text-align:center; font-size:12px;" |[[File:Seaglide.png|80px|center|link=Seaglide]][[Seaglide]] |
|||
| rowspan="4" style="text-align:center; font-size:12px;" |2 |
|||
<!--Seaglide--> |
|||
| rowspan="4" style="text-align:center; font-size:12px;" |''seaglide'' |
|||
{{smnr|item=Seaglide|height=120|count=4|scans=2|debugspawn=seaglide|coords= |
|||
| style="text-align:center; font-size:12px;" | -427 -57 10 |
|||
{{smnc|-39 -57 -26}} |
|||
|- |
|||
{{smnc|-63 -73 -151}} |
|||
| style="text-align:center; font-size:12px;" | -444 -81 12 |
|||
{{smnc|-222 -77 -52}} |
|||
|- |
|||
{{smnc|-429 -58 9|end}}}} |
|||
| style="text-align:center; font-size:12px;" | -171 -46 -110 |
|||
|- |
|||
<!--Seatruck Afterburner--> |
|||
| style="text-align:center; font-size:12px;" | -37 -55 -26 |
|||
{{smnr|item=Seatruck Afterburner Upgrade|count=4|scans=2|debugspawn=seatruckupgradeafterburner|coords= |
|||
|- |
|||
{{smnc|574 -235 -952}} |
|||
| rowspan="3" style="text-align:center; font-size:12px;" |[[File:Ultra High Capacity Tank.png|80px|center|link=Ultra High Capacity Tank]][[Ultra High Capacity Tank]] |
|||
{{smnc|448 -217 -833}} |
|||
| rowspan="3" style="text-align:center; font-size:12px;" |2 |
|||
{{smnc|484 -249 -852}} |
|||
| rowspan="3" style="text-align:center; font-size:12px;" |''highcapacitytank'' |
|||
{{smnc|345 -235 -1004|end}}}} |
|||
| style="text-align:center; font-size:12px;" |145 -100 -82 |
|||
|- |
|||
<!-- Seatruck Horsepower--> |
|||
| style="text-align:center; font-size:12px;" | -506 -133 4 |
|||
{{smnr|item=Seatruck Horsepower Upgrade|count=2|scans=2|debugspawn=seatruckupgradehorsepower|coords= |
|||
|- |
|||
{{smnc|587 -232 -860}} |
|||
| style="text-align:center; font-size:12px;" | -472 -82 -88 |
|||
{{smnc|533 -225 -773|end}}}} |
|||
|} |
|||
<!--Ultra High Capacity Tank--> |
|||
{{smnr|item=Ultra High Capacity Tank|count=7|scans=2|debugspawn=highcapacitytank|coords= |
|||
{{smnc|611 -231 -909}} |
|||
{{smnc|489 -219 -910}} |
|||
{{smnc|393 -266 -1033}} |
|||
{{smnc|220 -252 -821}} |
|||
{{smnc|291 -247 -1017}} |
|||
{{smnc|329 -226 -940}} |
|||
{{smnc|-704 -163 -452|end}}}} |
|||
}} |
|||
==Gallery== |
==Gallery== |
||
Revision as of 05:55, 30 November 2019
<infobox> <title source="title1"><default>Sea Monkey Nest</default></title>
<image source="image4"></image> <label>Category</label> <label>Category</label> <label>Description</label> <label>Hull Integrity</label> <label>Health</label> <label>Blueprint Source</label> <label>Acquired From</label> <label>Fragments</label> <label>Build Time</label> <label>Size</label> <label>Damage</label> <label>Drill Yield</label> <label>Biome</label> <label>Location</label> <label>Coordinates</label> <label>Perks</label> <label>Penalties</label> <label>Attribute</label> <label>Drops</label>
<label>Debug Spawn</label> <format> * {{#explode:{{{debugspawn}}}||1}} </format> <label>Debug Spawn</label> <format> * {{#explode:{{{item_id}}}||1}} </format><label>Music</label> <group layout="horizontal"> <label>Food</label> <label>H2O</label> </group> <label>Bioreactor</label> <label>Byproduct</label> <group collapse="open" class="tab-fragment"> <header>Fragments</header> <image source="image2"></image> <label>Item</label> <label>Description</label> <label>Location</label> <label>Fragments</label> <label>Attribute</label> <label>Debug Spawn</label> <format>{{{debugspawn2}}}</format> <image source="image3"></image> <label>Item</label> <label>Description</label> <label>Location</label> <label>Fragments</label> <label>Attribute</label> <label>Debug Spawn</label> <format>{{{debugspawn3}}}</format> <image source="image5"></image> <label>Item</label> <label>Description</label> <label>Location</label> <label>Fragments</label> <label>Attribute</label> <label>Debug Spawn</label> <format>{{{debugspawn4}}}</format> </group> <group collapse="open" class="tab-fragment"> <header>Data Boxes</header> <image source="image6"></image> <label>Location</label> </group> </infobox> Sea Monkey Nests are natural structures found in Subnautica: Below Zero. The Sea Monkey has a habit of stealing interesting objects and returning them to its nesting grounds, therefore many fragments of Alterra technology can be found in their nests for the player to scan. Up to three Sea Monkey Eggs can be found inside a nest. Nests can be found in the Arctic Kelp Caves and the Lilypad Islands.
Appearance
The nests appear to be composed of packed sediment with plant matter intertwined to give structural support. Several large chunks of metal scrap can be seen embedded into the nest walls.
Sea Monkey nests which are scannable used to be identical to those that were not, but a scannable nest will now be "decorated" with a ring of components around its approximate midsection, either the thing that the scan is for (for equipment) or parts of the vehicle it is an upgrade for (Seatruck or Prawn Suit parts). The player needs to aim the Scanner at the components specifically to get the scan, not the body of the nest.
Fragments
| Item | # of Scans | Blueprint ID | Location |
|---|---|---|---|
 |
2 | lasercutter
|
194 -146 -3 |
| 148 -102 -77 | |||
| 46 -116 -173 | |||
| 3 -83 -153 | |||
| -448 -83 9 | |||
| -461 138 -89 | |||
| -474 -84 -86 | |||
| -508 -134 8 | |||
| -719 -146 -441 | |||
| -725 -222 -611 | |||
| -653 -204 -621 | |||
 |
2 | constructor
|
265 -265 -931 |
| 129 -56 65 | |||
| 129 -124 4 | |||
| 179 -105 -10 | |||
| -173 -50 -109 | |||
| -386 -62 -106 | |||
| -582 -91 -35 | |||
| -505 -103 -205 | |||
| -710 -113 -370 | |||
|
2 | exosuitthermalreactormodule
|
284 -247 -885 |
| 217 -288 -889 | |||
| 348 -280 -1027 | |||
| 306 -238 -962 | |||
 |
2 | propulsioncannon
|
261 -114 -103 |
| 71 -140 -84 | |||
| -478 -143 -134 | |||
| -496 -140 -164 | |||
| -651 -183 -583 | |||
|
2 | repulsioncannon
|
518 -255 -849 |
| 524 -244 -816 | |||
| 204 -264 -906 | |||
| 307 -288 -1061 | |||
|
2 | seaglide
|
-39 -57 -26 |
| -63 -73 -151 | |||
| -222 -77 -52 | |||
| -429 -58 9 | |||
|
2 | seatruckupgradeafterburner
|
574 -235 -952 |
| 448 -217 -833 | |||
| 484 -249 -852 | |||
| 345 -235 -1004 | |||
|
2 | seatruckupgradehorsepower
|
587 -232 -860 |
| 533 -225 -773 | |||
|
2 | highcapacitytank
|
611 -231 -909 |
| 489 -219 -910 | |||
| 393 -266 -1033 | |||
| 220 -252 -821 | |||
| 291 -247 -1017 | |||
| 329 -226 -940 | |||
| -704 -163 -452 |
Gallery

Side view
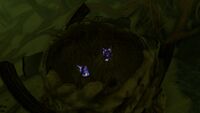
Two Sea Monkey eggs inside a nest

