
Control Room: Difference between revisions
No edit summary |
No edit summary |
||
| Line 11: | Line 11: | ||
|hull_integrity = [[Hull Integrity|-1.0 Unit]] |
|hull_integrity = [[Hull Integrity|-1.0 Unit]] |
||
}} |
}} |
||
The '''Control Room''' is a base piece |
The '''Control Room''' is a [[Base Pieces|base piece]] in [[Subnautica: Below Zero (Game)|''Subnautica: Below Zero'']]. It allows the player to name and color their [[Seabases|Seabase]], as well as managing power. |
||
== Uses == |
== Uses == |
||
The Control Room has a number of displays and interactive components. On one wall is a display showing the current time of day, the base's name and total [[Hull Integrity]], and general details of base power. The latter shows the base's current power reserves as a percentage of its maximum storage, the amount currently generated in green, and the amount currently being used in red. |
|||
In the centre of the Control Room there is a holographic display of your base from which you can cut off the power supply to individual [[Base Pieces|base pieces]] as well as resupply this power. This can be useful when low on power as non-essential modules can be shut down, instead only using power on the important modules. |
|||
On the opposite wall is an interactive display, which uses the same interface as a [[Vehicle Upgrade Console]], allowing the player to name their base and choose its colours with a colour picker. |
|||
The Control Room contains a console along the wall that can be used to alter the color of a [[Seabases|Seabase]] as well as rename the base. The wall of the Control Room features a panel that shows the time of day. Next to it there is a larger panel that displays an overhead map of the seabase, the location of hull breaches, the structural integrity, and the amount of power being generated / consumed, along with the percent of power available. |
|||
In the centre of the Control Room is a console which shows a holographic display of the base's layout, with base parts defaulting to blue save for the Control Room which is yellow, which the player can adjust the position of by interacting with the joystick on one side. While interacting with this, the movement keys will move the holograph around, while swim up and swim down are used to shift it up and down. |
|||
Placing the crosshair over any part of the base hologram will show its name, current power generation and consumption, and its contribution to the base's overall structural integrity, the latter including the bonuses of any parts that strengthen or weaken it. |
|||
Clicking on a room while its description is visible will toggle its power supply on and off: rooms that are switched off will change from blue to red. This can be used to manage base power in case of shortages by turning off rooms with high power consumption. Turning off the power to a base piece will also turn off any internal lighting in that piece, but does not deactivate [[Floodlight|Floodlights]]. The Control Room cannot deactivate itself. |
|||
A Control Room automatically adds a beacon for the base with the chosen name appended to it. |
|||
==Recipe== |
==Recipe== |
||
Revision as of 03:34, 28 November 2019
<infobox> <title source="title1"><default>Control Room</default></title>
<image source="image4"></image> <label>Category</label> <label>Category</label> <label>Description</label> <label>Hull Integrity</label> <label>Health</label> <label>Blueprint Source</label> <label>Acquired From</label> <label>Fragments</label> <label>Build Time</label> <label>Size</label> <label>Damage</label> <label>Drill Yield</label> <label>Biome</label> <label>Location</label> <label>Coordinates</label> <label>Perks</label> <label>Penalties</label> <label>Attribute</label> <label>Drops</label>
<label>Debug Spawn</label> <format> * {{#explode:basecontrolroom||1}} </format> <label>Debug Spawn</label> <format> * {{#explode:{{{item_id}}}||1}} </format><label>Music</label> <group layout="horizontal"> <label>Food</label> <label>H2O</label> </group> <label>Bioreactor</label> <label>Byproduct</label> <group collapse="open" class="tab-fragment"> <header>Fragments</header> <image source="image2"></image> <label>Item</label> <label>Description</label> <label>Location</label> <label>Fragments</label> <label>Attribute</label> <label>Debug Spawn</label> <format>{{{debugspawn2}}}</format> <image source="image3"></image> <label>Item</label> <label>Description</label> <label>Location</label> <label>Fragments</label> <label>Attribute</label> <label>Debug Spawn</label> <format>{{{debugspawn3}}}</format> <image source="image5"></image> <label>Item</label> <label>Description</label> <label>Location</label> <label>Fragments</label> <label>Attribute</label> <label>Debug Spawn</label> <format>{{{debugspawn4}}}</format> </group> <group collapse="open" class="tab-fragment"> <header>Data Boxes</header> <image source="image6"></image> <label>Location</label> </group> </infobox> The Control Room is a base piece in Subnautica: Below Zero. It allows the player to name and color their Seabase, as well as managing power.
Uses
The Control Room has a number of displays and interactive components. On one wall is a display showing the current time of day, the base's name and total Hull Integrity, and general details of base power. The latter shows the base's current power reserves as a percentage of its maximum storage, the amount currently generated in green, and the amount currently being used in red.
On the opposite wall is an interactive display, which uses the same interface as a Vehicle Upgrade Console, allowing the player to name their base and choose its colours with a colour picker.
In the centre of the Control Room is a console which shows a holographic display of the base's layout, with base parts defaulting to blue save for the Control Room which is yellow, which the player can adjust the position of by interacting with the joystick on one side. While interacting with this, the movement keys will move the holograph around, while swim up and swim down are used to shift it up and down.
Placing the crosshair over any part of the base hologram will show its name, current power generation and consumption, and its contribution to the base's overall structural integrity, the latter including the bonuses of any parts that strengthen or weaken it.
Clicking on a room while its description is visible will toggle its power supply on and off: rooms that are switched off will change from blue to red. This can be used to manage base power in case of shortages by turning off rooms with high power consumption. Turning off the power to a base piece will also turn off any internal lighting in that piece, but does not deactivate Floodlights. The Control Room cannot deactivate itself.
A Control Room automatically adds a beacon for the base with the chosen name appended to it.
Recipe
The blueprint for this object is acquired from a Data Box in Research Base Omega, at 546, -202, -1054. It is crafted in the Habitat Builder.
(no target detected)
Databank Entry
(No target detected)
Gallery
- Control room 2
Later more complete footage of the control room
- Minimap shader
Holographic base display showcase
- Base coloring
Developer Andreas Urwalek showcasing base color customisation
- Base naming
Andreas showcasing the base naming
- Mini base
Base hologram
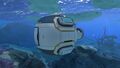
The outside of the control room

Trivia
- The central console was originally part of the Scanner Room in the Early Access builds of Subnautica.
Lua error in package.lua at line 80: module 'Dev:Navbox' not found.