
Shoal of Fish (Subnautica): Difference between revisions
m (Zone of Endless moved page Shoal of Fish to Shoal of Fish (Subnautica) without leaving a redirect: per admin approval, renaming in advance of Below Zero merge) |
(Implementing game-specific links) |
||
| Line 48: | Line 48: | ||
The [[Fauna]] in a Shoal will flee from the player when approached. The player can break up a Shoal by swimming through it, but the fish will swarm again once the danger is over. |
The [[Fauna]] in a Shoal will flee from the player when approached. The player can break up a Shoal by swimming through it, but the fish will swarm again once the danger is over. |
||
While Shoals of Fish cannot normally be interacted with, it is possible to use the [[Propulsion Cannon]] and the [[Prawn Suit Propulsion Cannon]] to grab and move the Shoal of Fish. |
While Shoals of Fish cannot normally be interacted with, it is possible to use the [[Propulsion Cannon (Subnautica)|Propulsion Cannon]] and the [[Prawn Suit Propulsion Cannon (Subnautica)|Prawn Suit Propulsion Cannon]] to grab and move the Shoal of Fish. |
||
==Swarming Species== |
==Swarming Species== |
||
The following species can be found forming Shoals: |
The following species can be found forming Shoals: |
||
* [[Bladderfish]] |
* [[Bladderfish (Subnautica)|Bladderfish]] |
||
* [[Boomerang]] |
* [[Boomerang (Subnautica)|Boomerang]] |
||
* [[Holefish]] |
* [[Holefish]] |
||
* [[Hoopfish]] |
* [[Hoopfish (Subnautica)|Hoopfish]] |
||
* [[Spinefish]] |
* [[Spinefish (Subnautica)|Spinefish]] |
||
==Gallery== |
==Gallery== |
||
<gallery position="left" widths="200" spacing="small" captionalign="left"> |
<gallery position="left" widths="200" spacing="small" captionalign="left"> |
||
Screen Shot 2017-03-03 at 16.11.04.png|A Shoal of [[Hoopfish]] in the [[Kelp Forest]] |
Screen Shot 2017-03-03 at 16.11.04.png|A Shoal of [[Hoopfish (Subnautica)|Hoopfish]] in the [[Kelp Forest]] |
||
Screen Shot 2017-03-03 at 16.15.20.png|A Shoal of [[Boomerang]] near the [[Jellyshroom Cave]] Entrance |
Screen Shot 2017-03-03 at 16.15.20.png|A Shoal of [[Boomerang (Subnautica)|Boomerang]] near the [[Jellyshroom Cave]] Entrance |
||
BladderfishSchool.jpg|A Shoal of [[Bladderfish]] |
BladderfishSchool.jpg|A Shoal of [[Bladderfish (Subnautica)|Bladderfish]] |
||
</gallery> |
</gallery> |
||
==Trivia== |
==Trivia== |
||
| Line 68: | Line 68: | ||
* Shoals of fish do not have a hitbox, thus making food unobtainable from them. As mentioned above, you can swim through the fish. |
* Shoals of fish do not have a hitbox, thus making food unobtainable from them. As mentioned above, you can swim through the fish. |
||
* The shoal of fish is the only entity to not have a hitbox. |
* The shoal of fish is the only entity to not have a hitbox. |
||
* Shoals are commonly seen to be clipping through [[Seabases]] and submersibles, being the most noticeable with the [[Cyclops]]. However, this is only an aesthetic glitch and it will not affect integrity or gameplay. |
* Shoals are commonly seen to be clipping through [[Seabases (Subnautica)|Seabases]] and submersibles, being the most noticeable with the [[Cyclops]]. However, this is only an aesthetic glitch and it will not affect integrity or gameplay. |
||
* Shoals spawn or appear in a rotating cuboid shape until they are observed which is when your crosshair intersects their bounding box, or you get near them. |
* Shoals spawn or appear in a rotating cuboid shape until they are observed which is when your crosshair intersects their bounding box, or you get near them. |
||
{{Navbox Fauna}} |
{{Navbox Fauna}} |
||
Revision as of 06:45, 3 February 2022
Hoopfish= <infobox>
 <title source="title1" style="font-weight:bold; text-align:center;">
   <default>Shoal of Fish (Subnautica)</default>
 </title>
 <image source="image1">
</image> <label>Category</label> <label>Tab</label> <label>Description</label> <label>Affiliation</label> <format></format> <label>Age</label> <label>Description when cooked</label> <label>Description when cured</label> <label>Inhabit</label> <label>Attitude</label> <label>Health</label> <label>Damage</label> <label>Adult Damage</label> <label>Juvenile Damage</label> <label>Drops</label> <label>Perks</label> <label>Biome</label> <label>Active During</label> <label>Size</label> <label>Length</label> <label>Bioreactor</label> <label>DNA</label> <label>Voice Actor</label> <label>Debug Spawn</label> <format>
- {{#explode:{{{debugspawn}}}||0}}
- {{#explode:{{{debugspawn}}}||1}}
- {{#explode:{{{debugspawn}}}||2}}
- {{#explode:{{{debugspawn}}}||3}}
- {{#explode:{{{item_id}}}||0}}
- {{#explode:{{{item_id}}}||1}}
- {{#explode:{{{item_id}}}||2}}
- {{#explode:{{{item_id}}}||3}}
- {{#explode:{{{debugspawn2}}}||0}}
- {{#explode:{{{debugspawn2}}}||1}}
- {{#explode:{{{debugspawn2}}}||2}}
- {{#explode:{{{debugspawn2}}}||3}}
- {{#explode:{{{debugspawn}}}||0}}
- {{#explode:{{{debugspawn}}}||1}}
- {{#explode:{{{debugspawn}}}||2}}
- {{#explode:{{{debugspawn}}}||3}}
Certain species of passive Fauna in Subnautica sometimes gather together in shoals, indicating that they are most likely juveniles. Usually, Shoals of Fish appear closer to the surface but certain species will swarm in the depths and in open waters.
The Fauna in a Shoal will flee from the player when approached. The player can break up a Shoal by swimming through it, but the fish will swarm again once the danger is over.
While Shoals of Fish cannot normally be interacted with, it is possible to use the Propulsion Cannon and the Prawn Suit Propulsion Cannon to grab and move the Shoal of Fish.
Swarming Species
The following species can be found forming Shoals:
Gallery
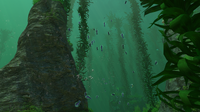
A Shoal of Hoopfish in the Kelp Forest
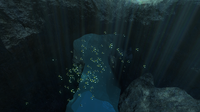
A Shoal of Boomerang near the Jellyshroom Cave Entrance

A Shoal of Bladderfish


Trivia
- Shoals of fish do not have a hitbox, thus making food unobtainable from them. As mentioned above, you can swim through the fish.
- The shoal of fish is the only entity to not have a hitbox.
- Shoals are commonly seen to be clipping through Seabases and submersibles, being the most noticeable with the Cyclops. However, this is only an aesthetic glitch and it will not affect integrity or gameplay.
- Shoals spawn or appear in a rotating cuboid shape until they are observed which is when your crosshair intersects their bounding box, or you get near them.
Lua error in package.lua at line 80: module 'Dev:Navbox' not found.
- Pages with script errors
- Passive
- Fauna
- Cathemeral
- Bioluminescent
- Inactive Lava Zone
- Mushroom Forest
- Blood Kelp Zone
- Grassy Plateaus
- Bulb Zone
- Dunes
- Floating Island
- Grand Reef
- Deep Grand Reef
- Kelp Forest
- Mountains
- Safe Shallows
- Sea Treader's Path
- Sparse Reef
- Underwater Islands
- Blood Kelp Caves
- Mushroom Forest Caves
- Sea Treader's Tunnel Caves
- Lost River
- Crag Field
- Bone Fields Caves