
Seabases (Subnautica): Difference between revisions
Tags: Visual edit apiedit |
No edit summary Tag: rte-source |
||
| Line 32: | Line 32: | ||
# Go to Step 2 and repeat. |
# Go to Step 2 and repeat. |
||
If you want to deconstruct a '''Seabase''' module, equip the Habitat Builder and hold "Q" while facing the module. The materials used to create the module will be returned to your [[PDA|Inventory]]. Note that you must first deconstruct everything attached to a [[Corridor]] or [[Multipurpose Room]] before you are allowed to deconstruct it. |
If you want to deconstruct a '''Seabase''' module, equip the Habitat Builder and hold "Q" while facing the module. The materials used to create the module will be returned to your [[PDA|Inventory]]. Note that you must first deconstruct everything attached to a [[Corridor]] or [[Multipurpose Room]] before you are allowed to deconstruct it. |
||
== Sounds == |
== Sounds == |
||
| Line 38: | Line 38: | ||
=== Welcome message === |
=== Welcome message === |
||
This message will play upon entering your seabase or seamoth. |
This message will play upon entering your seabase or seamoth. |
||
[[File:Welcome aboard captain |
[[File:Welcome aboard captain.ogg]] |
||
=== Power restoration === |
=== Power restoration === |
||
| Line 50: | Line 50: | ||
! class="unsortable" style="width: 50%; text-align: left;" |Description |
! class="unsortable" style="width: 50%; text-align: left;" |Description |
||
! class="unsortable" style="width: 15%; text-align: center;" |Hull Integrity |
! class="unsortable" style="width: 15%; text-align: center;" |Hull Integrity |
||
|- |
|- |
||
| style="text-align:center; font-size:12px;" |[[File:Hatch.png|70px|center|link=Hatch]] |
| style="text-align:center; font-size:12px;" |[[File:Hatch.png|70px|center|link=Hatch]][[Hatch]] |
||
[[Hatch]] |
|||
| style="text-align:left; font-size:12px;" |Needed to enter base |
| style="text-align:left; font-size:12px;" |Needed to enter base |
||
| style="text-align:center;" |-1.0 Unit |
| style="text-align:center;" | -1.0 Unit |
||
|- |
|- |
||
| style="text-align:center; font-size:12px;" |[[File:Corridor.png|70px|center|link=Corridor]] |
| style="text-align:center; font-size:12px;" |[[File:Corridor.png|70px|center|link=Corridor]][[Corridor]] |
||
[[Corridor]] |
|||
| style="text-align:left; font-size:12px;" |Basic Corridor |
| style="text-align:left; font-size:12px;" |Basic Corridor |
||
| style="text-align:center;" |-1.0 Unit |
| style="text-align:center;" | -1.0 Unit |
||
|- |
|- |
||
| style="text-align:center; font-size:12px;" |[[File:L Corridor.png|70px|center|link=L-Corridor]] |
| style="text-align:center; font-size:12px;" |[[File:L Corridor.png|70px|center|link=L-Corridor]][[L-Corridor]] |
||
[[L-Corridor]] |
|||
| style="text-align:left; font-size:12px;" |90 degree turn |
| style="text-align:left; font-size:12px;" |90 degree turn |
||
| style="text-align:center;" |-1.0 Unit |
| style="text-align:center;" | -1.0 Unit |
||
|- |
|- |
||
| style="text-align:center; font-size:12px;" |[[File:T Corridor.png|70px|center|link=T-Corridor]] |
| style="text-align:center; font-size:12px;" |[[File:T Corridor.png|70px|center|link=T-Corridor]][[T-Corridor]] |
||
[[T-Corridor]] |
|||
| style="text-align:left; font-size:12px;" |Left and right |
| style="text-align:left; font-size:12px;" |Left and right |
||
| style="text-align:center;" |-1.0 Unit |
| style="text-align:center;" | -1.0 Unit |
||
|- |
|- |
||
| style="text-align:center; font-size:12px;" |[[File:X Corridor.png|70px|center|link=X-Corridor]] |
| style="text-align:center; font-size:12px;" |[[File:X Corridor.png|70px|center|link=X-Corridor]][[X-Corridor]] |
||
[[X-Corridor]] |
|||
| style="text-align:left; font-size:12px;" |Four connections |
| style="text-align:left; font-size:12px;" |Four connections |
||
| style="text-align:center;" |-1.0 Unit |
| style="text-align:center;" | -1.0 Unit |
||
|- |
|- |
||
| style="text-align:center; font-size:12px;" |[[File:Window.png|70px|center|link=Window]] |
| style="text-align:center; font-size:12px;" |[[File:Window.png|70px|center|link=Window]][[Window]] |
||
[[Window]] |
|||
| style="text-align:left; font-size:12px;" |Observatory window |
| style="text-align:left; font-size:12px;" |Observatory window |
||
| style="text-align:center;" |-1.0 Unit |
| style="text-align:center;" | -1.0 Unit |
||
|- |
|- |
||
| style="text-align:center; font-size:12px;" |[[File:Reinforcement.png|70px|center|link=Reinforcement]] |
| style="text-align:center; font-size:12px;" |[[File:Reinforcement.png|70px|center|link=Reinforcement]][[Reinforcement]] |
||
[[Reinforcement]] |
|||
| style="text-align:left; font-size:12px;" |Increases hull strength |
| style="text-align:left; font-size:12px;" |Increases hull strength |
||
| style="text-align:center;" |+7.0 Units |
| style="text-align:center;" | +7.0 Units |
||
|- |
|- |
||
| style="text-align:center; font-size:12px;" |[[File:Foundation.png|70px|center|link=Foundation]] |
| style="text-align:center; font-size:12px;" |[[File:Foundation.png|70px|center|link=Foundation]][[Foundation]] |
||
[[Foundation]] |
|||
| style="text-align:left; font-size:12px;" |Build first |
| style="text-align:left; font-size:12px;" |Build first |
||
| style="text-align:center;" |+2.0 Units |
| style="text-align:center;" | +2.0 Units |
||
|- |
|- |
||
| style="text-align:center; font-size:12px;" |[[File:Ladder.png|70px|center|link=Ladder]] |
| style="text-align:center; font-size:12px;" |[[File:Ladder.png|70px|center|link=Ladder]][[Ladder]] |
||
[[Ladder]] |
|||
| style="text-align:left; font-size:12px;" |For Connecting two floors |
| style="text-align:left; font-size:12px;" |For Connecting two floors |
||
| style="text-align:center;" |0 Units |
| style="text-align:center;" |0 Units |
||
|- |
|- |
||
| style="text-align:center; font-size:12px;" |[[File:I-Corridor Glass.png|70px|center|link=I-Corridor Glass]] |
| style="text-align:center; font-size:12px;" |[[File:I-Corridor Glass.png|70px|center|link=I-Corridor Glass]][[I-Corridor Glass]] |
||
[[I-Corridor Glass]] |
|||
| style="text-align:left; font-size:12px;" |Basic glass corridor |
| style="text-align:left; font-size:12px;" |Basic glass corridor |
||
| style="text-align:center;" |-2.0 Units |
| style="text-align:center;" | -2.0 Units |
||
|- |
|- |
||
| style="text-align:center; font-size:12px;" |[[File:L-Corridor Glass.png|70px|center|link=L-Corridor Glass]] |
| style="text-align:center; font-size:12px;" |[[File:L-Corridor Glass.png|70px|center|link=L-Corridor Glass]][[L-Corridor Glass]] |
||
[[L-Corridor Glass]] |
|||
| style="text-align:left; font-size:12px;" |90 degree turn |
| style="text-align:left; font-size:12px;" |90 degree turn |
||
| style="text-align:center;" |-2.0 Units |
| style="text-align:center;" | -2.0 Units |
||
|- |
|- |
||
| style="text-align:center; font-size:12px;" |[[File:Room.png|70px|center|link=Multipurpose Room]] |
| style="text-align:center; font-size:12px;" |[[File:Room.png|70px|center|link=Multipurpose Room]][[Multipurpose Room]] |
||
[[Multipurpose Room]] |
|||
| style="text-align:left; font-size:12px;" |Basic Room |
| style="text-align:left; font-size:12px;" |Basic Room |
||
| style="text-align:center;" |-1.25 Units |
| style="text-align:center;" | -1.25 Units |
||
|- |
|- |
||
| style="text-align:center; font-size:12px;" |[[File:Vertical Connector.png|70px|center|link=Vertical Connector]] |
| style="text-align:center; font-size:12px;" |[[File:Vertical Connector.png|70px|center|link=Vertical Connector]][[Vertical Connector]] |
||
[[Vertical Connector]] |
|||
| style="text-align:left; font-size:12px;" |Vertical base connector |
| style="text-align:left; font-size:12px;" |Vertical base connector |
||
| style="text-align:center;" |-0.5 Units |
| style="text-align:center;" | -0.5 Units |
||
|- |
|- |
||
| style="text-align:center; font-size:12px;" |[[File:Bulkhead.png|70px|center|link=Bulkhead]] |
| style="text-align:center; font-size:12px;" |[[File:Bulkhead.png|70px|center|link=Bulkhead]][[Bulkhead]] |
||
[[Bulkhead]] |
|||
| style="text-align:left; font-size:12px;" |Structural support and can stop water flow. |
| style="text-align:left; font-size:12px;" |Structural support and can stop water flow. |
||
| style="text-align:center;" |+2.0 Units |
| style="text-align:center;" | +2.0 Units |
||
|- |
|- |
||
| style="text-align:center; font-size:12px;" |[[File:Water Park.png|70px|center|link=Alien Containment]] |
| style="text-align:center; font-size:12px;" |[[File:Water Park.png|70px|center|link=Alien Containment]][[Alien Containment]] |
||
[[Alien Containment]] |
|||
| style="text-align:left; font-size:12px;" |Provides optimal conditions for flora and fauna. Add a hatch to enter. |
| style="text-align:left; font-size:12px;" |Provides optimal conditions for flora and fauna. Add a hatch to enter. |
||
| style="text-align:center;" |0 Units |
| style="text-align:center;" |0 Units |
||
|- |
|- |
||
| style="text-align:center; font-size:12px;" |[[File:Water Filtration Machine.png|70px|center|link=Water Filtration Machine]] |
| style="text-align:center; font-size:12px;" |[[File:Water Filtration Machine.png|70px|center|link=Water Filtration Machine]][[Water Filtration Machine]] |
||
[[Water Filtration Machine]] |
|||
| style="text-align:left; font-size:12px;" |Separates water and salt. |
| style="text-align:left; font-size:12px;" |Separates water and salt. |
||
| style="text-align:center;" |-1.0 Units |
| style="text-align:center;" | -1.0 Units |
||
|- |
|- |
||
| style="text-align:center; font-size:12px;" |[[File:Observatory.png|70px|center|link=Observatory]] |
| style="text-align:center; font-size:12px;" |[[File:Observatory.png|70px|center|link=Observatory]][[Observatory]] |
||
[[Observatory]] |
|||
| style="text-align:left; font-size:12px;" |Look at the ocean life around you |
| style="text-align:left; font-size:12px;" |Look at the ocean life around you |
||
| style="text-align:center;" |-3.0 Units |
| style="text-align:center;" | -3.0 Units |
||
|- |
|- |
||
| style="text-align:center; font-size:12px;" |[[File:Seamoth Modification Station.png|70px|center|link=Vehicle Modification Station]] |
| style="text-align:center; font-size:12px;" |[[File:Seamoth Modification Station.png|70px|center|link=Vehicle Modification Station]][[Vehicle Modification Station]] |
||
[[Vehicle Modification Station]] |
|||
| style="text-align:left; font-size:12px;" |Build this in the moonpool to upgrade seamoth. |
| style="text-align:left; font-size:12px;" |Build this in the moonpool to upgrade seamoth. |
||
| style="text-align:center;" |0 Units |
| style="text-align:center;" |0 Units |
||
|- |
|- |
||
| style="text-align:center; font-size:12px;" |[[File:Moon Pool.png|70px|center|link=Moonpool]] |
| style="text-align:center; font-size:12px;" |[[File:Moon Pool.png|70px|center|link=Moonpool]][[Moonpool]] |
||
[[Moonpool]] |
|||
| style="text-align:left; font-size:12px;" |Docking room |
| style="text-align:left; font-size:12px;" |Docking room |
||
| style="text-align:center;" |-5.0 Units |
| style="text-align:center;" | -5.0 Units |
||
|- |
|- |
||
| style="text-align:center; font-size:12px;" |[[File:Wall Planter.png|70px|center|link=Living Wall]] |
| style="text-align:center; font-size:12px;" |[[File:Wall Planter.png|70px|center|link=Living Wall]][[Living Wall]] |
||
[[Living Wall]] |
|||
| style="text-align:left; font-size:12px;" |Wall-mounted foliage. Purely decorational. |
| style="text-align:left; font-size:12px;" |Wall-mounted foliage. Purely decorational. |
||
| style="text-align:center;" |0 Units |
| style="text-align:center;" |0 Units |
||
|- |
|- |
||
| style="text-align:center; font-size:12px;" |[[File:Scanner Room.png|70px|center|link=Scanner Room]] |
| style="text-align:center; font-size:12px;" |[[File:Scanner Room.png|70px|center|link=Scanner Room]][[Scanner Room]] |
||
[[Scanner Room]] |
|||
| style="text-align:left; font-size:12px;" |Scanner room |
| style="text-align:left; font-size:12px;" |Scanner room |
||
| style="text-align:center;" |-1 Units |
| style="text-align:center;" | -1 Units |
||
|} |
|} |
||
*Please note that negative changes to hull integrity do increase with depth. For more information see [[Hull Integrity]]. |
*Please note that negative changes to hull integrity do increase with depth. For more information see [[Hull Integrity]]. |
||
Revision as of 12:55, 27 August 2016

Seabases are installations created by the player through the use of the Habitat Builder tool.
Habitat Compartments modules are available to allow the creation of unique Seabases. One of their primary applications is to provide an area where the player can return for Oxygen and serve as an alternative to Lifepod 5 as a base of operations.
Seabases can be customized in the same way as the Cyclops through the installation of Lockers, Wall Lockers, Fabricators, Benches, Signs, and Aquariums and much more.
Abandoned Seabases can be found at the center and on the tops of the mountains of the Floater Island. Another is located in the Jelly Shroom Caves.
Hull Integrity

Hull Integrity refers the ability of your Seabase to withstand the pressure of the surrounding water. The majority of the modules will lower the integrity once added but the amount will vary by module. As Seabases are built at a greater depth the integrity reduction caused by each module will increase. Hull integrity can be increased by constructing Reinforcement panels, placing your Seabase on or near a Foundation (foundations built on top of rooms will still provide their benefit), or installing Bulkheads.
When the hull integrity of a Seabase reaches zero, it will begin to form hull breaches. Any corridor or room that is connected to the breach will fill but Bulkheads allow the player to compartmentalize the base and prevent floodwaters from moving between compartments. However, if the integrity remains below zero then eventually every compartment will develop a leak and the base will fill completely with water. To avoid this, quickly increase the integrity and fix all hull breaches in the base using a Welder.
Energy Usage
Energy can be provided to a Seabase by building various types of generators near the Seabase. Appliances such as the Fabricator will drain energy from the Seabase.
Seabases do not require energy to operate devices in Freedom Mode. A notable exception to this is the ability to dock a Seamoth in a Moonpool, which does require power.
Oxygen
Seabases produce Oxygen naturally, but requires power to do so. If the power is depleted, the Seabase will slowly lose oxygen, until it is completely gone.
How to Build a Seabase
- Find a suitable flat piece of land, or terraform the environment with the Terraformer. Placing a Foundation also flattens the terrain.
- Equip the Habitat Builder, click the RMB to bring up a crafting menu.
- In Habitat Compartments tab, select the desired module.
- Look at the desired building place (the outline of the module will become green if the location is valid).
- Adjust the rotation by pressing Q or E or by scrolling the mouse wheel.
- Place the module by clicking the LMB.
- Once placed, hold the LMB to finish the building process.
- Go to Step 2 and repeat.
If you want to deconstruct a Seabase module, equip the Habitat Builder and hold "Q" while facing the module. The materials used to create the module will be returned to your Inventory. Note that you must first deconstruct everything attached to a Corridor or Multipurpose Room before you are allowed to deconstruct it.
Sounds
The Seabase's AI makes two different sounds. Those are:
Welcome message
This message will play upon entering your seabase or seamoth. File:Welcome aboard captain.ogg
Power restoration
When the power to the Seabase is restored, the AI informs you about it. File:Power-restoration.ogg
Available Modules
| Modules | Description | Hull Integrity |
|---|---|---|
 |
Needed to enter base | -1.0 Unit |
 |
Basic Corridor | -1.0 Unit |
 |
90 degree turn | -1.0 Unit |
 |
Left and right | -1.0 Unit |
 |
Four connections | -1.0 Unit |
 |
Observatory window | -1.0 Unit |
 |
Increases hull strength | +7.0 Units |
 |
Build first | +2.0 Units |
 |
For Connecting two floors | 0 Units |
 |
Basic glass corridor | -2.0 Units |
 |
90 degree turn | -2.0 Units |
 |
Basic Room | -1.25 Units |
 |
Vertical base connector | -0.5 Units |
 |
Structural support and can stop water flow. | +2.0 Units |
| Alien Containment | Provides optimal conditions for flora and fauna. Add a hatch to enter. | 0 Units |
 |
Separates water and salt. | -1.0 Units |
 |
Look at the ocean life around you | -3.0 Units |
 |
Build this in the moonpool to upgrade seamoth. | 0 Units |
 |
Docking room | -5.0 Units |
 |
Wall-mounted foliage. Purely decorational. | 0 Units |
 |
Scanner room | -1 Units |
- Please note that negative changes to hull integrity do increase with depth. For more information see Hull Integrity.
Gallery
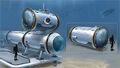
Seabase Concept Art
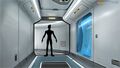
Seabase Interior Concept Art
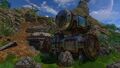
The main Abandoned Seabase on the Floater Island


.jpg)
For a more complete gallery, visit Seabases/Gallery.
Lua error in package.lua at line 80: module 'Dev:Navbox' not found.