
Sanctuary Zero: Difference between revisions
mNo edit summary |
No edit summary |
||
| Line 7: | Line 7: | ||
|gotoid=''sanctuary'' |
|gotoid=''sanctuary'' |
||
|coords=-551 -199 -488 |
|coords=-551 -199 -488 |
||
|title1=|caption1=|depth_range=|temp=|id=|nodes=|poi=|music=* [[Subnautica: Below Zero OST|''Sanctuary A'']] ( |
|title1=|caption1=|depth_range=|temp=|id=|nodes=|poi=|music=* [[Subnautica: Below Zero OST|''Sanctuary A'']] (Sanctuary Cavern) |
||
* [[Subnautica: Below Zero OST|''Sanctuary B'']] ( |
* [[Subnautica: Below Zero OST|''Sanctuary B'']] (Sanctuary Chamber)}} |
||
{{Quote2 (BZ)|We will be lost unless we find a new host.|[[Al-An]]|in response to [[Robin Ayou|Robin]]}} |
{{Quote2 (BZ)|We will be lost unless we find a new host.|[[Al-An]]|in response to [[Robin Ayou|Robin]]}} |
||
'''Sanctuary Zero''' is an [[Architect Bases|Architect Base]] that is located in the [[Twisty Bridges]]. It serves as a location for the [[Architects]] to transfer their consciousness to during an emergency. |
'''Sanctuary Zero''' is an [[Architect Bases|Architect Base]] that is located in the [[Twisty Bridges]]. It serves as a location for the [[Architects]] to transfer their consciousness to during an emergency. Unlike other sanctuaries, Sanctuary Zero seems to be capable of holding only one consciousness. |
||
An S.O.S. signal, as well as multiple pillars blinking in morse code, will attempt to draw the player towards the sanctuary. However, if the player has yet to trigger the story event inside of the sanctuary by the time they scan an [[Architect Artifacts (Disambiguation)|Architect Artifact]], a [[Beacon (Below Zero)|beacon]] will mark the approximate location of the sanctuary, further prompting the player to visit it. |
|||
If the player scans an [[Architect Artifacts (Disambiguation)|Architect Artifact]] after recieving the SOS, but fails to download [[Al-An]], they will recieve a beacon marking the location of Sanctuary Zero. The entrance to the tunnel is however 200m to the northeast of this marker, directly beside the data box containing [[Rebreather (Below Zero)|Rebreather]] |
|||
== |
==Story == |
||
For many years, Sanctuary Zero had been sending out an S.O.S. signal in the hopes of rescuing its occupant consciousness, [[Al-An]], from the failing structure. However, despite the signal being detected by multiple groups (including the crew of the [[Mercury II]]), none were able to access the building. Eventually, Al-An's savior would arrive in the form of [[Robin Ayou]], a rogue [[Xenoworx]] employee who received the signal after crashlanding near the Twisty Bridges. As Robin makes her way through the cavern leading to the sanctuary proper, Al-An reveals that the facility's power is nearly depleted, and that he will die if not transferred to a different storage medium. Working under the assumption that her [[PDA]] will make for a fine substitute, Robin begins the transferal process, only for it to be revealed that Robin's brain is the only suitable storage medium available. After the transferal is complete, the sanctuary powers down, causing the containment cube that previously held Al-An to collapse into pieces. With Al-An now in her head, Robin must construct a [[Al-An's Vessel|suitable vessel]] in order to get him out. |
|||
Sanctuary Zero is a location that Robin Ayou visits while she is stranded in [[Sector Zero]]. After receiving an Alien Transmission from the Sanctuary, Robin attempts to locate the facility and discover the source. When Robin enters the facility, she encounters Al-An. An announcement from the Sanctuary reveals that the facility's power is low, and that Al-An will die if not removed from the Sanctuary. Robin attempts to save Al-An by downloading him onto her PDA, but accidentally downloads him into her brain. The Sanctuary then powers down, and Robin exits with Al-An still in her brain. |
|||
== |
==Sanctuary Cavern== |
||
Before the player can reach the sanctuary proper, they must first pass through a short cavern. The cavern consists of a winding path including several bridges, one of which has been destroyed in a small cave-in. Water can be seen leaking from affected parts of the ceiling, further conveying the sorry state of the sanctuary. At the end of the cavern is a small corridor with three [[Ion Cube (Below Zero)|Ion Cubes]]. Players should be wary in this area, as a number of [[Alien Robot (Below Zero)|Alien Robots]] patrol the cavern. |
|||
==Sanctuary Chamber== |
|||
3 [[Ion Cube (Below Zero)|Ion Cubes]] can be found in the corridor leading into the Cube Room. [[Alien Robot (Below Zero)|Alien Robot]]s also patrol this area. |
|||
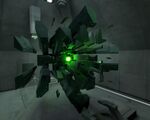
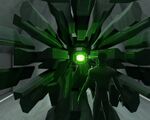
The Sanctuary Chamber is an ornate, square room with the Architect Containment Cube floating in the center. On the side opposite the entrance is the console for the Consciousness Transfer Device, which can be interacted with to initiate the transfer of Al-An's consciousness. Once the process is completed, all lights in the room will shut off, and the cube will collapse into pieces.<tabber> |
|||
== Cube Room == |
|||
The Main Feature of the Sanctuary, the Cube room is where Al-An resides. An Architect Containment Cube containing Al-An's conciousness can be seen suspended in mid-air in the center of the chamber. Located at the back of the room is a small ramp leading up to the Consciousness Transfer Device, which allows Robin to download Al-An's Consciousness. |
|||
Shortly after the transfer is complete, the Sanctuary's power completely fails, and the Containment Cube falls to pieces. |
|||
<tabber> |
|||
Resources= |
Resources= |
||
* [[Ion Cube (Below Zero)|Ion Cube]] |
* [[Ion Cube (Below Zero)|Ion Cube]] |
||
| Line 34: | Line 29: | ||
</tabber> |
</tabber> |
||
== |
==Relevant Databank Entries== |
||
{{Databank2 (BZ)|Architect Containment Cube}} |
{{Databank2 (BZ)|Architect Containment Cube}} |
||
{{Clear}} |
{{Clear}} |
||
| Line 43: | Line 38: | ||
{{Clear}} |
{{Clear}} |
||
== |
==Gallery== |
||
<tabber> |
<tabber> |
||
Photos= |
Photos= |
||
<gallery widths="200" spacing="small"> |
<gallery widths="200" spacing="small"> |
||
20190210165018 1.jpg|Entrance to |
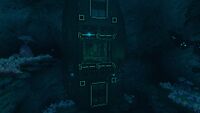
20190210165018 1.jpg|Entrance to Sanctuary Zero |
||
20190210165247 1.jpg|Overview of the |
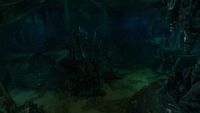
20190210165247 1.jpg|Overview of the cavern |
||
20190210165255 1.jpg|Close-up of the |
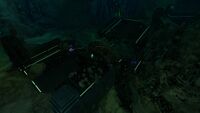
20190210165255 1.jpg|Close-up of the damaged bridge |
||
20190210165301 1.jpg|Entrance to the |
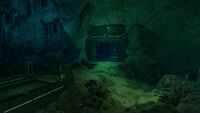
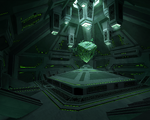
20190210165301 1.jpg|Entrance to the Sanctuary Chamber |
||
20190210165312 1.jpg| |
20190210165312 1.jpg|Sanctuary Chamber overview |
||
20190210165318 1.jpg|Close- |
20190210165318 1.jpg|Close-up of the Architect Containment Cube |
||
20190210165325 1.jpg|Consciousness Transfer Device |
20190210165325 1.jpg|The Consciousness Transfer Device console |
||
Destroyed cube.jpg| |
Destroyed cube.jpg|The remnants of the cube after power failure |
||
</gallery> |
</gallery> |
||
|-| |
|-| |
||
| Line 60: | Line 55: | ||
<gallery widths="200" spacing="small"> |
<gallery widths="200" spacing="small"> |
||
Sanctuary Zero Concept.png|[[Concept Art]] - by [[Cory Strader (Developer)|Cory Strader]] |
Sanctuary Zero Concept.png|[[Concept Art]] - by [[Cory Strader (Developer)|Cory Strader]] |
||
SanctuaryCubeUnfolded.jpeg|Unfolded Cube |
SanctuaryCubeUnfolded.jpeg|Unfolded Containment Cube concept art |
||
SanctuaryCubeUnfolded2.jpeg| |
SanctuaryCubeUnfolded2.jpeg|Ditto, another view |
||
</gallery> |
</gallery> |
||
</tabber> |
</tabber> |
||
Revision as of 03:59, 12 June 2024
.png)
|
Read at own risk This article contains unmarked spoilers. Players new to the game would want to avoid or be cautious toward this article. |
<infobox layout="stacked">
 <title source="title1">
   <default>Sanctuary Zero</default>
 </title>
 <image source="image1">
</image> <label>Category</label> <label>Type</label> <label>Depth Range</label> <label>Depth</label> <label>Temperature Range</label>
<label>Biome ID</label> <format> </format><label>Harvesting Nodes</label>
<label>goto ID</label> <format>- {{#explode:sanctuary||0}}
- {{#explode:sanctuary||1}}
- {{#explode:sanctuary||2}}
- {{#explode:sanctuary||3}}
<label>Coordinates</label> <group> <label>Point of Interest</label> </group> <label>Music</label> </infobox>
Sanctuary Zero is an Architect Base that is located in the Twisty Bridges. It serves as a location for the Architects to transfer their consciousness to during an emergency. Unlike other sanctuaries, Sanctuary Zero seems to be capable of holding only one consciousness.
An S.O.S. signal, as well as multiple pillars blinking in morse code, will attempt to draw the player towards the sanctuary. However, if the player has yet to trigger the story event inside of the sanctuary by the time they scan an Architect Artifact, a beacon will mark the approximate location of the sanctuary, further prompting the player to visit it.
Story
For many years, Sanctuary Zero had been sending out an S.O.S. signal in the hopes of rescuing its occupant consciousness, Al-An, from the failing structure. However, despite the signal being detected by multiple groups (including the crew of the Mercury II), none were able to access the building. Eventually, Al-An's savior would arrive in the form of Robin Ayou, a rogue Xenoworx employee who received the signal after crashlanding near the Twisty Bridges. As Robin makes her way through the cavern leading to the sanctuary proper, Al-An reveals that the facility's power is nearly depleted, and that he will die if not transferred to a different storage medium. Working under the assumption that her PDA will make for a fine substitute, Robin begins the transferal process, only for it to be revealed that Robin's brain is the only suitable storage medium available. After the transferal is complete, the sanctuary powers down, causing the containment cube that previously held Al-An to collapse into pieces. With Al-An now in her head, Robin must construct a suitable vessel in order to get him out.
Sanctuary Cavern
Before the player can reach the sanctuary proper, they must first pass through a short cavern. The cavern consists of a winding path including several bridges, one of which has been destroyed in a small cave-in. Water can be seen leaking from affected parts of the ceiling, further conveying the sorry state of the sanctuary. At the end of the cavern is a small corridor with three Ion Cubes. Players should be wary in this area, as a number of Alien Robots patrol the cavern.
Sanctuary Chamber
The Sanctuary Chamber is an ornate, square room with the Architect Containment Cube floating in the center. On the side opposite the entrance is the console for the Consciousness Transfer Device, which can be interacted with to initiate the transfer of Al-An's consciousness. Once the process is completed, all lights in the room will shut off, and the cube will collapse into pieces.<tabber> Resources=
|-| Others=
</tabber>
Relevant Databank Entries
| Architect Containment Cube |
 |
|---|
| <poem>While advanced human civilization has attempted for centuries to develop successful ‘whole brain emulation’ techniques, it appears that the Architect race has built a platform for accomplishing this holy grail of life extension technology. Physically, the containment cube appears to be comprised of a redundant array of quantum holographic storage layers, supporting a hyper-dense capacity of 35 bits per electron. The energy field that feeds a suspended, animated cube also serves to power the operating software, allowing the intelligence in storage to maintain consciousness throughout the storage period. Once a stored consciousness has been transferred out of the cube, the component parts will become inert. Without witnessing and carefully observing the backup process, it is difficult to ascertain how the transfer works, and whether or not the process is truly lossless.</poem> |
| Source: Scan the cube in Sanctuary Zero |
Achievement
| Spoiler alert: The following section contains story related material.
| |

|
Xenobiology Encounter a sapient alien lifeform.
|
Gallery
<tabber> Photos=
Entrance to Sanctuary Zero
Overview of the cavern
Close-up of the damaged bridge
Entrance to the Sanctuary Chamber
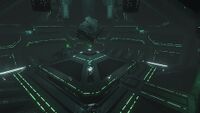
Sanctuary Chamber overview
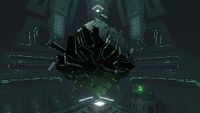
Close-up of the Architect Containment Cube

The Consciousness Transfer Device console
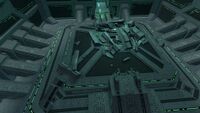
The remnants of the cube after power failure


|-| Concept Art=
Concept Art - by Cory Strader
Unfolded Containment Cube concept art
Ditto, another view


</tabber>
Lua error in package.lua at line 80: module 'Dev:Navbox' not found.