
Coral Tube Sample: Difference between revisions
m (scanning method) Tags: Visual edit apiedit |
Techhead7890 (talk | contribs) m (fix scanner link) |
||
| (44 intermediate revisions by 22 users not shown) | |||
| Line 1: | Line 1: | ||
{{SimilarName|'''Coral Sample'''|[[Table Coral Sample]]}} |
{{SimilarName|'''Coral Tube Sample'''|[[Table Coral Sample]]}} |
||
{{Craftable |
|||
| ⚫ | |||
|title1 = Coral Tube Sample |
|||
| ⚫ | |||
|image4 = Coral Tube Sample.png |
|||
|tab = [[Raw Materials]] |
|||
| ⚫ | |||
|acqired_from = * [[Giant Coral Tubes]] |
|||
* [[Coral Shell Plate]] |
|||
|size = 1 |
|||
|biome = * [[Bulb Zone]] |
|||
* [[Crash Zone]] |
|||
** [[Crash Zone|Main Crash Zone]] |
|||
**[[Crash Zone|Crash Zone Mesas]] |
|||
* [[Grassy Plateaus]] |
* [[Grassy Plateaus]] |
||
* [[ |
* [[Grassy Plateaus Caves]] |
||
* [[ |
* [[Kelp Forest]] |
||
* [[ |
* [[Mountains Caves]] |
||
| ⚫ | |||
* [[Safe Shallows]] |
|||
* [[Safe Shallows Caves]] |
* [[Safe Shallows Caves]] |
||
* [[Underwater Islands]] |
|||
* [[Safe Shallows]]|bioreactor = [[File:Coral Sample.png|30px]] +10 Energy|item_id = <i>coralchunk</i>|category = [[Coral]]}}The '''Coral Sample''' is a [[Raw Materials|raw material]] gained by harvesting a [[Coral Tube]] with the [[Survival Knife]]. Coral Samples can be [[Scanner|scanned]]. The method to do this is by obtaining one and dropping it. |
|||
|bioreactor = [[File:Coral Tube Sample.png|30px]] +70 Energy |
|||
|debugspawn = ''coralchunk'' |
|||
|category = [[Coral]] |
|||
}} |
|||
The '''Coral Tube Sample''' is a [[Raw Materials|raw material]] gained by harvesting a [[Giant Coral Tubes|Giant Coral Tube]] or a [[Coral Shell Plate]] with the [[Survival Knife (Subnautica)|Survival Knife]]. The Coral Tube Sample can be [[Scanner (Subnautica)|scanned]], although the method to do this is by obtaining one and dropping it when harvested from a Giant Coral Tube or simply scanning a piece which falls off from Coral Shell Plate. |
|||
==Uses in Crafting== |
==Uses in Crafting== |
||
{{Recipe2|page = Bleach}} |
|||
{{Recipe|item1=Salt Deposit|item2=Coral Sample|machine=Fabricator|result=Bleach}} |
|||
==Energy Value== |
==Energy Value== |
||
{{Recipe2}} |
|||
{{Recipe|item= Coral Sample|machine=Bioreactor|result=Energy|resultcount=10}} |
|||
{{clear}} |
|||
==Gallery== |
==Gallery== |
||
<gallery |
<gallery widths="200" spacing="small"> |
||
Coral Tube |
CoralSampleLocationTubes.png|Coral Tube Samples can be harvested from [[Giant Coral Tubes]] |
||
CoralChunkInGame.png|A Coral Tube Sample in game |
|||
</gallery> |
</gallery> |
||
==Trivia== |
|||
*The former names for the Coral Tube Sample were the ''Common Coral Sample'', and before that, the ''Coral Sample''. At some point in development it was known as the ''Coral Chunk''. |
|||
{{Navbox Items |
{{Navbox Items}} |
||
{{Navbox Corals}} |
|||
| ⚫ | |||
| ⚫ | |||
[[de:Röhrenkorallenprobe]] |
|||
[[fr:Échantillon de Corail tubulaire]] |
|||
[[ru:Образец_коралловой_трубы]] |
|||
[[Category:Coral]] |
[[Category:Coral]] |
||
[[Category:Harvestable]] |
[[Category:Harvestable]] |
||
| ⚫ | |||
| ⚫ | |||
Latest revision as of 20:43, 1 May 2024
<infobox> <title source="title1"><default>Coral Tube Sample</default></title>
<image source="image4"></image> <label>Category</label> <label>Category</label> <label>Description</label> <label>Hull Integrity</label> <label>Health</label> <label>Blueprint Source</label> <label>Acquired From</label> <label>Fragments</label> <label>Build Time</label> <label>Size</label> <label>Damage</label> <label>Drill Yield</label> <label>Biome</label> <label>Location</label> <label>Coordinates</label> <label>Perks</label> <label>Penalties</label> <label>Attribute</label> <label>Drops</label>
<label>Debug Spawn</label> <format> * {{#explode:coralchunk||1}} </format> <label>Debug Spawn</label> <format> * {{#explode:{{{item_id}}}||1}} </format><label>Music</label> <group layout="horizontal"> <label>Food</label> <label>H2O</label> </group> <label>Bioreactor</label> <label>Byproduct</label> <group collapse="open" class="tab-fragment"> <header>Fragments</header> <image source="image2"></image> <label>Item</label> <label>Description</label> <label>Location</label> <label>Fragments</label> <label>Attribute</label> <label>Debug Spawn</label> <format>{{{debugspawn2}}}</format> <image source="image3"></image> <label>Item</label> <label>Description</label> <label>Location</label> <label>Fragments</label> <label>Attribute</label> <label>Debug Spawn</label> <format>{{{debugspawn3}}}</format> <image source="image5"></image> <label>Item</label> <label>Description</label> <label>Location</label> <label>Fragments</label> <label>Attribute</label> <label>Debug Spawn</label> <format>{{{debugspawn4}}}</format> </group> <group collapse="open" class="tab-fragment"> <header>Data Boxes</header> <image source="image6"></image> <label>Location</label> </group> </infobox> The Coral Tube Sample is a raw material gained by harvesting a Giant Coral Tube or a Coral Shell Plate with the Survival Knife. The Coral Tube Sample can be scanned, although the method to do this is by obtaining one and dropping it when harvested from a Giant Coral Tube or simply scanning a piece which falls off from Coral Shell Plate.
Uses in Crafting


Energy Value
(no target detected)
Gallery
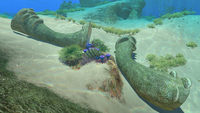
Coral Tube Samples can be harvested from Giant Coral Tubes
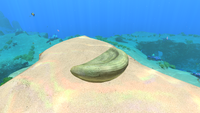
A Coral Tube Sample in game


Trivia
- The former names for the Coral Tube Sample were the Common Coral Sample, and before that, the Coral Sample. At some point in development it was known as the Coral Chunk.
Lua error in package.lua at line 80: module 'Dev:Navbox' not found. Lua error in package.lua at line 80: module 'Dev:Navbox' not found.