
Data Boxes: Difference between revisions
GemmaBeepo (talk | contribs) No edit summary Tags: Visual edit apiedit |
m (Resolving image-redirect) |
||
| (38 intermediate revisions by 22 users not shown) | |||
| Line 1: | Line 1: | ||
{{SimilarName|the '''Data Boxes'''|[[ |
{{SimilarName|the '''Data Boxes'''|[[Databank]]}} |
||
{{Craftable|title1 = Data Boxes|image4 = Data Box.png|tab = |
{{Craftable|title1 = Data Boxes|image4 = Data Box.png|tab = Items|acqired_from = * [[Degasi Seabases]] |
||
* [[Destroyed Lifepods]] |
* [[Destroyed Lifepods]] |
||
* [[Wrecks]]}} |
|||
* [[Wrecks]]}}'''Data Boxes''' are items found within [[Wrecks]], [[Destroyed Lifepods]], and [[Degasi Seabases]]. They can be opened to access [[blueprints]] for [[tools]], [[equipment]], and [[Upgrade Modules|upgrade modules]]. |
|||
'''Data Boxes''' are items found within [[Wrecks]], [[Destroyed Lifepods]], and [[Degasi Seabases]]. They can be opened to access [[blueprints]] for [[tools]], [[equipment]], and [[Upgrade Modules|upgrade modules]]. |
|||
'''Note:''' Certain data boxes won't spawn if one has already obtained the [[blueprints]] and didn't load the area beforehand. Opening a data box in which blueprints have already been obtained will give two pieces of [[Titanium]], similar to [[Scanner|scanning]] certain [[fragments]] when one already has the blueprint for them. |
|||
__TOC__ |
|||
==''Subnautica''== |
|||
{| class="article-table sortable" style="width: 100%;" cellspacing="1" cellpadding="1" border="0" |
{| class="article-table sortable" style="width: 100%;" cellspacing="1" cellpadding="1" border="0" |
||
|- |
|- |
||
! class="unsortable" style="width: 25%; text-align: center;" |Blueprint |
! class="unsortable" style="width: 25%; text-align: center;" |Blueprint |
||
! class="unsortable" style="width: 25%; text-align: center;" |Location |
! class="unsortable" style="width: 25%; text-align: center;" |Location |
||
|- |
|||
| style="text-align: center; font-size:12px;" |[[File:Alien Containment.png|center|70px|link=Alien Containment]][[Alien Containment (Subnautica)|Alien Containment]] |
|||
| style="text-align: center; font-size:12px;" | |
|||
*[[Wrecks|Bulb Zone Wreck]] |
|||
*[[Wrecks|Mountains Wreck]] |
|||
*[[Wrecks|Underwater Islands Wreck]] |
|||
|- |
|- |
||
| style="text-align: center; font-size:12px;" |[[File:Compass.png|center|70px|link=Compass]][[Compass]] |
| style="text-align: center; font-size:12px;" |[[File:Compass.png|center|70px|link=Compass]][[Compass]] |
||
| style="text-align: center; font-size:12px;" | |
| style="text-align: center; font-size:12px;" | |
||
*[[Wrecks|Kelp Forest Wreck]] |
*[[Wrecks|Kelp Forest Wreck]] |
||
*[[Destroyed Lifepods|Lifepod |
*[[Destroyed Lifepods|Lifepod 3]] |
||
|- |
|- |
||
| style="text-align: center; font-size:12px;" |[[File:Creature Decoy.png|center|70px|link=Creature Decoy]][[Creature Decoy]] |
| style="text-align: center; font-size:12px;" |[[File:Creature Decoy.png|center|70px|link=Creature Decoy]][[Creature Decoy]] |
||
| Line 28: | Line 38: | ||
| style="text-align: center; font-size:12px;" | |
| style="text-align: center; font-size:12px;" | |
||
*[[Wrecks|Grand Reef Wreck]] |
*[[Wrecks|Grand Reef Wreck]] |
||
*[[Wrecks|Mountains Wreck]] |
|||
*[[Wrecks|Sea Treader's Path Wreck]] |
*[[Wrecks|Sea Treader's Path Wreck]] |
||
|- |
|- |
||
| Line 33: | Line 44: | ||
| style="text-align: center; font-size:12px;" | |
| style="text-align: center; font-size:12px;" | |
||
*[[Wrecks|Blood Kelp Trench Wreck]] |
*[[Wrecks|Blood Kelp Trench Wreck]] |
||
*[[Wrecks|Sparse Reef Wreck]] |
|||
*[[Wrecks|Underwater Islands Wreck]] |
*[[Wrecks|Underwater Islands Wreck]] |
||
|- |
|- |
||
| style="text-align: center; font-size:12px;" |[[File:Cyclops |
| style="text-align: center; font-size:12px;" |[[File:Cyclops Depth Module MK1.png|center|70px|link=Cyclops Depth Module MK1]][[Cyclops Depth Module MK1]] |
||
| style="text-align: center; font-size:12px;" | |
| style="text-align: center; font-size:12px;" | |
||
*[[Wrecks|Dunes Wreck]] |
*[[Wrecks|Dunes Wreck]] |
||
| Line 44: | Line 56: | ||
| style="text-align: center; font-size:12px;" | |
| style="text-align: center; font-size:12px;" | |
||
*[[Wrecks|Dunes Wreck]] |
*[[Wrecks|Dunes Wreck]] |
||
*[[Wrecks|Grand Reef Wreck]] |
|||
*[[Wrecks|Mountains Wreck]] |
|||
*[[Wrecks|Sea Treader's Path Wreck]] |
*[[Wrecks|Sea Treader's Path Wreck]] |
||
*[[Degasi Seabases|Degasi Seabase - Deep Grand Reef]] |
*[[Degasi Seabases|Degasi Seabase - Deep Grand Reef]] |
||
| Line 54: | Line 64: | ||
*[[Wrecks|Bulb Zone Wreck]] |
*[[Wrecks|Bulb Zone Wreck]] |
||
*[[Wrecks|Grand Reef Wreck]] |
*[[Wrecks|Grand Reef Wreck]] |
||
*[[Wrecks|Mountains Wreck]] |
|||
|- |
|- |
||
| style="text-align: center; font-size:12px;" |[[File:Cyclops Thermal Reactor Module.PNG|center|70px|link=Cyclops Thermal Reactor Module]][[Cyclops Thermal Reactor Module]] |
| style="text-align: center; font-size:12px;" |[[File:Cyclops Thermal Reactor Module.PNG|center|70px|link=Cyclops Thermal Reactor Module]][[Cyclops Thermal Reactor Module]] |
||
| style="text-align: center; font-size:12px;" | |
| style="text-align: center; font-size:12px;" | |
||
*[[Wrecks| |
*[[Wrecks|Grand Reef Wreck]] |
||
*[[Wrecks|Mountains Wreck]] |
|||
*[[Wrecks|Northwestern Mushroom Forest Wreck]] |
|||
|- |
|- |
||
| style="text-align: center; font-size:12px;" |[[File:Lightweight High Capacity Tank.png|center|70px|link=Lightweight High Capacity Tank]][[Lightweight High Capacity Tank]] |
| style="text-align: center; font-size:12px;" |[[File:Lightweight High Capacity Tank.png|center|70px|link=Lightweight High Capacity Tank]][[Lightweight High Capacity Tank]] |
||
| style="text-align: center; font-size:12px;" | |
| style="text-align: center; font-size:12px;" | |
||
*[[Wrecks|Bulb Zone Wreck]] |
|||
*[[Wrecks|Grassy Plateaus Wreck]] |
|||
|- |
|||
| style="text-align: center; font-size:12px;" |[[File:Reinforced Dive Suit.png|center|70px|link=Reinforced Dive Suit]][[Reinforced Dive Suit]] |
|||
| style="text-align: center; font-size:12px;" | |
|||
*[[Wrecks|Bulb Zone Wreck]] |
|||
*[[Wrecks|Dunes Wreck]] |
*[[Wrecks|Dunes Wreck]] |
||
*[[Wrecks|Sparse Reef Wreck]] |
|||
*[[Destroyed Lifepods|Lifepod 19]] |
|||
|- |
|- |
||
| style="text-align: center; font-size:12px;" |[[File:Repulsion Cannon.png|center|70px|link=Repulsion Cannon]][[Repulsion Cannon]] |
| style="text-align: center; font-size:12px;" |[[File:Repulsion Cannon.png|center|70px|link=Repulsion Cannon]][[Repulsion Cannon]] |
||
| style="text-align: center; font-size:12px;" | |
| style="text-align: center; font-size:12px;" | |
||
*[[Wrecks|Grand Reef Wreck]] |
*[[Wrecks|Grand Reef Wreck]] |
||
*[[Wrecks|Underwater Islands Wreck]] |
|||
*[[Destroyed Lifepods|Lifepod 12]] |
*[[Destroyed Lifepods|Lifepod 12]] |
||
|- |
|||
| style="text-align: center; font-size:12px;" |[[File:Water Filtration Suit.png|center|70px|link=Water Filtration Suit]][[Water Filtration Suit (Subnautica)|Water Filtration Suit]] |
|||
| style="text-align: center; font-size:12px;" | |
|||
*[[Wrecks|Bulb Zone Wreck]] |
|||
*[[Wrecks|Dunes Wreck]] |
|||
*[[Wrecks|Mountains Wreck]] |
|||
|- |
|||
| style="text-align: center; font-size:12px;" | |
|||
[[File:Swim Charge Fins.png|center|70px|link=Swim Charge Fins]] |
|||
[[Swim Charge Fins]] |
|||
| style="text-align: center; font-size:12px;" | |
|||
* [[Wrecks|Underwater Islands Wreck]] |
|||
* [[Degasi Seabases|Degasi Seabase - Deep Grand Reef]] |
|||
|- |
|- |
||
| style="text-align: center; font-size:12px;" |[[File:Ultra Glide Fins.png|center|70px|link=Ultra Glide Fins]][[Ultra Glide Fins]] |
| style="text-align: center; font-size:12px;" |[[File:Ultra Glide Fins.png|center|70px|link=Ultra Glide Fins]][[Ultra Glide Fins]] |
||
| style="text-align: center; font-size:12px;" | |
| style="text-align: center; font-size:12px;" | |
||
*[[Wrecks|Grassy Plateaus Wreck]] |
*[[Wrecks|Grassy Plateaus Wreck]] |
||
*[[Destroyed Lifepods|Lifepod 6]] |
|||
*[[Destroyed Lifepods|Lifepod 13]] |
*[[Destroyed Lifepods|Lifepod 13]] |
||
*[[Degasi Seabases|Degasi Seabase - Floating Island]] |
*[[Degasi Seabases|Degasi Seabase - Floating Island]] |
||
|- |
|- |
||
| style="text-align: center; font-size:12px;" |[[File:Ultra High Capacity Tank.png|center|70px|link=Ultra High Capacity Tank]][[Ultra High Capacity Tank]] |
| style="text-align: center; font-size:12px;" |[[File:Ultra High Capacity Tank.png|center|70px|link=Ultra High Capacity Tank]][[Ultra High Capacity Tank|Ultra-High Capacity Tank]] |
||
| style="text-align: center; font-size:12px;" | |
| style="text-align: center; font-size:12px;" | |
||
*[[Wrecks| |
*[[Wrecks|Dunes Wreck]] |
||
*[[Destroyed Lifepods|Lifepod |
*[[Destroyed Lifepods|Lifepod 19]] |
||
*[[Degasi Seabases|Degasi Seabase - |
*[[Degasi Seabases|Degasi Seabase - Jellyshroom Cave]] |
||
|- |
|- |
||
| style="text-align: center; font-size:12px;" |[[File:Vehicle Modification Station.png|70px|center|link=Vehicle Upgrade Console]][[Vehicle Upgrade Console]] |
|||
| style="text-align: center; font-size:12px;" | |
| style="text-align: center; font-size:12px;" | |
||
*[[Wrecks|Dunes Wreck]] |
|||
[[File:Swim Charge Fins.png|center|70px|link=Swim Charge Fins]] |
|||
*[[Wrecks|Grassy Plateaus Wreck]] |
|||
[[Swim Charge Fins]] |
|||
*[[Wrecks|Northwestern Mushroom Forest Wreck]] |
|||
| style="text-align: center; font-size:12px;" | |
|||
* |
*[[Wrecks|Sparse Reef Wreck]] |
||
* [[Degasi Seabases|Degasi Seabase - Deep Grand Reef]] |
|||
|} |
|} |
||
==''Below Zero''== |
|||
{| class="article-table sortable" style="width: 100%;" cellspacing="1" cellpadding="1" border="0" |
|||
|- |
|||
! class="unsortable" style="width: 25%; text-align: center;" |Blueprint |
|||
! class="unsortable" style="width: 25%; text-align: center;" |Location |
|||
! class="unsortable" style="width: 25%; text-align: center;" |Coordinates |
|||
|- |
|||
| style="text-align: center; font-size:12px;"|[[File:Beacon (BZ).png|center|70px|link=Beacon (Below Zero)]][[Beacon (Below Zero)|Beacon]] |
|||
| style="text-align: left; font-size:12px;"| |
|||
* [[Arctic Kelp Forest]] |
|||
| style="text-align: left; font-size:12px;"| |
|||
*(107 -33 -9) |
|||
|- |
|||
| style="text-align: center; font-size:12px;"|[[File:Ultra High Capacity Tank (BZ).png|center|70px|link=Booster Tank]][[Booster Tank]] |
|||
| style="text-align: left; font-size:12px;" | |
|||
* [[Purple Vents]] |
|||
* [[Tree Spires]] |
|||
| style="text-align: left; font-size:12px;"| |
|||
*(253 -137 -420) |
|||
*(0 -451 -1118) |
|||
|- |
|||
| style="text-align: center; font-size:12px;"|{{Icon|Control Room|width=70}}[[Control Room]] |
|||
| style="text-align: left; font-size:12px;" | |
|||
* [[Omega Lab]] |
|||
* [[Outpost Zero]] |
|||
* [[Purple Vents]] |
|||
| style="text-align: left; font-size:12px;"| |
|||
*(546, -202, -1055) |
|||
*(-114 14 -330) |
|||
*(225 -103 -620) |
|||
|- |
|||
| style="text-align: center; font-size:12px;"|{{Icon|Headlamp|width=70}}[[Headlamp]] |
|||
| style="text-align: left; font-size:12px;" | |
|||
* [[Koppa Mining Site]] |
|||
| style="text-align: left; font-size:12px;"| |
|||
*(-97 -296 -644) |
|||
|- |
|||
| style="text-align: center; font-size:12px;"|[[File:High Capacity O₂ Tank (BZ).png|center|70px|link=High Capacity O₂ Tank (Below Zero)]][[High Capacity O₂ Tank (Below Zero)|High Capacity O₂ Tank]] |
|||
| style="text-align: left; font-size:12px;" | |
|||
* [[Twisty Bridges]] |
|||
| style="text-align: left; font-size:12px;"| |
|||
*(-253 -124 -251) |
|||
|- |
|||
| style="text-align: center; font-size:12px;" |{{Icon|Moonpool|width=70}}[[Moonpool (Below Zero)|Moonpool]] |
|||
| style="text-align: left; font-size:12px;" | |
|||
* [[Koppa Mining Site]] |
|||
| style="text-align: left; font-size:12px;"| |
|||
*(-295 -150 -777) |
|||
|- |
|||
| style="text-align: center; font-size:12px;" |[[File:Rebreather (BZ).png|center|70px|link=Rebreather (Below Zero)]][[Rebreather (Below Zero)|Rebreather]] |
|||
| style="text-align: left; font-size:12px;" | |
|||
* [[Twisty Bridges]] |
|||
| style="text-align: left; font-size:12px;"| |
|||
*(-371 -171 -318) |
|||
|- |
|||
| style="text-align: center; font-size:12px;" |[[File:Scanner Room (BZ).png|center|70px|link=Scanner Room (Below Zero)]][[Scanner Room (Below Zero)|Scanner Room]] |
|||
| style="text-align: left; font-size:12px;" | |
|||
* [[Delta Station]] |
|||
* [[Koppa Mining Site]] |
|||
| style="text-align: left; font-size:12px;"| |
|||
*(-261 41 -771) |
|||
*(-197 -273 -707) |
|||
|- |
|||
| style="text-align: center; font-size:12px;" |{{Icon|Snowfox Jump Module|width=70}}[[Snowfox Hop Module]] |
|||
| style="text-align: left; font-size:12px;" | |
|||
* [[Glacial Basin]] |
|||
| style="text-align: left; font-size:12px;"| |
|||
*(-1515 11 -1038) |
|||
|- |
|||
| style="text-align:center; font-size:12px;" |{{IconCreate|icon=Snowfox Ice Worm Attack Reduction Module|width=70}}[[Snowfox Ice Worm Attack Reduction Module]] |
|||
| style="text-align:left; font-size:12px;" | |
|||
* [[Arctic Spires]] |
|||
| style="text-align: left; font-size:12px;"| |
|||
*(-1096 61 332) |
|||
|- |
|||
| style="text-align:center; font-size:12px;" | |
|||
[[File:Stillsuit (BZ).png|80px|center|link=Water Filtration Suit (Below Zero)]][[Water Filtration Suit (Below Zero)|Water Filtration Suit]] |
|||
| style="text-align:left; font-size:12px;" | |
|||
* [[Marguerit Maida's Base]] |
|||
| style="text-align: left; font-size:12px;"| |
|||
*(48 -410 -870) |
|||
|- |
|||
| style="text-align:center; font-size:12px;" | |
|||
[[File:Swim Charge Fins (BZ).png|80px|center|link=Swim Charge Fins (Below Zero)]][[Swim Charge Fins (Below Zero)|Swim Charge Fins]] |
|||
| style="text-align:left; font-size:12px;" | |
|||
* [[Omega Lab]] |
|||
| style="text-align: left; font-size:12px;"| |
|||
*(550 -202 -1075) |
|||
|- |
|||
| style="text-align: center; font-size:12px;" |{{IconCreate|icon=Thumper|width=70}}[[Thumper]] |
|||
| style="text-align: left; font-size:12px;" | |
|||
* [[Arctic Spires]] |
|||
| style="text-align: left; font-size:12px;"| |
|||
*(-1817 37 -748) |
|||
*(-966 68 -84) |
|||
|} |
|||
==Gallery== |
==Gallery== |
||
<gallery widths="200" spacing="small"> |
<gallery widths="200" spacing="small"> |
||
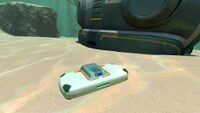
DataBox (1).jpg| |
DataBox (1).jpg|The Data Box beside Lifepod 17 |
||
Shield-Generator-Databox.jpg|The |
Shield-Generator-Databox.jpg|The Data Box found in the [[Mountains]] Wreck |
||
HighCapacityTankDataBoxJelly.png|The [[Ultra High Capacity Tank]] |
HighCapacityTankDataBoxJelly.png|The [[Ultra High Capacity Tank]] Data Box in the [[Jellyshroom Cave]] Degasi Seabase |
||
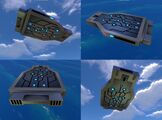
Data Box.jpg|Developer screenshot of the |
Data Box.jpg|Developer screenshot of the Data Box |
||
Data_Box_Chip.jpg|Developer screenshot of the |
Data_Box_Chip.jpg|Developer screenshot of the Data Box Chip |
||
</gallery> |
</gallery> |
||
{{Navbox Items}} |
{{Navbox Items}} |
||
{{Navbox Items (BZ)}} |
|||
[[Category:Item]] |
|||
[[de:Datenbox]] |
|||
[[fr:Boîtes de données]] |
|||
[[ru:Ящик с данными]] |
|||
[[Category:Wrecks]] |
[[Category:Wrecks]] |
||
Latest revision as of 02:27, 30 March 2024
<infobox> <title source="title1"><default>Data Boxes</default></title>
<image source="image4"></image> <label>Category</label> <label>Category</label> <label>Description</label> <label>Hull Integrity</label> <label>Health</label> <label>Blueprint Source</label> <label>Acquired From</label> <label>Fragments</label> <label>Build Time</label> <label>Size</label> <label>Damage</label> <label>Drill Yield</label> <label>Biome</label> <label>Location</label> <label>Coordinates</label> <label>Perks</label> <label>Penalties</label> <label>Attribute</label> <label>Drops</label>
<label>Debug Spawn</label> <format> * {{#explode:{{{debugspawn}}}||1}} </format> <label>Debug Spawn</label> <format> * {{#explode:{{{item_id}}}||1}} </format><label>Music</label> <group layout="horizontal"> <label>Food</label> <label>H2O</label> </group> <label>Bioreactor</label> <label>Byproduct</label> <group collapse="open" class="tab-fragment"> <header>Fragments</header> <image source="image2"></image> <label>Item</label> <label>Description</label> <label>Location</label> <label>Fragments</label> <label>Attribute</label> <label>Debug Spawn</label> <format>{{{debugspawn2}}}</format> <image source="image3"></image> <label>Item</label> <label>Description</label> <label>Location</label> <label>Fragments</label> <label>Attribute</label> <label>Debug Spawn</label> <format>{{{debugspawn3}}}</format> <image source="image5"></image> <label>Item</label> <label>Description</label> <label>Location</label> <label>Fragments</label> <label>Attribute</label> <label>Debug Spawn</label> <format>{{{debugspawn4}}}</format> </group> <group collapse="open" class="tab-fragment"> <header>Data Boxes</header> <image source="image6"></image> <label>Location</label> </group> </infobox> Data Boxes are items found within Wrecks, Destroyed Lifepods, and Degasi Seabases. They can be opened to access blueprints for tools, equipment, and upgrade modules. Note: Certain data boxes won't spawn if one has already obtained the blueprints and didn't load the area beforehand. Opening a data box in which blueprints have already been obtained will give two pieces of Titanium, similar to scanning certain fragments when one already has the blueprint for them.
Subnautica


Below Zero
| Blueprint | Location | Coordinates |
|---|---|---|
| ||
 |
| |
 |
| |
|
| |
 |
| |
|
| |
 |
| |
 |
| |
|
| |
|
| |
 |
| |
 |
| |
|
|
Gallery
The Data Box beside Lifepod 17

The Data Box found in the Mountains Wreck

The Ultra High Capacity Tank Data Box in the Jellyshroom Cave Degasi Seabase

Developer screenshot of the Data Box
Developer screenshot of the Data Box Chip
.jpg)


Lua error in package.lua at line 80: module 'Dev:Navbox' not found. Lua error in package.lua at line 80: module 'Dev:Navbox' not found.