
Lab Equipment: Difference between revisions
No edit summary Tags: Visual edit apiedit |
m (Doesn't exist in bz, therefore no page) |
||
| (68 intermediate revisions by 26 users not shown) | |||
| Line 1: | Line 1: | ||
<div class="ItemTabber"><tabber style="border:none!important;"> |
|||
<div style="float:right; width:auto;"> |
|||
Microscope= |
|||
<tabber style="border:none!important;"> |
|||
{{Craftable |
|||
Lab Equipment 1= |
|||
|title1 = Microscope |
|||
<div style="height:370px; text-align:center;"> |
|||
|image4 = Electron Microscope.png |
|||
{| style="width:300px; border:1px;" class="infobox" |
|||
|tab = [[Placeable Items]] |
|||
! style="background-color:#0130B9; text-align:center;" colspan="2" border="0" | Lab Equipment |
|||
|description = Non-functional laboratory equipment. |
|||
|- |
|||
|size = 4 (2×2) |
|||
! style="background-color:#0C2134; padding:10px;" colspan="2" border="0" | [[File:Lab_Equipment_1.png|thumb]] |
|||
|location = * [[Aurora]] |
|||
|- |
|||
* [[Destroyed Lifepods|Lifepod 7]] |
|||
! style="text-align:left; background-color:#0C2134; padding:10px;" border="0" | Size |
|||
* [[Wrecks]] |
|||
! style="text-align:left; background-color:#0C2134;" border="0" | 4 (2x2) |
|||
** [[Dunes]] |
|||
|- |
|||
** [[Sparse Reef]] |
|||
! style="text-align:left; background-color:#0C2134; padding:10px;" border="0" | Description |
|||
{{Smallspoiler| |
|||
! style="text-align:left; background-color:#0C2134;" border="0" | Lab equipment |
|||
* [[Degasi Seabases|Deep Grand Reef Degasi Seabase]]}} |
|||
|- |
|||
|debugspawn = ''labequipment1'' |
|||
! style="text-align:left; background-color:#0C2134; padding:10px;" border="0" | Item ID |
|||
}} |
|||
! style="text-align:left; background-color:#0C2134;" border="0" | "''labequipment1''" |
|||
|} |
|||
</div> |
|||
|-| |
|-| |
||
Fluid Analyzer= |
|||
Lab Equipment 2= |
|||
{{Craftable |
|||
<div style="height:370px; text-align:center;"> |
|||
|title1 = Fluid Analyzer |
|||
{| style="width:300px; border:1px;" class="infobox" |
|||
|image4 = Lab_Equipment_2-0.png |
|||
! style="background-color:#0130B9; text-align:center;" colspan="2" border="0" | Lab Equipment |
|||
|tab = [[Placeable Items]] |
|||
|- |
|||
|description = Non-functional laboratory equipment. |
|||
! style="background-color:#0C2134; padding:10px;" colspan="2" border="0" | [[File:Lab_Equipment_2-0.png|thumb]] |
|||
|size = 4 (2×2) |
|||
|- |
|||
|location = * [[Wrecks|Small Wrecks]] |
|||
! style="text-align:left; background-color:#0C2134; padding:10px;" border="0" | Size |
|||
** [[Safe Shallows]] |
|||
! style="text-align:left; background-color:#0C2134;" border="0" | 4 (2x2) |
|||
{{Smallspoiler| |
|||
|- |
|||
* [[Degasi Seabases|Deep Grand Reef Degasi Seabase]]}} |
|||
! style="text-align:left; background-color:#0C2134; padding:10px;" border="0" | Description |
|||
|debugspawn = ''labequipment2'' |
|||
! style="text-align:left; background-color:#0C2134;" border="0" | Lab equipment |
|||
}} |
|||
|- |
|||
! style="text-align:left; background-color:#0C2134; padding:10px;" border="0" | Item ID |
|||
! style="text-align:left; background-color:#0C2134;" border="0" | "''labequipment2''" |
|||
|} |
|||
</div> |
|||
|-| |
|-| |
||
Sample Analyzer= |
|||
Lab Equipment 3= |
|||
{{Craftable |
|||
<div style="height:370px; text-align:center;"> |
|||
|title1 = Sample Analyzer |
|||
{| style="width:300px; border:1px;" class="infobox" |
|||
|image4 = Lab_Equipment_3.png |
|||
! style="background-color:#0130B9; text-align:center;" colspan="2" border="0" | Lab Equipment |
|||
|tab = [[Placeable Items]] |
|||
|- |
|||
|description = Non-functional laboratory equipment. |
|||
! style="background-color:#0C2134; padding:10px;" colspan="2" border="0" | [[File:Lab_Equipment_3.png|thumb]] |
|||
|size = 4 (2×2) |
|||
|- |
|||
|location = * [[Aurora]] |
|||
! style="text-align:left; background-color:#0C2134; padding:10px;" border="0" | Size |
|||
* [[Wrecks]] |
|||
! style="text-align:left; background-color:#0C2134;" border="0" | 4 (2x2) |
|||
** [[Dunes]] |
|||
|- |
|||
** [[Sparse Reef]] |
|||
! style="text-align:left; background-color:#0C2134; padding:10px;" border="0" | Description |
|||
* [[Wrecks|Small Wrecks]] |
|||
! style="text-align:left; background-color:#0C2134;" border="0" | Lab equipment |
|||
** [[Safe Shallows]] |
|||
|- |
|||
{{Smallspoiler| |
|||
! style="text-align:left; background-color:#0C2134; padding:10px;" border="0" | Item ID |
|||
* [[Degasi Seabases|Deep Grand Reef Degasi Seabase]]}} |
|||
! style="text-align:left; background-color:#0C2134;" border="0" | "''labequipment3''" |
|||
|debugspawn = ''labequipment3'' |
|||
|} |
|||
}} |
|||
</div> |
|||
</tabber> |
</tabber></div> |
||
</div> |
|||
'''Lab Equipment''' is a [[Placeable Items|placeable Item]] found in [[Wrecks]], [[Destroyed Lifepods|Lifepod 7]] and the [[Aurora]]. |
|||
Lab Equipment only serves as a decoration and has no actual purpose in game. |
|||
{{ExtraSpoilersection|Lab Equipment can be found in the [[Deep Grand Reef]] [[Degasi Seabases|Degasi Seabase]].}} |
|||
'''Lab Equipment''' is a [[Placeable Items]] found in [[Wrecks]]. |
|||
'''Lab Equipment''' currently has no use other than decoration. |
|||
==Gallery== |
==Gallery== |
||
<gallery> |
<gallery widths="200" spacing="small"> |
||
Labequipmentinbase.png|The three Lab Equipment variations placed on a [[Counter (Subnautica)|Counter]]. |
|||
</gallery> |
|||
==Trivia== |
|||
</gallery> |
|||
*The Microscope and the Fluid Analyzer are branded with a supposed company name "SIMA." It is possible that this is a branch of Alterra, but nothing is known about this company except that it makes lab equipment. |
|||
{{Navbox Items}} |
|||
[[fr:Équipement de laboratoire]] |
|||
[[Category:Placeable Item]] |
[[Category:Placeable Item]] |
||
[[Category:Safe Shallows]] |
[[Category:Safe Shallows]] |
||
[[Category:Wrecks]] |
[[Category:Wrecks]] |
||
[[Category:Cosmetic]] |
[[Category:Cosmetic]] |
||
[[Category: |
[[Category:Aurora]] |
||
Latest revision as of 22:01, 27 February 2024
<tabber style="border:none!important;">
Microscope= <infobox> <title source="title1"><default>Lab Equipment</default></title>
<image source="image4"></image> <label>Category</label> <label>Category</label> <label>Description</label> <label>Hull Integrity</label> <label>Health</label> <label>Blueprint Source</label> <label>Acquired From</label> <label>Fragments</label> <label>Build Time</label> <label>Size</label> <label>Damage</label> <label>Drill Yield</label> <label>Biome</label> <label>Location</label> <label>Coordinates</label> <label>Perks</label> <label>Penalties</label> <label>Attribute</label> <label>Drops</label> <label>Debug Spawn</label> <format> * {{#explode:labequipment1||1}} </format> <label>Debug Spawn</label> <format> * {{#explode:{{{item_id}}}||1}} </format> <label>Music</label> <group layout="horizontal"> <label>Food</label> <label>H2O</label> </group> <label>Bioreactor</label> <label>Byproduct</label> <group collapse="open" class="tab-fragment"> <header>Fragments</header> <image source="image2"></image> <label>Item</label> <label>Description</label> <label>Location</label> <label>Fragments</label> <label>Attribute</label> <label>Debug Spawn</label> <format>{{{debugspawn2}}}</format> <image source="image3"></image> <label>Item</label> <label>Description</label> <label>Location</label> <label>Fragments</label> <label>Attribute</label> <label>Debug Spawn</label> <format>{{{debugspawn3}}}</format> <image source="image5"></image> <label>Item</label> <label>Description</label> <label>Location</label> <label>Fragments</label> <label>Attribute</label> <label>Debug Spawn</label> <format>{{{debugspawn4}}}</format> </group> <group collapse="open" class="tab-fragment"> <header>Data Boxes</header> <image source="image6"></image> <label>Location</label> </group> </infobox> |-| Fluid Analyzer= <infobox> <title source="title1"><default>Lab Equipment</default></title> <image source="image4"></image> <label>Category</label> <label>Category</label> <label>Description</label> <label>Hull Integrity</label> <label>Health</label> <label>Blueprint Source</label> <label>Acquired From</label> <label>Fragments</label> <label>Build Time</label> <label>Size</label> <label>Damage</label> <label>Drill Yield</label> <label>Biome</label> <label>Location</label> <label>Coordinates</label> <label>Perks</label> <label>Penalties</label> <label>Attribute</label> <label>Drops</label> <label>Debug Spawn</label> <format> * {{#explode:labequipment2||1}} </format> <label>Debug Spawn</label> <format> * {{#explode:{{{item_id}}}||1}} </format> <label>Music</label> <group layout="horizontal"> <label>Food</label> <label>H2O</label> </group> <label>Bioreactor</label> <label>Byproduct</label> <group collapse="open" class="tab-fragment"> <header>Fragments</header> <image source="image2"></image> <label>Item</label> <label>Description</label> <label>Location</label> <label>Fragments</label> <label>Attribute</label> <label>Debug Spawn</label> <format>{{{debugspawn2}}}</format> <image source="image3"></image> <label>Item</label> <label>Description</label> <label>Location</label> <label>Fragments</label> <label>Attribute</label> <label>Debug Spawn</label> <format>{{{debugspawn3}}}</format> <image source="image5"></image> <label>Item</label> <label>Description</label> <label>Location</label> <label>Fragments</label> <label>Attribute</label> <label>Debug Spawn</label> <format>{{{debugspawn4}}}</format> </group> <group collapse="open" class="tab-fragment"> <header>Data Boxes</header> <image source="image6"></image> <label>Location</label> </group> </infobox> |-| Sample Analyzer= <infobox> <title source="title1"><default>Lab Equipment</default></title> <image source="image4"></image> <label>Category</label> <label>Category</label> <label>Description</label> <label>Hull Integrity</label> <label>Health</label> <label>Blueprint Source</label> <label>Acquired From</label> <label>Fragments</label> <label>Build Time</label> <label>Size</label> <label>Damage</label> <label>Drill Yield</label> <label>Biome</label> <label>Location</label> <label>Coordinates</label> <label>Perks</label> <label>Penalties</label> <label>Attribute</label> <label>Drops</label> <label>Debug Spawn</label> <format> * {{#explode:labequipment3||1}} </format> <label>Debug Spawn</label> <format> * {{#explode:{{{item_id}}}||1}} </format> <label>Music</label> <group layout="horizontal"> <label>Food</label> <label>H2O</label> </group> <label>Bioreactor</label> <label>Byproduct</label> <group collapse="open" class="tab-fragment"> <header>Fragments</header> <image source="image2"></image> <label>Item</label> <label>Description</label> <label>Location</label> <label>Fragments</label> <label>Attribute</label> <label>Debug Spawn</label> <format>{{{debugspawn2}}}</format> <image source="image3"></image> <label>Item</label> <label>Description</label> <label>Location</label> <label>Fragments</label> <label>Attribute</label> <label>Debug Spawn</label> <format>{{{debugspawn3}}}</format> <image source="image5"></image> <label>Item</label> <label>Description</label> <label>Location</label> <label>Fragments</label> <label>Attribute</label> <label>Debug Spawn</label> <format>{{{debugspawn4}}}</format> </group> <group collapse="open" class="tab-fragment"> <header>Data Boxes</header> <image source="image6"></image> <label>Location</label> </group> </infobox> </tabber>Lab Equipment is a placeable Item found in Wrecks, Lifepod 7 and the Aurora.
Lab Equipment only serves as a decoration and has no actual purpose in game.
|
Spoiler alert: The following section contains story related material. |
|---|
|
Lab Equipment can be found in the Deep Grand Reef Degasi Seabase. |
Gallery
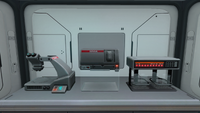
The three Lab Equipment variations placed on a Counter.

Trivia
- The Microscope and the Fluid Analyzer are branded with a supposed company name "SIMA." It is possible that this is a branch of Alterra, but nothing is known about this company except that it makes lab equipment.
Lua error in package.lua at line 80: module 'Dev:Navbox' not found.