
Shoal of Fish (Below Zero): Difference between revisions
(Adding categories) |
No edit summary Tag: 2017 source edit |
||
| (14 intermediate revisions by 6 users not shown) | |||
| Line 1: | Line 1: | ||
{{SubnauticaLink}} |
|||
{{SubnauticaLinkThe}} |
|||
<div class="ItemTabber"><tabber style="border:none!important;"> |
<div class="ItemTabber"><tabber style="border:none!important;"> |
||
Arrow Ray= |
Arrow Ray= |
||
{{Fauna|title1 = Shoal of Arrow Rays |
{{Fauna (BZ)|title1 = Shoal of Arrow Rays |
||
|tab = [[Fauna]] |
|tab = [[Fauna]] |
||
|image1 = Unknown.png |
|image1 = Unknown (BZ).png |
||
|attitude = [[:Category: Passive|Passive]] |
|attitude = [[:Category: Passive|Passive]] |
||
|biome = * [[Lilypad Islands]] |
|biome = * [[Lilypad Islands]] |
||
**[[Lilypad Islands|Main Lilypad Islands]] |
**[[Lilypad Islands|Main Lilypad Islands]] |
||
*[[Tree Spires]] |
*[[Tree Spires]] |
||
|respawn_interval = 300 seconds |
|||
|debugspawn = -}} |
|debugspawn = -}} |
||
|-| |
|-| |
||
Boomerang= |
Boomerang= |
||
{{Fauna|title1 = Shoal of Boomerangs |
{{Fauna (BZ)|title1 = Shoal of Boomerangs |
||
|tab = [[Fauna]] |
|tab = [[Fauna]] |
||
|image1 = Unknown.png |
|image1 = Unknown (BZ).png |
||
|attitude = [[:Category: Passive|Passive]] |
|attitude = [[:Category: Passive|Passive]] |
||
|biome = *[[Arctic]] |
|biome = *[[Arctic]] |
||
*[[Arctic Kelp Forest]] |
*[[Arctic Kelp Forest]] |
||
*[[Glacial Bay]] |
*[[Glacial Bay]] |
||
|respawn_interval = 300 seconds |
|||
|debugspawn = ''boomerangschool''}} |
|debugspawn = ''boomerangschool''}} |
||
|-| |
|-| |
||
Feather Fish= |
Feather Fish= |
||
{{Fauna|title1 = Shoal of Feather Fish |
{{Fauna (BZ)|title1 = Shoal of Feather Fish |
||
|tab = [[Fauna]] |
|tab = [[Fauna]] |
||
|image1 = Unknown.png |
|image1 = Unknown (BZ).png |
||
|attitude = [[:Category: Passive|Passive]] |
|attitude = [[:Category: Passive|Passive]] |
||
|biome = *[[Deep Purple Vents]] |
|biome = *[[Deep Purple Vents]] |
||
| Line 32: | Line 34: | ||
*[[Purple Vents]] |
*[[Purple Vents]] |
||
*[[Thermal Spires]] |
*[[Thermal Spires]] |
||
|respawn_interval = 300 seconds |
|||
| ⚫ | |||
| ⚫ | |||
| ⚫ | |||
| ⚫ | |||
| ⚫ | |||
| ⚫ | |||
| ⚫ | |||
| ⚫ | |||
| ⚫ | |||
| ⚫ | |||
*[[Tree Spires]] |
|||
|debugspawn = -}} |
|debugspawn = -}} |
||
|-| |
|-| |
||
Hoopfish= |
Hoopfish= |
||
{{Fauna|title1 = Shoal of Hoopfish |
{{Fauna (BZ)|title1 = Shoal of Hoopfish |
||
|tab = [[Fauna]] |
|tab = [[Fauna]] |
||
|image1 = Shoal of Fish Fauna.png |
|image1 = Shoal of Fish Fauna (BZ).png |
||
|attitude = [[:Category: Passive|Passive]] |
|attitude = [[:Category: Passive|Passive]] |
||
|biome = *[[Arctic]] |
|biome = *[[Arctic]] |
||
| Line 55: | Line 47: | ||
*[[Tree Spires]] |
*[[Tree Spires]] |
||
*[[Twisty Bridges]] |
*[[Twisty Bridges]] |
||
|respawn_interval = 300 seconds |
|||
|debugspawn = ''hoopfishschool''}} |
|debugspawn = ''hoopfishschool''}} |
||
| ⚫ | |||
| ⚫ | |||
| ⚫ | |||
| ⚫ | |||
| ⚫ | |||
| ⚫ | |||
| ⚫ | |||
| ⚫ | |||
* [[Fabricator Caverns]] |
|||
| ⚫ | |||
|respawn_interval = 300 seconds |
|||
| ⚫ | |||
|-| |
|-| |
||
Spinefish= |
Spinefish= |
||
{{Fauna|title1 = Shoal of Spinefish |
{{Fauna (BZ)|title1 = Shoal of Spinefish |
||
|tab = [[Fauna]] |
|tab = [[Fauna]] |
||
|image1 = Unknown.png |
|image1 = Unknown (BZ).png |
||
|attitude = [[:Category: Passive|Passive]] |
|attitude = [[:Category: Passive|Passive]] |
||
|biome = *[[Deep Lilypads Cave]] |
|biome = *[[Deep Lilypads Cave]] |
||
*[[Deep Twisty Bridges]] |
*[[Deep Twisty Bridges]] |
||
* [[Fabricator Caverns]] |
|||
|respawn_interval = 300 seconds |
|||
|debugspawn = ''spinefishschool''}} |
|debugspawn = ''spinefishschool''}} |
||
</tabber></div> |
</tabber></div> |
||
Certain species of [[:Category: Passive|passive]] [[fauna]] in ''[[Subnautica: Below Zero |
Certain species of [[:Category: Passive|passive]] [[fauna]] in ''[[Subnautica: Below Zero|Below Zero]]'' sometimes gather together in shoals, indicating that they are most likely juveniles. Usually '''Shoals of Fish''' appear closer to the surface but certain species will swarm. The species in a Shoal will flee from the player when approached. The player can break up a Shoal by swimming through it, but the fish will swarm again once the danger is over. |
||
While Shoals of Fish cannot normally be interacted with, it is possible to use the [[Propulsion Cannon]] and the [[Prawn Suit Propulsion Cannon]] to grab and move the Shoal of Fish. |
While Shoals of Fish cannot normally be interacted with, it is possible to use the [[Propulsion Cannon (Below Zero)|Propulsion Cannon]] and the [[Prawn Suit Propulsion Cannon (Below Zero)|Prawn Suit Propulsion Cannon]] to grab and move the Shoal of Fish. |
||
==Swarming Species== |
==Swarming Species == |
||
The following species can be found forming Shoals: |
The following species can be found forming Shoals: |
||
* |
*[[Arrow Ray]] |
||
* |
*[[Boomerang (Below Zero)|Boomerang]] |
||
* |
*[[Feather Fish]] |
||
* |
*[[Hoopfish (Below Zero)|Hoopfish]] |
||
* |
*[[Red Feather Fish]] |
||
* |
*[[Spinefish (Below Zero)|Spinefish]] |
||
==Gallery== |
==Gallery== |
||
<gallery position="left" widths="200" spacing="small" captionalign="left"> |
<gallery position="left" widths="200" spacing="small" captionalign="left"> |
||
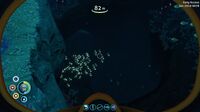
0qG7p6c.jpg|Shoals of Boomerang and Hoopfish in the [[Twisty Bridges]] |
0qG7p6c.jpg|Shoals of [[Boomerang]] and [[Hoopfish]] in the [[Twisty Bridges]] |
||
File:Spinefish (BZ).jpg|A Shoal of [[Spinefish]] and [[Red Feather Fish]] within the [[Fabricator Caverns]] |
|||
</gallery> |
</gallery> |
||
{{Navbox Fauna}} |
{{Navbox Fauna (BZ)}} |
||
[[Category:Fauna]] |
[[Category:Fauna]] |
||
[[Category:Passive]] |
[[Category:Passive]] |
||
| Line 101: | Line 109: | ||
[[Category:Deep Lilypads Cave]] |
[[Category:Deep Lilypads Cave]] |
||
[[Category:Deep Twisty Bridges]] |
[[Category:Deep Twisty Bridges]] |
||
[[Category:Creatures with variants]] |
|||
[[Category:Fabricator Caverns]] |
|||
Latest revision as of 22:55, 17 April 2023
Arrow Ray= <infobox>
 <title source="title1" style="font-weight:bold; text-align:center;">
   <default>Shoal of Fish (Below Zero)</default>
 </title>
 <group layout="horizontal">

 </group>
 <image source="image1">
</image>
<label>Category</label>
<label>Type</label>
<label>Diet</label>
<label>Description</label>
<label>Affiliation</label>
<format></format>
<label>Age</label>
<label>Description when cooked</label>
<label>Description when cured</label>
<label>Inhabit</label>
<label>Attitude</label>
<label>Health</label>
<label>Damage</label>
<label>Adult Damage</label>
<label>Juvenile Damage</label>
<label>Drops</label>
<label>Perks</label>
<label>Biome</label>
<label>Location</label>
<label>Active During</label>
<label>Size</label>
<label>Length</label>
<label>Respawn Time</label>
<label>Bioreactor</label>
<label>DNA</label>
<label>Voice Actor</label>
<label>Debug ID</label>
<format>
</format>
<label>Coordinates</label>
<group layout="horizontal">
<header>Food & Water</header>
<label>Food</label>
<label>H2O</label>
<label>O2</label>
</group>
<group layout="horizontal">
<header>Food</header>
<label>Raw</label>
<label>Cooked</label>
<label>Cured</label>
</group>
<group layout="horizontal">
<header>H2O</header>
<label>Raw</label>
<label>Cooked</label>
<label>Cured</label>
</group>
<group layout="horizontal">
<header>O2</header>
<label>Raw</label>
<label>Cooked</label>
<label>Cured</label>
</group>
<group collapse="open" class="tab-eggs">
<header>Egg</header>
<group layout="horizontal">
</group>
<label>Category</label>
<label>Description</label>
<label>Biome</label>
<label>Incubation</label>
<label>Bioreactor</label>
<label>Debug ID</label>
<format>
- {{#explode:{{{debugspawnegg}}}||0}}
- {{#explode:{{{debugspawnegg}}}||1}}
- {{#explode:{{{debugspawnegg}}}||2}}
- {{#explode:{{{debugspawnegg}}}||3}}
- {{#explode:boomerangschool||0}}
- {{#explode:boomerangschool||1}}
- {{#explode:boomerangschool||2}}
- {{#explode:boomerangschool||3}}
- {{#explode:{{{debugspawnegg}}}||0}}
- {{#explode:{{{debugspawnegg}}}||1}}
- {{#explode:{{{debugspawnegg}}}||2}}
- {{#explode:{{{debugspawnegg}}}||3}}
- {{#explode:{{{debugspawnegg}}}||0}}
- {{#explode:{{{debugspawnegg}}}||1}}
- {{#explode:{{{debugspawnegg}}}||2}}
- {{#explode:{{{debugspawnegg}}}||3}}
- {{#explode:hoopfishschool||0}}
- {{#explode:hoopfishschool||1}}
- {{#explode:hoopfishschool||2}}
- {{#explode:hoopfishschool||3}}
- {{#explode:{{{debugspawnegg}}}||0}}
- {{#explode:{{{debugspawnegg}}}||1}}
- {{#explode:{{{debugspawnegg}}}||2}}
- {{#explode:{{{debugspawnegg}}}||3}}
- {{#explode:{{{debugspawnegg}}}||0}}
- {{#explode:{{{debugspawnegg}}}||1}}
- {{#explode:{{{debugspawnegg}}}||2}}
- {{#explode:{{{debugspawnegg}}}||3}}
Certain species of passive fauna in Below Zero sometimes gather together in shoals, indicating that they are most likely juveniles. Usually Shoals of Fish appear closer to the surface but certain species will swarm. The species in a Shoal will flee from the player when approached. The player can break up a Shoal by swimming through it, but the fish will swarm again once the danger is over.
While Shoals of Fish cannot normally be interacted with, it is possible to use the Propulsion Cannon and the Prawn Suit Propulsion Cannon to grab and move the Shoal of Fish.
Swarming Species
The following species can be found forming Shoals:
Gallery
Shoals of Boomerang and Hoopfish in the Twisty Bridges
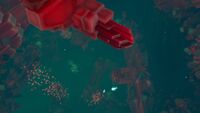
A Shoal of Spinefish and Red Feather Fish within the Fabricator Caverns

.jpg)
Lua error in package.lua at line 80: module 'Dev:Navbox' not found.