
Obelisk: Difference between revisions
Nighteyes5 (talk | contribs) No edit summary |
(Adding categories) |
||
| (5 intermediate revisions by 4 users not shown) | |||
| Line 1: | Line 1: | ||
{{Craftable|title1 = Obelisk|image1 = ObeliskIcon.png|biome = * [[Arctic Kelp Caves]] |
{{Craftable (BZ)|title1 = Obelisk|image1 = ObeliskIcon.png|biome = * [[Arctic Kelp Caves]] |
||
* [[Deep Twisty Bridges]]|coordinates = {{SpoilerLocation| |
* [[Deep Twisty Bridges]]|coordinates = {{SpoilerLocation| |
||
* -706 -234 -607 |
|||
| ⚫ | |||
{{clear}} |
|||
| ⚫ | |||
== Data Bank Entry == |
|||
| ⚫ | |||
<nowiki>*</nowiki> [[Deep Twisty Bridges]] small side cave at the lower southeast end of the lower cavern. Depth 350m. Entrance to the cavern 250m south-southwest of the Drop Pod. |
|||
<nowiki>*</nowiki> [[Arctic Kelp Caves]] 700m southwest of the Drop Pod and 500m west of Station Delta dock at 230m depth. |
|||
Presumably, this was used as [[Ion Cube]] recharging or creating, as several of these can be found near them. |
|||
| ⚫ | |||
==Gallery== |
==Gallery== |
||
| Line 25: | Line 18: | ||
[[Category:Deep Twisty Bridges]] |
[[Category:Deep Twisty Bridges]] |
||
[[Category:Arctic Kelp Caves]] |
[[Category:Arctic Kelp Caves]] |
||
[[Category:Subnautica: Below Zero]] |
|||
Latest revision as of 06:14, 7 April 2023
<infobox>
 <title source="title1">
   <default>Obelisk</default>
 </title>
 <group layout="horizontal">

 </group>
 <image source="image1">
</image> <label>Category</label> <label>Sub-Category</label> <label>Description</label> <label>Hull Integrity</label> <label>Health</label> <label>Blueprint Source</label> <label>Source</label> <label>Acquired From</label> <label>Build Time</label> <label>Size</label> <label>Damage</label> <label>Drill Yield</label> <label>Biome</label> <label>Location</label> <label>Scannables Location</label> <label>Coordinates</label> <label>Perks</label> <label>Attribute</label> <label>Drops</label> <label>Incubation</label> <label>Bioreactor Value Per Slot</label> <label>Bioreactor Energy</label>
<label>Debug ID</label> <format>- {{#explode:{{{debugspawn}}}||0}}
- {{#explode:{{{debugspawn}}}||1}}
- {{#explode:{{{debugspawn}}}||2}}
- {{#explode:{{{debugspawn}}}||3}}
<group layout="horizontal">
<label>BODY HEAT</label>
<label>HEALTH</label>
<label>FOOD</label>
<label>H2O</label>
<label>O2</label>
</group>
<label>Byproduct</label>
<group collapse="open" class="tab-fragment">
<header>Fragments</header>
<image source="image2">
</image>
<label>Item</label>
<label>Description</label>
<label>Location</label>
<label>Fragments</label>
<label>Attribute</label>
<label>Debug ID</label>
<format>{{{debugspawn2}}}</format>
<image source="image3">
</image>
<label>Item</label>
<label>Description</label>
<label>Location</label>
<label>Fragments</label>
<label>Attribute</label>
<label>Debug Spawn</label>
<format>{{{debugspawn3}}}</format>
<image source="image5">
</image>
<label>Item</label>
<label>Description</label>
<label>Location</label>
<label>Fragments</label>
<label>Attribute</label>
<label>Debug Spawn</label>
<format>{{{debugspawn4}}}</format>
</group>
<group collapse="open" class="tab-fragment">
<header>Data Boxes</header>
<image source="image6">
</image>
<label>Location</label>
</group>
</infobox>
The Obelisk is comprised of four outer structures that beam energy towards a central pylon. It was presumably used as Ion Cube recharging or creating, as several of these can be found near them.
Data Bank Entry
| Obelisk |
 |
|---|
| <poem>This artifact’s function is poorly understood, but scans indicate it is generating a strong electromagnetic field. Some hypothesised functions: - Energy transfer device |
| Source: Scan an Obelisk |
Gallery
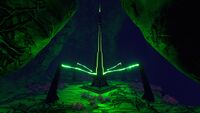
The Deep Twisty Bridges Obelisk

The Arctic Kelp Caves Obelisk

