
Nutrient Block (Subnautica): Difference between revisions
No edit summary Tag: 2017 source edit |
No edit summary Tag: 2017 source edit |
||
| (5 intermediate revisions by 4 users not shown) | |||
| Line 1: | Line 1: | ||
{{SubnauticaLink|Nutrient Blocks}} |
{{SubnauticaLink|Nutrient Blocks}} |
||
{{Craftable|title1 = Nutrient Block|image4 = Nutrient Block.png|tab = Food|description = Dense, processed food recovered from the Aurora.|acqired_from = * [[Lifepod 5]] |
{{Craftable|title1 = Nutrient Block|image4 = Nutrient Block.png|tab = Food|description = Dense, processed food recovered from the Aurora.|acqired_from = * [[Lifepod 5]] |
||
* [[Supply Crate]]s |
* [[Supply Crate (Subnautica)|Supply Crate]]s |
||
* [[Aurora]] |
|||
| ⚫ | |||
|location=* [[Wrecks]] |
|||
| ⚫ | |||
** [[Bulb Zone]] |
|||
** [[Dunes]] |
|||
** [[Grand Reef]] |
|||
** [[Mountains]] |
|||
| ⚫ | |||
| ⚫ | |||
| ⚫ | |||
| ⚫ | Nutrient Blocks can only be found inside [[Supply Crate (Subnautica)|Supply Crate]]s, a type of [[storage]] that’s found in the [[Crash Zone]], [[Wrecks]], and sometimes in other biomes, but mostly lying around in certain rooms in the Aurora. Two are also found inside the storage unit of [[Lifepod 5]]. |
||
A useful trick is to consume a Nutrient Block when the Food Meter is near 99 (but not 100), this will overflow the meter to up to 174 allowing for an extra long trip before food is required again. |
|||
==Gallery== |
==Gallery== |
||
| Line 14: | Line 23: | ||
</gallery> |
</gallery> |
||
|-| |
|-| |
||
Models= |
|||
Others= |
|||
<gallery> |
<gallery> |
||
YummyBlockModel.jpeg|Model from [https://sketchfab.com/3d-models/nutrient-block-ff1c4cd89d684e459395665428643cb8 Sketchfab] |
YummyBlockModel.jpeg|Model from [https://sketchfab.com/3d-models/nutrient-block-ff1c4cd89d684e459395665428643cb8 Sketchfab] |
||
Latest revision as of 21:26, 23 September 2022
<infobox> <title source="title1"><default>Nutrient Block (Subnautica)</default></title>
<image source="image4"></image> <label>Category</label> <label>Category</label> <label>Description</label> <label>Hull Integrity</label> <label>Health</label> <label>Blueprint Source</label> <label>Acquired From</label> <label>Fragments</label> <label>Build Time</label> <label>Size</label> <label>Damage</label> <label>Drill Yield</label> <label>Biome</label> <label>Location</label> <label>Coordinates</label> <label>Perks</label> <label>Penalties</label> <label>Attribute</label> <label>Drops</label>
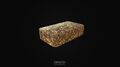
<label>Debug Spawn</label> <format> * {{#explode:nutrientblock||1}} </format> <label>Debug Spawn</label> <format> * {{#explode:{{{item_id}}}||1}} </format><label>Music</label> <group layout="horizontal"> <label>Food</label> <label>H2O</label> </group> <label>Bioreactor</label> <label>Byproduct</label> <group collapse="open" class="tab-fragment"> <header>Fragments</header> <image source="image2"></image> <label>Item</label> <label>Description</label> <label>Location</label> <label>Fragments</label> <label>Attribute</label> <label>Debug Spawn</label> <format>{{{debugspawn2}}}</format> <image source="image3"></image> <label>Item</label> <label>Description</label> <label>Location</label> <label>Fragments</label> <label>Attribute</label> <label>Debug Spawn</label> <format>{{{debugspawn3}}}</format> <image source="image5"></image> <label>Item</label> <label>Description</label> <label>Location</label> <label>Fragments</label> <label>Attribute</label> <label>Debug Spawn</label> <format>{{{debugspawn4}}}</format> </group> <group collapse="open" class="tab-fragment"> <header>Data Boxes</header> <image source="image6"></image> <label>Location</label> </group> </infobox> The Nutrient Block is a dense block of processed Food that was part of the remnants of the rations eaten aboard the Aurora before its demise. They provide the most food of any single food item in Subnautica. Nutrient Blocks can only be found inside Supply Crates, a type of storage that’s found in the Crash Zone, Wrecks, and sometimes in other biomes, but mostly lying around in certain rooms in the Aurora. Two are also found inside the storage unit of Lifepod 5. A useful trick is to consume a Nutrient Block when the Food Meter is near 99 (but not 100), this will overflow the meter to up to 174 allowing for an extra long trip before food is required again.
Gallery
<tabber> In-Game=

In-game

|-| Models=
Model from Sketchfab

</tabber>
Lua error in package.lua at line 80: module 'Dev:Navbox' not found.