
HUD: Difference between revisions
(merged; there actually was almost no info on the BZ page. needs info about temperature, pinning, and screenshots of BZ HUD) |
m (Updated.) |
||
| Line 1: | Line 1: | ||
The '''HUD''' (Heads Up Display) is a vital mechanic in video games, providing important information directly on the screen. |
The '''HUD''' (Heads Up Display) is a vital mechanic in video games, providing important information directly on the screen. |
||
==The HUD== |
== The HUD == |
||
The HUD in monitors the player's [[Oxygen]], [[Food & Water|Hunger, Thirst]], and Health. It also monitors the player's [[Temperature (Below Zero)|Temperature]] in ''[[Subnautica: Below Zero]]'' The full set is only present in survival and hardcore. In freedom, only health and oxygen are displayed. In Creative, none of these are present. |
The HUD in monitors the player's [[Oxygen]], [[Food & Water|Hunger, Thirst]], and Health. It also monitors the player's [[Temperature (Below Zero)|Temperature]] in ''[[Subnautica: Below Zero]]'' The full set is only present in survival and hardcore. In freedom, only health and oxygen are displayed. In Creative, none of these are present. |
||
| Line 10: | Line 10: | ||
Pressing {{Key|F6}} allows the player to remove elements of the HUD, pressing it several times will remove more elements. |
Pressing {{Key|F6}} allows the player to remove elements of the HUD, pressing it several times will remove more elements. |
||
==The Toolbar== |
== The Toolbar == |
||
The Toolbar is located in the bottom section of the HUD. Players may select which items are to be accessed via the Toolbar. There are five slots to use. |
The Toolbar is located in the bottom section of the HUD. Players may select which items are to be accessed via the Toolbar. There are five slots to use. |
||
There is selection of items that can be put in the Toolbar. These primarily include [[Fauna|Small Fauna]], [[Tools]], some [[Equipment]], and [[Placeable Items]]. |
There is selection of items that can be put in the Toolbar. These primarily include [[Fauna|Small Fauna]], [[Tools]], some [[Equipment]], and [[Placeable Items]]. |
||
===How to Use=== |
=== How to Use === |
||
# Open the [[PDA]] |
# Open the [[PDA]] |
||
# Hover the mouse cursor over the item that is to be assigned to the Toolbar |
# Hover the mouse cursor over the item that is to be assigned to the Toolbar |
||
| Line 22: | Line 22: | ||
# Close the PDA and press the correct key to equip the item assigned to that slot. |
# Close the PDA and press the correct key to equip the item assigned to that slot. |
||
====Controls==== |
==== Controls ==== |
||
{| class="article-table" |
{| class="article-table" |
||
!Action |
! Action |
||
!Mouse & Keyboard |
! Mouse & Keyboard |
||
!Xbox One |
! Xbox One |
||
!PlayStation 4 |
! PlayStation 4 |
||
!Nintento Switch |
! Nintento Switch |
||
|- |
|- |
||
|'''Open PDA''' |
| '''Open PDA''' |
||
|<center>{{Key|TAB}}</center> |
| <center>{{Key|TAB}}</center> |
||
|{{Key |
| {{Key/Xbox|back}} |
||
|{{Key/PS4|touch}} |
| {{Key/PS4|touch}} |
||
|{{Key/Switch|minus}} |
| {{Key/Switch|minus}} |
||
|- |
|- |
||
|'''Assign Item''' |
| '''Assign Item''' |
||
|<center>{{Key|1}} to {{Key|5}},<br />Drag and Drop</center> |
| <center>{{Key|1}} to {{Key|5}},<br />Drag and Drop</center> |
||
|{{Key |
| {{Key/Xbox|A}} |
||
|{{Key/PS4|X}} |
| {{Key/PS4|X}} |
||
|{{Key/Switch|A}} |
| {{Key/Switch|A}} |
||
|} |
|} |
||
==Gallery== |
== Gallery == |
||
<tabber> |
<tabber> |
||
HUD= |
|-|HUD= |
||
<gallery widths="200" spacing="small" > |
<gallery widths="200" spacing="small" hideaddbutton="true"> |
||
New hud.jpg|The HUD |
New hud.jpg|The HUD |
||
HudOxygenDeplete.gif|The HUD as oxygen is depleting |
HudOxygenDeplete.gif|The HUD as oxygen is depleting |
||
HUDStats.gif|Stats info displaying when the [[PDA]] is open |
HUDStats.gif|Stats info displaying when the [[PDA]] is open |
||
</gallery> |
</gallery> |
||
|-| |
|-|Toolbar= |
||
| ⚫ | |||
Toolbar= |
|||
| ⚫ | |||
ToolbarEmpty.png|An empty toolbar |
ToolbarEmpty.png|An empty toolbar |
||
ToolbarFilled.png|A filled toolbar |
ToolbarFilled.png|A filled toolbar |
||
| Line 59: | Line 58: | ||
ToolbarButton.gif|Pressing a key to put an item in the toolbar |
ToolbarButton.gif|Pressing a key to put an item in the toolbar |
||
</gallery> |
</gallery> |
||
| ⚫ | |||
|-| |
|||
| ⚫ | |||
| ⚫ | |||
| ⚫ | |||
Fox3d-entertainment-43e19294024343-5e73d6df70b1b.jpg|Hud [[Concept Art]] |
Fox3d-entertainment-43e19294024343-5e73d6df70b1b.jpg|Hud [[Concept Art]] |
||
Fox3d-entertainment-955aeb94024343-5e73d6df7423f.jpg|[[Concept Art]] of different HUD variations |
Fox3d-entertainment-955aeb94024343-5e73d6df7423f.jpg|[[Concept Art]] of different HUD variations |
||
| Line 68: | Line 66: | ||
Fox3d-entertainment-2020-07-04-13-28-48.jpg|Depth Meter Concept Art |
Fox3d-entertainment-2020-07-04-13-28-48.jpg|Depth Meter Concept Art |
||
</gallery> |
</gallery> |
||
</tabber> |
</tabber> |
||
<!-- Interwiki Language Links --> |
|||
[[fr:HUD]] |
|||
<!-- Categories --> |
|||
[[Category:Mechanics]] |
[[Category:Mechanics]] |
||
Revision as of 09:33, 19 September 2021
The HUD (Heads Up Display) is a vital mechanic in video games, providing important information directly on the screen.
The HUD
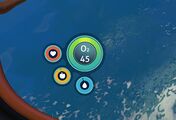
The HUD in monitors the player's Oxygen, Hunger, Thirst, and Health. It also monitors the player's Temperature in Subnautica: Below Zero The full set is only present in survival and hardcore. In freedom, only health and oxygen are displayed. In Creative, none of these are present.
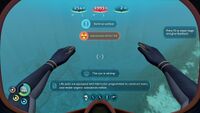
When the PDA is opened, the HUD will display numerical values in place of the icons, allowing players to track the exact amount of hunger they will gain from food, and how long they have until they must eat or drink.
At the top of the HUD, the Depth Meter is displayed. If a Compass is equipped, it will be displayed directly below the Depth Meter.
Pressing F6 allows the player to remove elements of the HUD, pressing it several times will remove more elements.
The Toolbar
The Toolbar is located in the bottom section of the HUD. Players may select which items are to be accessed via the Toolbar. There are five slots to use.
There is selection of items that can be put in the Toolbar. These primarily include Small Fauna, Tools, some Equipment, and Placeable Items.
How to Use
- Open the PDA
- Hover the mouse cursor over the item that is to be assigned to the Toolbar
- Press the corresponding number key to assign the item to a slot
- Alternatively, drag and drop an item into a slot, which replaces the previous item assigned to the slot (if there was one)
- Close the PDA and press the correct key to equip the item assigned to that slot.
Controls
| Action | Mouse & Keyboard | Xbox One | PlayStation 4 | Nintento Switch |
|---|---|---|---|---|
| Open PDA | Error: Invalid Button Specified | Error: Invalid Button Specified | Error: Invalid Button Specified | |
| Assign Item | Drag and Drop |

|
Error: Invalid Button Specified | 
|
Gallery
<tabber> |-|HUD=
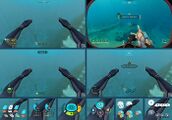
The HUD
The HUD as oxygen is depleting
Stats info displaying when the PDA is open


|-|Toolbar=

An empty toolbar
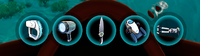
A filled toolbar
Dragging an item into the toolbar
Pressing a key to put an item in the toolbar


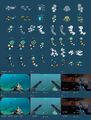
|-|Concept Art=
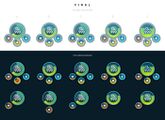
Hud Concept Art
Concept Art of different HUD variations
Ditto
Finalized Hud Concept Art, featuring an unused Sun Setting widget

Depth Meter Concept Art


</tabber>