
Large Room: Difference between revisions
No edit summary |
m (Updating names) |
||
| Line 13: | Line 13: | ||
* [[Hatch]]es can be built on the wall nodes. They pop out from the room a small distance when built. |
* [[Hatch]]es can be built on the wall nodes. They pop out from the room a small distance when built. |
||
* [[ |
* [[I Compartment]]s, [[L Compartment]]s, [[T Compartment]]s, [[X Compartment]]s, [[I Glass Compartment]]s, and [[L Glass Compartment]]s can also be built on the wall nodes. |
||
* [[Multipurpose Room]]s, [[Observatory|Observatories]], and [[Scanner Room]]s can be built on the nodes, where they will create a tiny corridor leading to the room. |
* [[Multipurpose Room]]s, [[Observatory|Observatories]], and [[Scanner Room]]s can be built on the nodes, where they will create a tiny corridor leading to the room. |
||
* [[Water Filtration Machine]]s can be built along the same wall nodes, though note that they take up a small amount of floor space. |
* [[Water Filtration Machine]]s can be built along the same wall nodes, though note that they take up a small amount of floor space. |
||
Revision as of 19:07, 3 February 2019
| The subject of this article was not implemented in Version 1.0 and information is limited! |
<infobox> <title source="title1"><default>Large Room</default></title>
<image source="image4"></image> <label>Category</label> <label>Category</label> <label>Description</label> <label>Hull Integrity</label> <label>Health</label> <label>Blueprint Source</label> <label>Acquired From</label> <label>Fragments</label> <label>Build Time</label> <label>Size</label> <label>Damage</label> <label>Drill Yield</label> <label>Biome</label> <label>Location</label> <label>Coordinates</label> <label>Perks</label> <label>Penalties</label> <label>Attribute</label> <label>Drops</label>
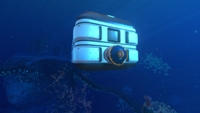
<label>Debug Spawn</label> <format> * {{#explode:{{{debugspawn}}}||1}} </format> <label>Debug Spawn</label> <format> * {{#explode:{{{item_id}}}||1}} </format><label>Music</label> <group layout="horizontal"> <label>Food</label> <label>H2O</label> </group> <label>Bioreactor</label> <label>Byproduct</label> <group collapse="open" class="tab-fragment"> <header>Fragments</header> <image source="image2"></image> <label>Item</label> <label>Description</label> <label>Location</label> <label>Fragments</label> <label>Attribute</label> <label>Debug Spawn</label> <format>{{{debugspawn2}}}</format> <image source="image3"></image> <label>Item</label> <label>Description</label> <label>Location</label> <label>Fragments</label> <label>Attribute</label> <label>Debug Spawn</label> <format>{{{debugspawn3}}}</format> <image source="image5"></image> <label>Item</label> <label>Description</label> <label>Location</label> <label>Fragments</label> <label>Attribute</label> <label>Debug Spawn</label> <format>{{{debugspawn4}}}</format> </group> <group collapse="open" class="tab-fragment"> <header>Data Boxes</header> <image source="image6"></image> <label>Location</label> </group> </infobox> The Large Room is an improved version of the Multipurpose Room that can build using the Habitat Builder.
Expansion
The Large Room has ten wall nodes on which room expansions can be built. Two such locations are in the center of the shorter ends of the room, and eight other locations exist on the longer walls.
- Hatches can be built on the wall nodes. They pop out from the room a small distance when built.
- I Compartments, L Compartments, T Compartments, X Compartments, I Glass Compartments, and L Glass Compartments can also be built on the wall nodes.
- Multipurpose Rooms, Observatories, and Scanner Rooms can be built on the nodes, where they will create a tiny corridor leading to the room.
- Water Filtration Machines can be built along the same wall nodes, though note that they take up a small amount of floor space.
- Bioreactors, Nuclear Reactors, and Alien Containments can be built on notes in the center of the room. The four nodes of this kind are marked by large black tiles.
- Partitions and Partition Doors can be built along the markings on the floor, as well as attached to walls at wall nodes. Note that Partition Doors must be built within existing Partitions.
- Ladders can be placed where ceiling tiles are located, so long as another Large Room or Multipurpose Room is above the tile.
Recipe
(no target detected)
Gallery
Two Large Rooms stacked on top of each other.

Lua error in package.lua at line 80: module 'Dev:Navbox' not found.